 |
|
| Home | Marine Aquariums |
Freshwater Aquariums |
Planted Aquariums |
Brackish Systems |
Ponds,
lakes & fountains |
Turtles & Amphibians |
Aquatic Business |
Aquatic Science |
Ask the WWM Crew a Question |
| Please visit our Sponsors | ||||
As you've seen, there are several methods of building water effects. Some applications call out for a formal, geometric shape. For leisurely, even solitary pace and timely ease, among other substantive reasons, use of block, mortar, concrete and other materials might be the most appropriate technology in these settings. Think about your pond in question: you're seriously considering the block construction method with or without a waterproof under-lining because you want to 1) take your time, possibly do-it-yourself entirely, 2) you desire a smooth, vertical, geometric wall look, 3) you're working on an embankment and/or possibly hope to use the pond as an in-placed retaining wall, 4) you have lots of block around or close connections with a good source. Is this the best way for you? Proceed. Design: Is much the same as for liner, preformed, and other novel-material pond constructs. The basin/s you'll want to be as large as possible/practical, with the edge finishing somewhat above grade. You'll need to make all the same appropriate provisions for filtration, plumbing, electrical and such. Rather than reiterate the particulars of these elements, I refer you to Sections in this series, manuals and books dealing with such details. Here let us dwell on the subject at hand, actual construction with block and cementaceous materials.
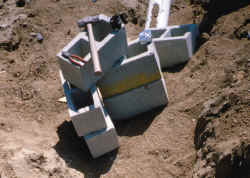
Excavation: Digging the hole(s) is pretty much the same for above-ground, partial above-ground, and below-ground ponds with one major addition; the provision of trenching for block footing and needed conduits for plumbing and possibly electrical. Do yourself a giant favor and draw all this out before actually starting to dig. You can do it, and sketching your intentions will go the long way to solidifying in your, and significant other/s mind/s what you all have in mind. Measure the block you intend to use to make your walls, most often utilized are ones @ 16" by 8" by 8", plus some determinate gap for mortar joints between them, typically a quarter of an inch per face. Why do all this? A very important function of ponds is keeping the water inside them. Accomplishing this is in turn a function of their construction, excavation here. It is imminently important that this point be hammered: the pond trenches for footings and the bottom must be made on naturally settled, original, not compacted grade; that is, you must not "backfill" any of the excavated area to "bring the grade back up". Therefore, measure twice (or more) and dig once. Is this clear? Let's peruse an example just to be sure. Imagine you're planning on a pond that is intended to "finish" at two feet at the shallowest and three feet at the deepest area. Assume in our example the walls are all two feet plus cap along the pond's edge and the bottom itself slopes. Because the block (most likely) are eight inches we will want to set a measure to cut down approximately this two feet along the sides plus trenching an adequate depth for footings (more on this in a moment). The bottom digging can/may/should be done at a later time after the walls have been built. Actual Digging: Ugh! Yow! The real work, believe me. Use power tools, help, dynamite, but keep digging, measuring, digging, take your time, but keep going. Don't over-dig. As mentioned above, you cannot backfill. If you have gaps, holes from mis-digging, humongous rocks, roots, stumps, et al. you'll have to fill them in with concrete when you pour your footings and/or bottom(s). Don't over-dig the areas that will be the outside of the walls. This is one of those blessed occasions where neatness does not count. You don't need to "finish" the outside faces of below-grade walls; in fact, such fastidiousness will do more harm than good. Drainage Not to be too hypocritical, but allow me to reverse myself slightly here. You will have to backfill in the outside wall area, most likely with the excavate (love that word) so laboriously removed earlier. Before you do so, consider if there is any "special" need for drainage. Water from purposeful irrigation and runoff may be excessive in your circumstances. A contrivance such as "French" drains, perforated pipe, or a simple modicum of gravel placed around the outside bottom edge of the pond before backfilling with soil may be called for. At any length, "wicking" away excess moisture from the outside walls is a good idea, though not always absolutely necessary. Footings: These are supports, most often constructed of poured concrete reinforced by steel bar, and possibly wire, for the perimeter of the pond. This area serves as structural reinforcement for the base as well as the walls of the pond basin/s. The block are nestled in a mortar bed on this footing. Depth is a matter of science, engineering and common sense. There are textbook formulae for calculating what type and depth of footing to employ. Very likely, there is a governmental regulatory function in your vicinity that can/will read you the "law of the land" for a phone call or visit. If/when/where in doubt, over-engineer and over-build. If a six inch footing will do, a ten inch one is better. No footing should be less than a "good" four-inch slab. Don't skimp. Reinforcement should be used. Consult with a good public reference, a Sunset, Ortho, or the like do-it-your-selfer manual re such matters. Have a real mason, maybe even a pond builder come out and consult/bid/help you with the same. By any and all means, do thoroughly check out all tools and materials available for this work before buying or commencing work. There are great labor, time, aka your body and money, saving devices for cutting, bending and tying rebar (reinforcing steel bar) and welded and "twisted" wire. Learn about and use them. The statement above regarding the robustness of trenches/footings applies similarly to reinforcing structure; over engineer and build. I strongly suggest using nothing smaller than half inch diameter rebar, and "stubbing-up" for every "cell". Cells are the hollows or cavities in the block; most blocks have two. Even if you're overlapping your block in the walls in a "herring-bone" pattern, it is best to have the rebar rod sticking up inside each cell. Here again I want to re-emphasize the importance of making a shop-drawing/plan and measuring carefully for the placement of your reinforcing rod. Will they be about eight inches on center? Hmmm. Should the reinforcement extend to the latter-poured bottom/s? Generally not. Pouring Footings is easy. Calculate the total needed volume and mix or order it in a standard five or six bag (five or six bags of cement to a total of twenty seven cubic foot/bags per yard of concrete), half inch aggregate (grade of gravel), sand and water concrete mix. Fill, tamp, but don't float that sucker. The roughness of the surface will aid binding with the block. Take a break. Wall Construction
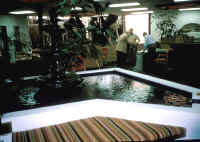
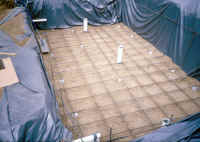
Better order some five to ten percent extra for breakage & waste; hey, have you got enough for the filter basin and fall support? Some first and later generation "Japanese" block-pond builders stack their block one on top of another, as mentioned above I encourage staggering between courses, the layers or levels of blocks. If you've never done any cement type work, learn or get some help. Cold Joints? What the? Yeah, these are the areas where relatively older cementaceous surfaces come in contact with "younger" ones, and they are the most likely source of trouble leak- and crack-wise. Some folks advocate using special "glues", thin-set bonders, cement additives, and the like. These may be a good idea depending on your circumstances. By and large, if not a whole lot of time has passed since pouring your footings, building your walls and bottom/s and the excavation and other work is done right, cold joints will not be a big concern. The coating you should do over the entire pond surface will preclude major cracking and water loss. See below. Other Construction Concerns: Bottoms are contoured (fancy word for dug) sometime after the walls and possible cap are constructed. The pond should slope to drains, intakes and sediment traps. Conduits are carefully laid in trenches prepared at this time. There are several schema for prepping pipe for thru-hull applications. Please review these before simply stubbing up the pipe through the pond wall. Some involve flanging, others use bonders, special pours around the pipe itself. Take your time here. Bottom Pouring is done with the same concrete mix as the foundations cited above. Float away from the drains etc. toward the walls. Utilize a semi-"stiff" mix. Check with your supplier re such terms as a four to six inch "slump". Filling The Block Cells is also executed at this time, if not before. Fill those bug-a-boos up with concrete, give them a good rodding with a piece of rebar and top them off. Foundation Coatings: This is a very important process. It is really the "skin" of the pond that makes the whole thing watertight and beautiful. Check out the various options carefully here. My favorite is still the various cementaceous formulations by the Thoro corporations... Thoroseal (tm), etc. Other folks endorse bituminous derivatives, chlorinated and butylated rubber "paints" et alia. Whatever you choose and use you need to apply all in one setting. Clean up and prep. as per manufacturer's specifications for your application. Conclusion: I'd still like to give a plug for my favorite method of pond construction; involving liners. If nothing else to urge you to consider a hybrid "safety-net" method of placing a water-proof membrane underneath and around the above mentioned block and concrete pond as a "worry-wart" back-up containment system, should your cementaceous skin fail. Especially in geographies where the ground shakes a lot and you have expensive livestock. Certainly not the least expensive method, though one of the strongest; for a take-your-time, last-person-on-the-planet, formal/geometric walled method of pond construction nothing compares with concrete and block methods. Consider them.
|
|

|
Features: |
|
| Featured Sponsors: |