 |
|
| Home | Marine Aquariums |
Freshwater Aquariums |
Planted Aquariums |
Brackish Systems |
Ponds,
lakes & fountains |
Turtles & Amphibians |
Aquatic Business |
Aquatic Science |
Ask the WWM Crew a Question |
| Please visit our Sponsors | ||||
|
Now let’s get into the first
question that most aquarium folks have about scrubbers: Should you buy
or build? Before the year 2010 there were not really any options to buy,
but now you can buy tiny to medium size scrubbers in the upflow style,
or medium to large sizes in the waterfall styles. And for building DIY,
discussion forums now have examples of every attempted scrubber ever
thought of, complete with growth examples and nutrient measurements over
time. There are some really amazing builds that have been done. We won’t
get into DIY plans here though because there are so many available
elsewhere, such as our AlgaeScrubber.Net forum that goes back to the
very first builds in the year 2008.
An algae scrubber can be made DIY
fairly easily if you are good with building. The typical materials of
pvc pipe, acrylic sheet, glue, airline, etc are needed, just as if you
are building a DIY reactor, overflow, or sump. One difference with
scrubbers however, which makes them a bit more difficult, is the
lighting that’s needed for the growth. Not only are you now dealing with
electricity, but unlike DIY display lights which are above the tank in a
dry air environment that you rarely touch, the lighting
for a scrubber is in a humid or wet environment (or even
underwater) that you touch daily, with wet algae dropping on
top of it, all while possibly standing on a wet floor (maybe even
with bare feet). So don’t make a complex algae scrubber your first-ever
DIY project. Some advantages of buying a
scrubber are that you obviously don’t need the time or space to build
one. But other reasons are that it’s hard to DIY some types of scrubber
designs, even if you are good with DIY. Things like underwater lights
for upflow scrubbers, or gravel-epoxy surfaces for algal attachment, or
the long slot in a waterfall pipe, takes a few tries to get it right
(meaning your first try will probably not work).
Buying a pre-built unit, however,
is limited to what is for sale. Currently the only models available are
waterfalls (which we invented in 2008 and are now made by us and others)
and upflows (only made by us), and these are in certain sizes only.
There are a very few number of horizontal river models, but these are
from China, are tiny, and are without any lights. And there are no
dumping bucket designs available at all, probably because of their
complexity. The big advantage of DIY is of
course money; most $300 USD commercial models can be DIY’d in a week for
$60 in parts, and most of this is probably for the lights.
But DIY also lets you choose the exact style, size, and layout
you want to fit into your exact space. If you need a very large model,
such as for small exhibits at public aquariums, you will have to DIY. DIY waterfall styles are generally
going to need some acrylic or plastic gluing, unless you can find the
proper size plastic box to start with. Cutting the slot in the waterfall
pipe is the hardest part, and although it can be done with a Dremel moto-tool
cutoff wheel, most people end up doing it over again with a table saw,
router, or other shop equipment. The lights are easy however; usually
the low cost Chinese plant-grow lights can be used from Ebay, as long as
you follow the safety steps such as shown in LEDsafety.org properly.
Most DIY folks can do the pvc pipes, so that’s not a problem. Waterfalls
are not really suitable for freshwater, however, because the growth gets
long and clogs drains and pumps. Also, waterfalls work best when placed
over a sump; not externally on their own, because they can overflow,
leak, and also drip from the waterfall pipe.
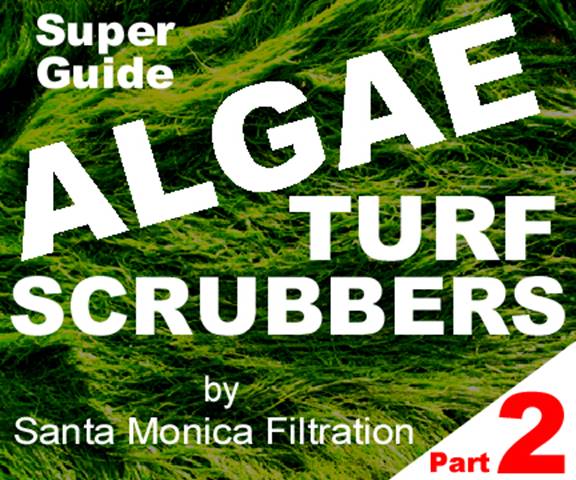
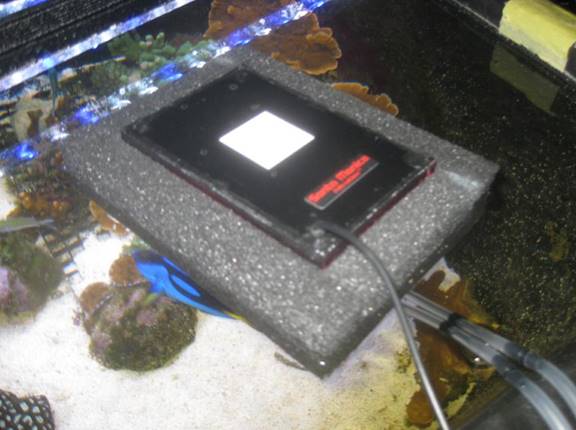
DIY bubbling upflow styles can be
the easiest, if they are similar to the Hang-On-Glass® styles that we
make. These styles need no acrylic gluing or pvc pipe, and the LED
lights just stick to a plastic cover on the outside of the sump or tank
wall using magnets or suction cups. And the airline tubing for the
bubbles is as easy as a goldfish tank. Cheap LED lights and a power
supply from Ebay will do because they stay dry and are low voltage (no
240/120 volts at the light). These designs might be suitable for first
DIY projects if you can get help with the lights, and are great for
freshwater too because the long growth is kept mostly inside the growth
compartment. Lastly, they can’t overflow, leak, or drip because they are
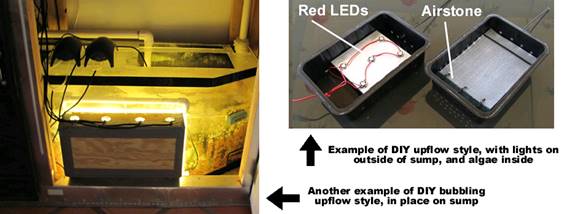
already underwater. DIY horizontal rivers are
relatively easy to build; at least the river water part is. But again,
the lighting can be a challenge over the long narrow pathway. One
workaround for this is to put it under your display lights, but that’s
just too cumbersome and unsightly for most people. And if put over a
sump, these designs tend to cover the top of the sump like a lid, so you
can’t get to anything.
If you have multiple tanks, a good
bit of advice is to try a scrubber first on the smallest one, especially
if it’s freshwater, because that way you can get a feel for placement,
lighting, cleaning, sounds, etc. before working up to a bigger one.
Meanwhile if you want to take a look at modern scrubbers, here is
our SURF2 floating model, shown floating on a saltwater reef pond:
https://www.santa-monica.cc/product.asp?itemid=40
|
|

|
Features: |
|
| Featured Sponsors: |