 |
|
| Home | Marine Aquariums |
Freshwater Aquariums |
Planted Aquariums |
Brackish Systems |
Ponds,
lakes & fountains |
Turtles & Amphibians |
Aquatic Business |
Aquatic Science |
Ask the WWM Crew a Question |
| Please visit our Sponsors | ||||
|
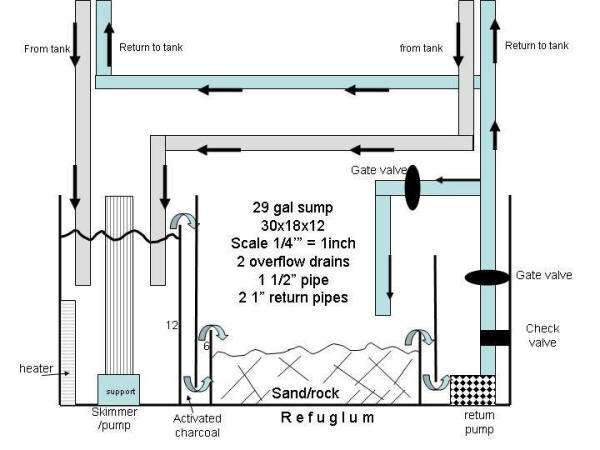
The purpose of a plumbing arrangement in a marine aquarium set-up is to conduct water to and from various components, sumps, possibly drains in a conducive, quiet manner... w/o spills, drips, salt-creep, continuous checking and repairs, too-much induced drag... Few actual arrangements come very close to achieving these ends. The following notes, suggestions and examples will hopefully help you to avoid costly mistakes... Planning: Measure Twice, Cut Three Times: The plumbing of your saltwater system is likely the most perilous and adventurous part of your aquarium system... Do it on paper first! It is immensely more satisfying to erase a line, valve, coupler with an eraser and redraw it, make a shopping list and only have to go to the store a few (versus several) times to get parts and tools... then to find your plumbing diagram/scheme won't work, your diameters are off, you're short a part/tool... Believe me, "been there, done that"... too many times! Maybe you're really familiar with a CAD-CAM computer program, but most folks do fine with quadrille paper (for estimating size) a pencil, straight-edge and a BIG eraser. Draw out the basics of your main/display tank, any sumps, reservoirs, refugiums you intend, how they will likely be juxtaposed (measuring and drawing their dimensions as well as stands/supports), AND THEN consider how and where they might best be joined by plumbing. Space! Take a look about the area you will be placing all this gear... is there sufficient space to get around, reach all? I'm not just talking about the obvious gap/s behind, on the side/s of the main tank, but the entire three dimensional aspect of the entire arrangement. "Oh, I won't need to get behind, around XXXX once it's all in place"... Ha haaaahhaaa, oh, you're killing me! Don't make the simple mistake of closing all the sumps, filters, pumps into too small an area... leave/make room to get to all... and I mean all of the plumbing, equipment such that you can repair, easily remove it if necessary. It may well be necessary. Choice of Materials: Pipe and fittings should be, of course, chemically inert. No metal parts, not even band clamps need apply! If you need a clamp, there are sturdy all-plastic varieties available... PVC (Poly Vinyl Chloride) pipe is the material of choice, generally "Schedule 40" (rated for up to 400 psi pressure), though there are clear plastics (that won't stay so...), ABS, even advocates of flexible tubing... For practical purposes, unless there is some strong compelling reason/s to do otherwise, do use PVC... of Schedule 40 construction... a comment though: there are times, places where some fittings, like unions, may only be available in Schedule 80 (rated fro 800 psi)... and applications like thread in adaptors (as in nipples to/from pump volutes) where Schedule 80 makes sense... But do avoid thinner walled PVC (e.g. Schedule 200) as this material is just too flimsy, hard to solvent securely, easily broken... to be practical. The Actual Arrangement: Due diligence, what does it mean to you? Here it means investigating enough to make intelligent choices/decisions on what is best for your system... How many through-puts (bulkheads, gas-jet fittings, thru-hulls...) of what diameter will you want/need? Where should they go? Maybe an overflow standpipe arrangement is better for your application? Perhaps even an engineered or DIY tower of some sort? How big is your pump? Where should it be placed? What about sizing the tubing to/from it? Should you leave open/space for adding other discharges, returns for a sump/refugium later? All these issues and more should be considered before even buying your tank... as both glass and acrylic models can be custom-ordered/made and the former are much easier to drill/fit for lines before assembly. Check with your dealer or fabricator re this possibility. You'll be very glad you did. Don't lose your mind! Or sense of purpose here in working out the plumbing arrangement for your system. There are indeed "many roads" to Rome and getting the water about for your saltwater set-up. The very best advice (what I would do) is to visit shops, other aquarists, closely examine their rigs and ask them what they might do differently had they to do all over again. Plumbing and Fitting Size: There are tables of tubing/plumbing size recommendations per any given run (length) of line, as well as mathematical formulae for increased drag (or alternatively needed flow pressure) for given reductions in diameter, 90 degree, sweep turns... These can be found in reference works, even pet-fish ones, as well as on the Internet. A few standard suggestions apply to all arrangements: 1) For most applications, using tubing of greater diameter than the volute fittings on your pump/s (intake and discharge) is not beneficial. You won't get more flow, save electricity, quiet the pump or water movement noise... by bushing up the lines here. 2) Practically speaking there is no "too large" overflow line size or number of overflows themselves. If you think 1" diameter through puts will do, go with 1 1/4" or even 1 1/2". Think you can get by with one overflow line of large/r diameter? Use at least two overflows... trust me here... as one is very likely, make that VERY likely to fail, get clogged, blocked by any number of circumstances, events. Systems of more than a hundred or so gallons should have at least three overflow lines... I've seen very big tanks with numerous overflow lines and even a safety set drilled/made a bit higher "just in case" the lower rung failed... they do. 3) Avoid excess, extra twists and turns in your plumbing arrangement. All those tees, elbows, couplings, gate valves... anything that restricts flow is to be reduced to a minimum. All such impediments reduce flow, add resistance to your pump, increase the cost per unit flow. Through-Put Fittings: Call them Bulkhead Fittings, Gas-Jacket/Spa Fittings, Through-Hull Fittings... these are all plastic devices fitted through holes in tanks that allow (slip and thread) to connect to plumbing. 1) Size matters! As previously mentioned, when/where in doubt, up-size through-put fitting diameter. Practically speaking they cannot be too large. Very often, they are too small to accommodate adequate flow or if one is blocked, all the flow without flooding. 2) Generally it doesn't matter what "strength" these fittings are... ones for boats work as well as flimsier ones for spas... look around as there are some very large price differences here. 3) Number can be important as I've said... what happens if you have just one through-put and it somehow gets blocked (happens all the time)... will the second and possibly only other one be enough to prevent water from going on your floor, your neighbors ceiling...? In the face of paying to replace burnt out pump/s, ruined flooring, moving expenses.... another through-put or two is cheap! 4) Placement is important. You don't want to drill the holes for or place your through-put fittings too close to the top, corners, or edge of the tank for two reasons. To retain the structural integrity of the tank, and to provide for "welling" up of the water ahead of its flowing back and over the down spouts. If you find your overflows are so large that they're draining too much water to allow for the water level height, or have so much water in play that your sump volume is being overwhelmed with the power turned off, you can add "street" elbows that you can "turn up" or on their side/at an angle to adjust water height and transit volume. 5) That Silicone Trick again. What's the best means of securing the threaded nut to your through put fittings? With a smear of 100% Silicone Sealant... allowing a bit of shaking, tank movement (they do at times) w/o breaking... and even the possibility of easier removal should you want to... Did a gasket (maybe two) come with each through-put fitting? Smear a little Silicone on either side of it and the flat of the fitting and place it... on the inside of the tank side... if/should you have two gaskets, do the same with the other one and place one on either side/face of the tank. Overflow Boxes vs. Drilled Fittings: I tend to be more charitable re these devices than several of my cohorts. Overflow boxes are for folks who have not or don't want to have their tanks drilled, but instead come to rely on hang-on arrangements that in turn are subject to tragic failure... counting on sufficient water level/s, a lack of blockage by livestock... IF you want to use overflow boxes instead of drilling your tank/s, DO use at least two (yes, I know they're expensive... so is your gear, livestock, flooding, divorce) on ANY size system. At least one is certain to fail over time... the likelihood of both going between times of your notice is a much better bet.
About Flexible Tubing: Some installers like to use flexible tubing in their plumbing arrangements... lot of advantages (goes around corners, over lips of tanks without other fittings... makes switching out pumps and other gear easy), relatively inexpensive (especially compared with larger diameter valves, unions...) and easy to employ (either using thread to barb connectors and plastic (never metal) clamps or specialized flexible to rigid PVC primer and solvents. Whereas some types of systems are well-suited for use of some flexible piping, I strongly discourage most home-hobbyists from using it, and instead encourage them to utilize rigid for the sakes of how many times I've seen mixed flexible plumbing fail (mainly due to poor installation). About Check Valves: Believe it or not, I have seen tanks that were drilled through their bottoms that relied on check valving to stop water from draining when pumping was turned off... While there are some dandy ball, swing and spring type check valves, they all eventually fail in these applications. Don't rely on check valves to hold water back when you want (like when servicing a pump)... and especially don't rely on them when no one is around... during power failures, at night... About Cutting Tools: Don't chintz yourself by trying to cut plastic pipe and even flexible tubing with anything other than a specialized cutting tool (i.e. NOT a saw blade...). You want fast, straight, accurate cuts w/o burrs... look into the hand tools that have cammed engineering, use a "Sharpie" for marking your cuts, labeling cut parts... For folks doing whole stores or aquaculture facilities, look into "chop" or cut-off saws and specialized blades (lots of small teeth) for really ripping out multiple cuts. About Solvents: PVC is NOT glued together... but actually solvented, melded together by melting... To make a "good joint" between slip to slip fittings (don't solvent threaded fittings, please... use Silicone). There are a myriad of options to choose amongst, doing with solvent density, color... and possibly the use of a primer. I strongly encourage (along with good, square cuts and new/er, clean pipe and fittings) the use of "landscape" PVC solvent... like the green viscous kind/s or best "Christy's Red Hot Blue Glue"... which works well even in wet, dirty (under tank) environments. I am forever telling folks to "work from the fixed end" in doing plumbing work... after carefully measuring, cutting, laying out the parts and cut pipe, to thread, solvent all from the most fixed point (like a wall or a pump or a tank...) on out. Use paper or old towels to catch drippings, make smooth, uniform smears of solvent on both sides of a given slip/slip joint, wait a few seconds, and turn the most free end piece into the more fixed... Oh, and waiting a good hour before running water in newly solvented lines is about right in terms of curing time. Okay? About Pump Fittings: Most all pumps are fitted with MIPs and FIPs for their intakes/discharges... either male and/or female threaded openings to attach plumbing lines to. Now, listen/read very carefully hear. I'm about to relate some extremely useful "trade secrets" to you re how best to make these connections. First, imagine what is going on between your pump (the motor, housing, volute and impeller) and the lines bringing water to and away from it... What would Elvis say? "A whole lot of shaking goin' on!". Next, think on how soft PVC is and what will happen to it as time goes by with all that vibration twixt the pump and it's plumbing... Small wonder so much salt creep and many leaks occur here. There are a few things one can do to avoid these messes. 1) The pump... look at it. Most are engineered to be oriented in a certain aspect. You want to mount the pump in this orientation... Perhaps not on the same plane/level as the sump/tank it is servicing... in the event of a flood. 2) You want to make a solid junction between the lines going to/from the pump and the plumbing they attach to... but it is very likely you will want to provide an "intermediate" junction... best of stronger/thicker PVC, nominally Schedule 80 (that heavy gray stuff). For FIP (female) fittings the material of choice are Sch 80 risers or nipples... that have male to male threads that can be threaded into the pump volute (the part covering the impellers with the fittings) intake/discharge. MIP (male) volute fittings can be fitted with Sch 80 threaded couplers with female to female or female to slip fittings and these in turn coupled (see below) to more distal plumbing. NOW how do you make these threaded fittings secure? Teflon tape? Nope. Plumber's Dope? Nope.... with 100% Silicone Sealant... Yep, the same material used to adhere glass panels in high-rises, shower stalls (sans mildewcides of course) and, by golly, fish tanks! Just a smear on the threads (one side is fine, my choice, the male) and tightening by hand will do. Voila (!). No muss, no fuss... no leaks, and you'll be able to unthread these fittings if you should desire at a later date... This Silicone trick is really a worthwhile technology... nesting the threads snugly, while allowing for vibration. Just make sure you're using 100% Silicone, not material adulterated with other matter for other applications. 3) Unions and valves that allow you to remove your pump/s w/o draining tanks, sumps... are they important? You bet! And now is the time to draw them in, plan on their purchase and installation. Exercise caution here, as there are a few types of these fittings... you don't necessarily want/need the more expensive higher rated ones, or even types made of exotic plastics, but you DO want "true" unions and "flush" valves... Terminology varies, but I'll try to explain what you're after here: True unions versus non true unions are ones that you can install and take apart without having to elongate the plumbing arrangement to do so (tough with little space, all hard plumbing...). They have flat faces with o-rings that allow you to simply thread apart a connection (or two) and remove the part (like the pump). Flush valves are similarly constructed and have the important trait that their "ball" (the rotating piece that blocks water) does not fall out when the union is open... Look around (the Net, hardware and larger LFS stores) and you will find examples of both these types of fittings. Having true unions and flush type valves will allow you to take your pump and/or other gear out of line and inspect it, replace it w/o having to drain your tank, sumps... useful to you? Yes. About Balancing Water Flows Twixt Uneven Containers: "Oh, I'll have equal rated pumps just shoot the water from one tank to the other..." Have I heard about flow valves, shut-off switches, magical siphon loops? On yes I have... There are folks who try to "defy gravity" by seeking to pump "just enough" water twixt and 'tween parts of their system... Alas, these all ultimately fail. Don't rely on a "make-up" siphon to save you should the electricity fail, or power selectively give out to one element of your "fail safe" arrangement. I believe in gravity, it's always let me down. Either provide real (as in large) overflow lines should the worst happen... or do away with silly notions of pumping to and from system containers to keep them balanced. Won't work. About Quieting Down Overflow Lines: A few things can be done to lessen the gurgling, sucking noise in open plumbing lines... 1) Oversize them! A majority of problems, decibels are due to plumbing diameters that are too small... water having to pile up over overflows, shooting out of discharges... with no chance to provide some sort of muffling manifold on their ends... 2) Vent them! Provide tees attached to overflow lines (higher than the tank) and discharges (to slow down the water, coalesce air...) to aid the water along gently. The former has been done for many decades but is popularly credited to a "Durso" designation (www.dursostandpipes.com/) and can be purchased from them or bought as parts and easily assembled. 3) Aspirate the! Just like an internal-combustion engine carburetor, a small/er diameter line (flexible or rigid tubing) can be inserted into the larger diameter overflow line/s allowing more gentle mixing of air with water... experiment with the length, placement of aspirators before affixing them permanently. About Micro Bubble Problems: A bunch of small bubbles in your water can be more than unsightly... they can cause serious health problems for your livestock. The best way to alleviate small bubble problems is to coalesce them at their source, usually the discharge side of overflow lines... by a combination of mechanical media (like batting) for the water to run over, and baffling (using compartments in the sump/s to allow the bubbles time/space to join and dissipate. Finding pump plumbing intake leaks can be difficult, but a few tools can help... a new paper towel or napkin wiped around all piping, fittings AND the pump volute (often the leak is due to a bad seal, o-ring, or screws not completely tightened...)... a length of tubing you can hold up to your ear and along the piping on the pumps intake side may reveal a "hissing" noise from a leak... a spray bottle of water applied to fittings has shown many a leak as well... Find the source of air-bubble entrainment by whatever means and FIX IT immediately. About Painting Overflows I was hoping that you might know about paints. I'm really not too pleased with the color of the overflow covers that came with my tank. They are speckled black and blue. I would rather them be a solid black. The covers are acrylic, I believe. Are there any safe paints that I could use to repaint my covers? If not, are there places online where I could buy black covers? Thanks, JR <Water-based latex paints are fine here... but do require that the parts be clean, dry. Bob Fenner> About Spills... IF a sump should overflow, a fitting be blocked, plumbing leak... where will the water go? On the floor almost assuredly. Some folks go so far as to plan for these near-eventualities by arranging a sort of "spill pan" around their tanks, gear, sometimes with even a good-sized drain line... going to a lower spot (easy to do in houses with a raised foundation, cellar or basement. Is this safeguard a good idea to prepare for flooding? Maybe. Conclusion: Well, I waited a few years before committing my ideas on marine plumbing to print... about time! There is a bunch that one could write on the topic... whole books as a matter of fact. But the basics presented here are likely to be enough to get the majority of aquarists where they want to go... inspire the lot to seek out other input and advice, rather than just cutting and gluing "whatever" or simply giving up the hobby.
Recommended Reading: "An Engineering View of Aquarium Systems Design: Pumps and Plumbing," by Sanjay Joshi, Ph.D., Nathan Paden & Shane Graber. It can be found here: http://www.advancedaquarist.com/issues/jan2003/featurejp.htm |
|

|
Features: |
|
| Featured Sponsors: |