 |
|
| Home | Marine Aquariums |
Freshwater Aquariums |
Planted Aquariums |
Brackish Systems |
Ponds,
lakes & fountains |
Turtles & Amphibians |
Aquatic Business |
Aquatic Science |
Ask the WWM Crew a Question |
| Please visit our Sponsors | ||||
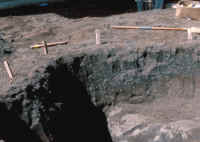
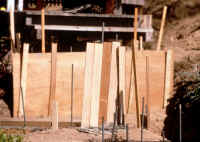
There are several appropriate structural technologies available for building water features. Liners of different sorts, polyethylene and other plastic pre-made basins, wood & metal tubs, bituminous-asphaltum material, fiberglass and resin; even the gouged-out ground alone or treated to make it relatively impervious to water loss. And then there's concrete; a wonderful (it fills me with wonder) mixture of sand, aggregate (crushed rock) cement and water. Concrete ponds make up the bulk of water effects and for good reason: They're durable, reliable and with the right knowledge, skill and tools, easy to build into any shape and size. This lengthy article details the steps our construction Division, Aquatic Environments, went through in the course of building a "production" concrete pond. Through many years and hundreds of ponds we found this outline useful for detailing steps to completion for bid and construction. (1) Site: the job with the owner(s) or their representative(s). What do they want from the feature in terms of sights and sounds? What colors, textures, sizes? We like to bring samples, brochures and portfolios of photographs and drawings depicting what's available, what can and has been done. Here is a brief review of the highlights of Design: on Site Selection: (To Do: Link) When you've decided that a fountain, reflecting pool, fish pond or waterfall is just right for your for your landscape, you need to answer some basic questions as to the position, orientation to the sun, and availability of utilities. Site selection involves a balance of functional and aesthetic considerations. How will the water effect look and sound from your most common viewing place(s)? Happily, most can be situated in such a way as to be conveniently viewed from the walkway, kitchen, living room, patio or other frequented spot. Likewise, thought must be given to the placement of equipment, if any is to be used. Often pumps, filters and related gear can be remoted to areas beyond the feature. Sometimes they can be situated below ground in landscape irrigation boxes or submersed to mask their appearance and noise. With a little ingenuity your fall or stream can disguise your pump noise. Site selection has to also include considerations of future maintenance. For the most part, water effects should be near the home, near a wall to reduce spray, splash, evaporation by the wind. If the pond has living things in it, placing it out of the way of the elements will cut down on temperature change and help keep the system stable. Most aquatic plants used in ponds; lilies, lotus, water lettuce, hyacinths, papyrus, horsetails, iris, and others to be covered in a later installment, do best in full sun. Therefore a southerly, open exposure is preferred for a planted water effect. The less sun the better for those systems where no live plant material is to be grown. You might consider a lathe or screen shelter over your water effect as an adjunct to algae control and to keep out leaf litter. Runoff and Drainage. When building a water effect and trying to plan on keeping it clean you should think of drainage of the feature as well as rain and irrigation runoff getting into it. What will happen if the basin should dump completely? Will it flood your neighbor's property? Rain on your roof or ground should not flow into your feature, unless this is planned, as noxious chemicals can be introduced. Most times runoff and overflow are easily controlled with the use of existing slope and drainage of your property. To drain your system, it may be advantageous to locate the water above grade near a sewer clean out, canyon, or street. Some people hook up their water feature discharge lines for cleaning and de-watering to existing irrigation. Nearness to existing electrical and water supply is important. Check with your local building codes as to set-backs, easements, and to see if you can use inexpensive romex or PVC shielded conduit to a new junction box to run your possible pump, lights, time box. For refilling, most people simply top off their water levels from time to time while watering their landscape. Alternatively, you can cut in a floating check-valve to a pressurized water source. We'll hear about these under the construction, maintenance topics. Every landscape can benefit from a well designed and built water effect. Careful, planned placement can go a long way to insure maximum utility and minimum care. After and while determining the relative placement of the pond, considerations of size and shape are taken into account. The basin(s) should be as large, steep and deep as possible and practical. A very useful technique is to throw a garden hose on the ground and move it around to come to some agreement as to the limits of pond, waterfall, mechanicals, et al. perimeters. These can be marked with flags, chalk, flour...., measured and drawn for site planning, shop-drawing/bidding and construction purposes. This is the place where filters should be discussed. In Japan, where I grew up and started in the industry, hobby and science of aquatics, the filter system is designed and built before the rest of the waterscape. Rationale? Read on! Filter type: Aquatic systems are of two basic formats; 1) intentionally biological & 2) non-biological. Koi, goldfish, "natural", bio-topic, lily-"living" things are of the former and reflecting pool, ornamental fountain, sanitized/poisoned systems the latter. Biological systems require either lots of space for appropriate technology filtration, or lots of time ,money and fooling for inappropriate. For rule of thumb, a system's bio-filters should be at least ten percent (or more) of the surface area & volume of the pond(s) they service. Some folks are into adapted swimming-pool tech. for their systems. Pressurized container filters, i.e. diatomaceous earth, cartridge and sand filters, require more pump, more care with much less efficiency per dollar and smaller safety margins and greater upkeep and more "chemical" and "physical" treatment of your system & & & Don't do it! Plan for and build in an appropriate filtration system. So, where are we? We've come to an agreement (on paper!) of what we're going to do, where the basin(s), rockwork and landscape if any, equipment and filtration are going to go, source of water, electricity and drainage; relative placement, size and shape of all major components. What's next? Digging! Take your time here. This is the part of the job that typically costs the most in terms of time, money & injury. Nuff said. Now that you've got your basin(s) roughed out (and/or built-up above ground with forms, foundation, block or cast), trenching done for all the plumbing & electrical conduit; you're ready for our Standard Operating Procedure for constructing leak proof systems.
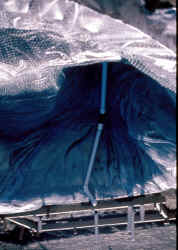
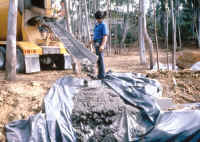
Still with me? Hang in there; we're getting to the concrete soon. Plumbing in general was thoroughly covered in a previous article. For most residential systems, laying the pipe up and over the sides (as illustrated) is the way to go. If you must penetrate the waterproof liner membrane, useful techniques are offered in the Plumbing article. Otherwise, the plastic piping is laid down and tie-wired to the reinforcing mesh. These "stub-ups" are fitted with protective risers, covers and taped over to keep dirt and concrete out. What's next? Not concrete? Not yet. Real or artificial rockwork and other embellishments like pilings bridge and gazebo supports should be arranged and placed. Large, dense objects should have a "pad" placed under them. This padding may be old newspaper or carpet scraps or perhaps a "wheely" of cementatious material; most anything to spread out the force of the object on top. (8) Concrete: Yay! Finally! Various notes here:
Mention might be made of another cementatious compound called gunite. This is a mixture of sand, cement and @ five percent water; quite dry. Due to the high cost of set-up with the equipment used, this common swimming pool technology is generally more expensive per unit than concrete mixes. Additionally, gunite is too smooth and water permeable, requiring periodic cement plastering to render it waterproof. If you or a neighbor are having a pool or large spa shot out in gunite, a competitive bid might be had for doing your water effect at the same time.
Each technique has it's pro's and con's; III) is least expensive, but may result in too much sharp surface exposure and higher alkalinity. II) is most expensive but allows you to change the texture and chemistry of the exposed surface; an item important to biological systems where alkalinity and high pH is a continuing concern.
We typically will coat our concrete work either with a foundation coating right after finishing it or spray on a cure-retardant product on it. There are generally no cracking problems where liners are employed. Most concrete will "cure" well enough within a few to several hours to coat or further treat. Excess water that "comes out" and floats over the finished surfaces may be sopped-up with a sponge or left in the basin(s); yes, concrete will even "set" underwater. For our purposes, once our mixes have set, we are only further concerned with extracting some of the more alkaline surface material and possibly exposing some of the aggregate underneath. An Action Plan and precautionary remarks are provided for doing acid washing in a later article titled Acid and Bleach Washing. Details may be found there. Diluted Muriatic (three molar hydrochloric acid) is our choice for initially cleaning and de-liming. We add about one third acid to a plastic watering can with a small amount of liquid soap to reduce fuming and gingerly spread/spray this mix over all surfaces. Sometimes we'll employ a (swimming-pool) acid-washing brush and extension pole to scrub the rocks and concrete material with the acid. This is all subsequently rinsed, diluted and pumped to sewer. Some folks endorse the use of a weaker organic acid; vinegar or acetic acid. This can be sponged on full-strength utilizing rubber gloves. There is even another technique involving pouring acid into the already filled system & allowing time to go by. It is better and faster to remove excess alkalinity by treating the basin(s) and fall(s) when they are empty. Even plastic cement and low alkaline foundation coatings should be acid-washed before introducing livestock. Provide adequate ventilation & as usual, try to keep these materials off your clothes and skin. In our business, due to cost/time constraints and desires on the part of the customers to have their systems operational ASAP, we will frequently applied a siliceous/cementatious foundation coating over just-finished concrete. I am personally a champion of the Thoro line of products. There are several, similar products available regionally. Particulars regarding instructions for application have been provided in a separate piece, Repairing Concrete Water Features. At this point then we have the structural "shell" of our water effect completed and yet there probably are some aesthetic elements to still "set in concrete".
If these embellishments are rather large and space has been set aside before other concreting, these may be simply encircled as the rest of the system is done. If smaller, it is more proper to set and concrete them in place as you do the rest. Some fabricators set most "extra" materials after the shell work. They utilize a mortar-mix, much the same as a concrete mix without aggregate. Sometimes an admixture of latex, "glue"-bonder or lime is blended to anneal the new work to old. A useful technique for matching color is to test dry some of the new material on the end of a trowel for comparison. Rock; artificial and natural, acquisition and placement will be discussed in a later article.
Bibliography/Further Reading: Ballou, Burt. 1994. Building a formal pond. Koi USA 11,12/94
|
|

|
Features: |
|
| Featured Sponsors: |