|
Acrylic Repair 3/17/20
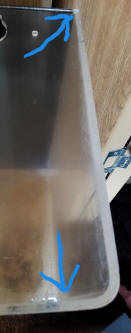
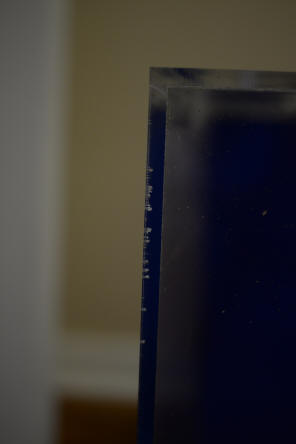
Hello, I was gifted a 55 gallon Clarity Plus tank (Score!!). The top right
end seal between the arrows on the picture is completely gone (can sand
between the sheets) and possible stress marks in other seams. After reading
through a bunch of your information, I plan on getting some 3/8" square rods
(the tank is 1/4") and solvent them into the entire inside.
My question is whether or not to use Weld-On 3 on the separated top piece
first or not, especially since it goes completely around one corner?
<Likely a good idea... to use a more viscous product. Less viscous/gooey on
the doweling>
Also, how does one reinforce the curved front corners?
<I would leave these as is. This tank should give you good service once the
other repairs are done>
From the pictures, is there anything else I should be aware of? Thank you so
much for your time and expertise.
<Mmm; nothing more. If this were my tank, and I intended to use it long
term, I would proceed as you have detailed. Bob Fenner>
|

 |
|
Re: Acrylic Repair 3/17/20
Awesome! I was planning on using Weld-On 16 for the dowelling.
<Yes; this would be my choice>
Should I clamp it in place first and let it seep in?
<Better to just use tape, if deemed necessary; will allow easier flow>
Or put it on first and place the dowels on afterwards?
<Mmm, no, put the cut/sized dowel piece in, one at a time, tilting the tank
letting gravity help with the placement, then use a thin-tipped application
bottle to have capillary action fill the gap. Takes very little material>
I was trying to find that answer on your website, but not running into it...
<I should get off my duff and make a YouTube presentation, or find one and
link it re. Do ask about at your local fish store, aquarium club... plastic
outlet/fabricator to see if someone who has done this work will show you in
person.>
Thanks again,
Julie
<Welcome. BobF>
|
|
Acrylic Tank Question; seam going
6/15/15
Hi guys! Thanks for the website and the info--due to some (possibly overly
paranoid) worry I have, I wanted to send you an e-mail about a tank I just got.
Picked the tank up from someone who was looking to get out of fishkeeping, he
had it for several years and never had any issues with leaks and despite being
on a stand that I don't think was the best (large gap in the middle so it wasn't
supporting the entire bottom of the tank, which we would be reinforcing), there
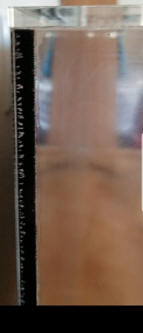
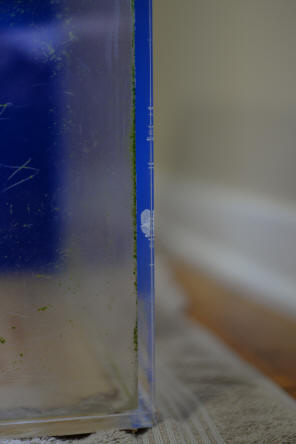
wasn't any bowing going on. I think the brand was SeaClear, unfortunately only
3/8" thick which seems to be pretty standard for these mass produced tanks, and
there is some noticeable crazing with a few spots that made me a little uneasy.
I'm not super familiar with acrylic tanks, but I wanted to send some photos of
the spots I mentioned to see if I'm just being paranoid or if there is serious
cause for concern.
<The whited out area labeled Right Bottom is (too) bothersome... While the tank
is out, clean, empty... I would use a water thin solvent... such as: "SCIGRIP 3
Acrylic Solvent Cement, Low-VOC, Water-thin".... applied with a small squirt
bottle with needle applicator... will take just a drop... into the seam/gap
here>
For as long as he had the tank, there were no issues, no leaks, bowing, or
anything like that and he kept an Oscar, a Parrot, a Firefin, two Plecos, a
number of pretty decent sized rocks/ornaments and a lot of substrate for several
years without any issues. Am I getting worried over nothing?
Thanks
guys!
<All such "bad areas" that go this deep into the seam are definitely worth
worrying about, and fixing. In this case, likely just by re-solventing the
area/s... In more advanced cases by fitting in square doweling (of acrylic;
check that the corner inserts are 90 degree angles; i.e. NOT concave), with
heavier bodied (Weldon 16 my fave) solvent... in all internal corners...
Bob Fenner>
|
 |
|
Re: Acrylic Tank Question 6/15/15
Yeah, the impression I was getting from your site and others was that using the
two products you mentioned would help fix the problem, with the latter applying
to tanks that looked worse than ours.
<Yes>
If we just use the Weld-On 3, how long do you think could we reasonably expect
the tank to last without fear of leaks/bursting?
<IF the white out completely disappears, indefinitely>
Thanks so much for the response, Bob :D
Mark Hemmert
<Glad to share. BobF>
Re: Acrylic Tank Question 6/15/15
Is the solvent anything we could buy locally, or is our best bet to order
online?
<You might get lucky and find someone who sells nearby... like an acrylic
fabricator, outlet... Most folks have to order. B>
|
|
Acrylic tank; blem., stand/level concern
12/31/14
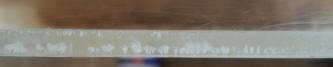
I wanted to ask you guys a couple questions. I have a 1200
gallon 1 1/2" acrylic tank. The seems look ok with some
crazing. I have included a pic at the top of the front panel. It is
about 1/2" wide so it is still leaving about an inch of bonded space.
<I see this "blem"... and suggest you or someone try a low viscosity
Weld-On product or equivalent... to fill in this gap>
Should I reinforce this or is this ok if the rest of the tank is normal?
<Because it is near the top, its shape, size, not likely a problem ever;
but I would still try capillating in a wee-bit of solvent here.
Take care NOT to drip excess... perhaps a bit of blue tape around the
area lest there be run-off>
The tank dimensions are 10'x4'x4'. My last question is
I talked to an engineer and my tank is level side to side but
from front to back (4' side) it is almost a 1/2" unlevel.
<?! What?... I really, make that REALLY don't like this... measure the
panels... length and width... is/was one side actually mis-cut this half
inch?>
He said this was about an extra 100lbs on that panel but should be
fairly insignificant to the rest of the tank. He said it should be fine.
Do you agree with this? Thanks.
<"Should be fine" in that the tank should not catastrophically fail,
yes... but if this were some tank our old company had fabricated, we
would not ship it; and if I paid others to make it; I'd at the very
least extract a ten year warranty against leaking or failure... if not
sent it back. Bob Fenner> |
 |
|
Re: Acrylic tank
12/31/14
Thanks for the responses. I probably phrased the question wrong. The tank is
all the same size, just my floor has a slight decline causing the tank to
lean slightly.
<Ahh; still a concern. I'd be making sure the floor underneath is strong
enough by far... AND shimming up whatever support you're utilizing to spread
the mass of this set up about, above or below floor>
The tank side to side is level but because the concrete
<Oh! On the floor side then>
is slightly going down hill, the water level is about 1/2" higher in the
front of the tank than the back. So over 4' it has a 1/2" decline. Is this a
problem or was the engineer correct in saying the panel will hold about
100lbs of water extra and shouldn't be a big concern?
<It is FAR better for you to make sure the tank is level AND planar. Have
you read my article re stands on WWM?>
Thank you.
<Welcome. BobF> |
poor seam 6/5/2011
Hello; I have a 600 gal saltwater tank. One seam on a
1" X 1" acrylic 3' high corner has a
cloudy look half way up. .The rest of the seam is
still clear as well as all other corners. The tank is a 2 year old
reef-fish with many critters so emptying it would, I'm afraid, kill
some of my friends although I will if there is no other solution.
<There is none>
I was thinking of welding a strap down the seam
<This IS what I'd do... in ALL the inside seams... square
acrylic doweling is available... Solvent this in place with flat sides
to the two edges>
but then to make it look uniform I would have to do the same to the
other corners.
<Yes... Again, best to do now for ALL inside seams/corners>
The corners have a 3/4" radius so I don't think I could wrap
around the corner and get a good weld.
<INSIDE, not out>
(also I don't have the knowledge to heat the acrylic to bend it
)
<Just measure carefully and cut to abut>
The tank is very odd shaped ( like looking down on an H with a tub in
one end of the H and a shower on the other with the aquarium as the
walls ) plus there are straps welded across the top tying each side of
the H together. What I'm wondering is there a way to mend that seam
without emptying the water or any other solution?
<No; not>
Does the #40 epoxy weld under water?
<No>
Dan
<Good luck w/ your project. If it were, mine, I'd get some
experienced help. Bob Fenner>
Removing Paint from an Acrylic Aquarium --
12/01/10
Hello,
<<Greetings John>>
I am looking at purchasing a used 55 gallon Hex acrylic tank that has
one pane spray painted black.
<<Mmm'¦>>
I would like to remove the paint so the aquarium can be put in the
center of a room. The owner said he used black spray paint. Can the
paint be safely removed from the acrylic, and if so, any suggestions on
the best way to try this?
<<I can't think of any way to remove the paint that won't
damage the 'clarity' of the acrylic. Solvent paint strippers
(Citric Acid based or not) will likely cloud the acrylic -- and of
course, sanding the paint away will obscure the view as well. The good
news is the acrylic can be polished to return the clarity of the
viewing pane. And this is easier done than many realize. If it were me,
I would 'carefully' wet-sand away the paint (use the finest
grit that will remove the paint) versus a solvent paint stripper, as
any 'clouding' from the stripper may go deeper in to the
acrylic (in some situations, this may even penetrate the full
thickness) than any light sanding scratches. Once the paint is gone,
it's a simple matter to sand and polish the acrylic back to its
original clarity. Do a NET search re 'Acrylic Scratch Removal'
for kits and supplies. There are both 'liquid' and 'sand
paper' type products for this -- my preference is to use the paper
(called 'Micro-Mesh') first, and then finish with a liquid
polish like that offered by 'Novus' - just follow the
manufacturer's recommendations. You will also find there are kits
available for use with power tools, but for a small project like this
-- and as a first-time user -- the ole' 'elbow grease' kits
will serve you best>>
Thank You,
John
<<Happy to share'¦ EricR>>
240 g acrylic repair question -- 10/19/10
I've got a 240 g acrylic tank that I just filled with water for the
first time and when halfway filled I noticed @ 0.5 ml of water on
inside corner bottom panel seam of internal overflow box. Can I just
silicone it from
the inside of box? It doesn't leak to outside of aquarium just to
inside of rear corner overflow.
<You can try this... Silastic doesn't stick well to acrylic...
but if it/this is only a pin-hole leak w/ little pressure... this fix
might work.
Do make sure the surface is completely dry and clean ahead of applying
the Silicone. Bob Fenner>
135 gallon Clear for Life acrylic aquarium, seam-dowel
repair/strengthening 3/16/10
Hello everyone!
I have a problem or worry about a future problem. I bought a 135 gallon
Clear For Life acrylic tank about 4 years ago. the typical 72x24x18 at
3/8" to cut cost tank. It was setup fresh for a few years and when
I moved I never set it up. Well I decided to setup a ray/shark tank,
until they outgrow it. When I got all of my other equipment together, I
filled it, and after the system was running for a minute (literally a
minute) the rear right seam blew and flooded my living room.
<Yeeikes!>
I got about half of the water out into my yard instead of my carpet.
After contacting advanced aqua tanks they repaired that seam by adding
a corner brace at the bottom and up the side.
<Yes. A/the common approach/repair>
I brought it home and filled it with fresh and it held. It did the
usually bowing but I am seriously concerned about it happening again. I
have read pages and pages about acrylic tanks and I can tell you that
it does not have that much crazing as my 125 Uniquarium(which is a
whole other problem). My
ultimate question is about using weld-on or a similar product to
strengthen the seams before I set it up.
<?... only to anneal more corner doweling...>
I read one of the last questions, Re: Acrylic Tank Crack
Repair/Drilling Acrylic -- 12/31/07, that someone recommended it that
maybe it would apply to my situation as well. I don't want to do
something that could weaken an already weak joint.
<It would to only add it to an existing/old bond>
Also, if you do recommend it, after it has cycled transfer my
inhabitants of my other tank to and do the same to the Uniquarium. As I
mentioned it is a lot worse off where the crazing goes completely to
the interior of the back panel of the sump area.
<I would NOT simply apply solvent to a crazed area... DO look into
sealing square acrylic rod, cut to size, in the inside joints>
I have other questions about the sump setup and return of the 135 but
until I read those articles I will leave them alone.
Thank you for your time.
James B
<Do "chat" w/ others who have done this
modification/addition... perhaps have them help you one on one. Bob
Fenner>
Repairing a 90G Acrylic Tank, w/ Epoxy
6/23/09
Hi,
<Hello>
How are things?
<Fair to middling... though most all the Crew seem to have
evaporated...>
I'm a big fan of your site, I read the FAQs weekly, and whenever
I'm wondering about something aquarium-related. The advice and tips
are just great, and easy to understand.
<Thank you for this>
Well, I wanted to ask about repairing a 90G acrylic. Actually, I want
to ask if I made the right repair, or if I have managed to mess it
up.
I bought a used 90G for a really good price ($100, versus multiple
hundreds new), but it came with a catch. The back right corner had a
small crack, and I needed/wanted to plug two drain holes that had been
cut into the bottom of the left corner overflow tower. (The tank will
sit on a very low stand, with the sump next to it, not underneath it,
so the holes had to be plugged.)
I had read about Weld-On, looked for it all over town, could not find
it, and finally thought - how about marine epoxy?
<Mmm, messy, and unsightly... but could work with glomming on to
edges of patch pieces... applying inside...>
I had read articles and posts around the web about how reef-keepers use
marine epoxy to attach frags in their tanks. That made it seem
non-toxic enough to try. And I also thought, maybe incorrectly, that
since marine epoxy is used to repair boat hulls, it has got to be
strong enough to take the relatively smaller water pressure in a 90
gallon tank.
So I made the repairs with Loctite Aqua-Marine Epoxy (waterproof
epoxy).
The corner crack was about 3/8th of an inch long, curved, in the back
panel bottom corner, but didn't cross the three-way corner joint.
The tank held water even with the crack. I just didn't trust that
the corner would keep holding water over time.
To brace it, I cut the corner from a small acrylic sump that came free
with the tank, then epoxied the corner inside the tank to cover the
corner where the crack was. On the outside of the tank, I epoxied two
3" squares on each side, layered so that their joint was off-set
from the tank's corner weld, and then coated the bottom of the
corner with more epoxy.
To plug the overflow holes in the other corner, I cut a square of
acrylic and epoxied that down, coated the seams, and coated the bottom
underneath the tank with more epoxy.
Then I let everything cure for a day, and filled the tank. After a day
with water in it, it's holding water. No sign of leaks, and the
epoxy is rock-hard to the touch.
Maybe it is just a case of second thoughts and after-the-fact jitters,
but do you think this repair will hold long-term?
<Yes I do>
I'd like to be prepared in case I need to tear down the tank
quickly and make a fast repair, if a leak springs, or if I should do
something more before trusting that the repair is good.
Thank you,
Matt
<Thank you for sharing. Bob Fenner>
Re: Repairing a 90G Acrylic Tank -
6/23/09
Hi Bob,
<Matt>
Thanks for getting back to me. I appreciate the reassurance. It was the
first time I've tried to repair acrylic.
<Is a neat medium... I do wish the useful solvents were more readily
available... Weld-On does have some sterling products>
Just for fun, last night, I put two pieces of scrap acrylic together
with a dab of Loctite Marine . . . then tried to pry them apart this
morning . . .
they're not coming apart.
<Uh no... the acrylic will break first>
Hammering and prying just damages the non-epoxied part. The part with
the epoxy wants to stay where it is. That's with only 12 hours of
curing. Looks like this will work out. It's not as pleasing to the
eye as Weld-On would be, I guess, but that's fine, the repairs are
not in a visible part of the tank.
<Yes>
Thanks for your help!
Matt
<Certainly welcome. BobF>
Crack In My Round Acrylic Tank 'Can It Be
Repaired? -- 10/15/08 I have a coffee table acrylic tank.
There was a small crack by the upper lip since I have had it but it
never affected the tank. <<Okay>> Recently we moved the
tank and my 'help" decided to do the final move by themselves
and extended the crack down about four inches into the tank.
<<Uh-oh>> I can keep it half full (which is still pretty
good) but I would like to use the whole tank. <<Indeed>> Is
it repairable? <<It is 'though you won't be able to
'hide' the repair>> I thought of maybe silicone and then
a strap around the top so the crack could not spread but, I don't
know. <<Absolutely not'¦ Silicone does not adhere well
to acrylic 'you would very likely end up with 'water on
the floor'>> I s there a way to fix it or should I just cry
and say goodbye to it? Lorraine <<There is a way to repair this
tank, Lorraine 'though the crack/repair will remain visible,
but this does not seem to be an issue with you. The tank can be
repaired/bonded using solvent cement that will 'recombine' the
molecules making the repair as strong as the original unbroken Acrylic
panel 'if done correctly. Acrylic solvent cements come in
different viscosities for different uses, what you need for this job is
the 'water-thin' solvent used to bond Acrylic by 'capillary
action.' You will also need a special needle-applicator to apply
the solvent. You can find both of these on the NET 'one source
is here for the solvent
(http://www.craftics.com/products.cfm?category=80), the 2oz bottle
should suffice for your repair 'and you can get a
needle-applicator here
(http://www.craftics.com/products.cfm?Category=2). To make the repair,
draw the crack tightly closed (perhaps with the aforementioned strap)
and apply the solvent with the applicator so that it is drawn
completely in to the crack (you may need to do this from both sides).
This takes a bit of finesse as applying too little too slow will seal
the edges of the crack without getting thorough/complete coverage, and
applying too much to fast will cause the solvent to run down the side
of the tank and leave a 'permanent' mark (practice on some
scrap beforehand if possible). After the solvent is applied, leave the
strap on the tank until the repair has cured well (at least several
hours). If the crack has pieces that have been broken away and it does
not close and fit together tightly the water-thin solvent won't
work, but there are 'thickened' solvent cements that can be
used to make the repair (e.g. -- Craftics Cement #33). You can also use
the thickened cement to fix your crack if you are not comfortable with
the capillary method (apply to the break before drawing it together
with the strap), but the repair won't be as 'clean' as with
the capillary method. Do also query the NET for more detailed
instructions on repairing cracks in Acrylic. This may all seem a bit
overwhelming but if you take your time, research the methodology, and
do a bit of practicing with the applicator you should be able to effect
a reasonable repair. Regards, EricR>>
How level does a tank have to be ?/ Acrylic
Repair Tank Leveling/Sump Repair 2/15/08 Dear Crew,
<Eric.> You've helped me with my various setups in the past,
including this one, and was hoping you can answer this. I am setting up
a 65 gallon AGA RR tank. The tank sits on a heavy duty wood stand that
was built by the original owner. The setup sits on a concrete basement
floor ( no carpet, etc. ). The tank is level lengthwise, but the front
is about ¼' lower than the back. <Not good.> If I
am correct in assuming that that is a problem, what is the best way of
leveling the tank? <Shimming, cutting long tapered pieces to give
support over the entire weight bearing areas of the stand.> Should I
shim it or run a length of ¼' wood under the front.
<The latter, along with long shims down the side to distribute the
load.> If shimming, do I place shims the whole length, and along the
sides where they are now raised? <Yes, just combine this with the
continuous piece in the front.> The shims will probably protrude
from under the tank. Can I trim them? <Yes.> The setup also came
with a DIY acrylic sump which has a leak. There are no visible cracks
in the vicinity of the leak so I am assuming it is a bad seal. I've
been told to use Weldon to repair it but can't find it locally.
<This sounds like a leaky seam. WeldOn will fix this, do be sure to
thoroughly clean the area of any salt or other residue first (just
rinse with water).> I have found a hobby shop that carries a product
called Tenax 7R, which the owner says he used to repair his acrylic
skimmer. Would this be ok to use? <Yes, this will work fine.>
Thanks, Eric <Welcome, good luck, Scott V.>
Acrylic Tank Crack Repair/Drilling Acrylic --
12/30/07 Hello, <<Greetings>> I am writing to ask a
question regarding repair to the top panel of my 110 gallon acrylic
tank. <<Okay>> I just got the tank really cheap and it is
not filled yet. The tank is 60lx24hx18w and is made of 3/8'
acrylic. <<Mmm'¦too thin for this
'height''¦you will have some bowing>> There are
2 access holes in the top, and there is a crack running from the right
side of the hole on the left to the back side of the tank. <<Not
good, as you are/should be aware'¦most acrylic tanks gain much
of their structural integrity from the perimeter brace around the
top>> My idea is using JB Weld on the crack, then covering it
with 1/8' or ¼' acrylic I have cut to size, and
gluing that to the top to completely cover the crack on both sides so
it won't separate again. Please let me know if this is a good
approach to this problem. <<A good plan'¦ And although
pulling the crack together and 'fusing' with the solvent would
likely be enough (the cracked piece would again become 'one' if
done correctly)'¦I would suggest an oversize piece of 1/8'
acrylic on both sides to 'sandwich' the crack for that extra
measure of reassurance>> Also, the tank has a built in overflow
which is cool, I plan to keep the skimmer and heater in the sump so
they aren't in the display tank. <<Sounds good>> My
problem with this is there is no access hole near the sides for
wave-makers I have and would like to put at each end of the tank. I
know acrylic can be drilled easily, but drilling how close to the ends
is safe, and how big a hole should I drill for the cords? <<You
mean the perimeter brace at the ends of the tank, yes? I would keep at
least an inch from the tank sides 'and make the hole just
large enough to pass the equipment 'plug-in' through. Do use a
'bi-metal' hole-saw 'and practice on a piece of scrap
to get a 'feel for it''¦>> I am paranoid about
weakening the top support for this tank after hearing the horror
stories about how badly a tank this height made out of this thickness
acrylic will bow when filled. <<3/8' acrylic on a 24'
high tank is going to bow 'period>> Thanks for your
time, Chris <<Happy to assist. EricR>>
Re: Acrylic Tank Crack Repair/Drilling Acrylic
-- 12/31/07 Hello again, and thanks for your quick response.
<<Hi Chris 'and quite welcome>> To update, I
called around today and had no luck at glass shops finding my solvent
weld, <<I generally turn to the NET for such>> but one of
them recommended I call a company here in Erie, Pa. called Polymer
Marketing. <<I see>> So I called and spoke with a guy named
Mark, not only did he wait around for me to stop by after work to pick
up the Weld-On acrylic glue. <<Mmm'¦not a 'glue'
but a solvent (Methylene chloride and methyl ethyl ketone [MEK], I
believe)'¦it creates a solvent 'weld' (breaks down or
'dissolves' the acrylic which allows it to recombine
molecules)>> He gave me a 15 minute or so demo of exactly how to
use it, then didn't even charge me for the solvent or the
applicator bottle with syringe- man, now that is customer service!
<<Indeed!>> Anyways, we sketched out on paper my tank and
the crack and he felt that this product along with the 1/8''
piece of acrylic will be fine. <<Excellent>> He also gave
me a good tip to pass along- taking the applicator bottle and going
over the back and bottom seams the aquarium has to reinforce and
strengthen them, and fix any weak points. <<Agreed>> The
way this stiff sucks itself into the smallest opening is amazing,
pretty nifty product. <<Ah yes'¦. In its least-viscid
form, the solvent requires the parts be fitted very closely to allow
the solvent be drawn throughout the joint by capillary action. Heavier,
more jell-like versions of varying degree (made so by the addition of
acrylic resin) for other applications are also available and quite
handy to the DIYer>> He also felt that with these precautions
since the tank is used, that the 3/8 acrylic will be plenty strong
enough for 110 gallons (I am crossing my fingers). <<Oh yes,
quite 'strong enough' to hold this volume of water
indeed 'but not at 24-inches of depth without 'some'
bowing>> So I will be setting up this week, I appreciate your
help, thanks guys. Chris <<Happy to share 'good luck
with your project. Eric Russell>>
Should I silicones seams on acrylic tank? 11/3/05 Hi, I
recently purchased a used acrylic 125 gallon aquarium. It is in a very
good shape. It does not leak. But just in case I am thinking about
sealing seams with silicone anyway. Do you think it's a good idea?
<Mmm, no> I'm wondering if silicone sealant might damage
acrylic. Thanks for the great site! <Welcome. Silicone in
acrylic seams/corners doesn't provide much strength (and in between
surfaces not often enough)... Acrylic doweling can be fitted, solvented
into corners if there is a need/desire. Bob Fenner>
Acrylic gluing... plugging holes. 1/22/06
Howdy folks, <Paul> quick question about my tank. I
have two bulkheads in my 90 gallon reef tank that I don't want to
use anymore. They are on the back of the tank, one near the
top and the other near the bottom. Can I remove the
bulkheads, then get two small squares of acrylic and use Weld-On glue
to cover up the holes? <Yes> Will they hold once the tank is
full? <Hopefully, yes> How big should the squares
be? <An inch or more beyond the hole diameters> On
the outside back, there will be the openings where the holes used to
be. Should I add something on that side in case? <Could,
but not necessary> Is there another way to close up the
holes? One bulkhead is 1" threaded, the other is 3/4
non-threaded. Is there some sort of plug that could be put
in there. <Yes... a piece of pipe in the non-threaded
one with either a threaded or not terminus with a cap... the threaded
one with a threaded cap, Silastic for "pipe dope"> What if
I just cut the pipes (the ones coming from each bulkhead) from the back
and cement them up with a PVC cap. <Could be done> I
could leave strainers on the inside of the tank. It would be
kind of a dead spot in terms of water movement (only an inch or two
deep though), but nothing would get in there. What do you
think? What would you do. Thank you very much Paul
<If I was very sure I'd never want to re-use these through-puts
I'd solvent the covers over, if not, cap them... Bob Fenner>
Glue and acrylic tank question(s) 3/31/07 Hello;
I have an acrylic dispenser box that was originally used
for storing soap at an "earth friendly" store. My spouse
convinced me I should try it out for an aquarium (it was free).
Originally I thought this was a bad idea but we set it up and tried
running it with a few goldfish. They are thriving in the tank after six
weeks. It's about 40 gallons in very tall, slim proportions.
A couple of questions maybe you could help me with:
First off, I apologize for using my goldfish as test
subjects--I don't normally do such. 1) Is six
weeks long enough to be able to say it's not leaching anything
toxic into the water? <Yes> (I have many species of
FW fish: cichlids, catfishes, loaches, ghost knife and I may creep over
to the marine side eventually.....) 2) It has some
permanent ugly lettering on the back. I'm thinking of
'gluing' sand to the inside of the back panel as a background.
Would Weld-On work to make the acrylic tacky, allowing the sand to
stick? <Mmm... I would not use this... for fear of weakening,
ruining the panel... I would affix whatever you'd like on another
thin sheet of acrylic and mount this, just place inside against the
back...> Or do you know of something else I can use, like a spray
paint or glue? I expect it will be permanently there. <Mmm... there
are some epoxies that are non-toxic (once-cured) that you can use
here... Check with the "Plastic Store" where you buy the
scrap (hopefully from their bin of such... to save money)>
Thank you very much for your time and expertise, best
regards, Anna PS. I tried to register to WWM chat forum to
ask my questions but was unable to. <Am going to cc Zo here re...
We're all friends, associated in that way, but only he
"administers" WWF. Bob Fenner>
200 gallon tank (acrylic
repair) <<Greetings,>> I was reading also something
about drilling small holes on the bottom where the side and bottom
connects and fill those holes with the #40 solvent along with sealing
the inside of the tank; is that true???? <<I've never seen an
acrylic tank built this way, although I can see why one might consider
this stronger than a typical 90 degree joint. For certain, these holes
would need to be precision drilled - too close to the outer edge, and
the material will be weakened. Too close to the inner edge and the tank
will likely leak. Cheers, J - >>
Re: 200 gallon tank (acrylic repair) When I push the
side and bottom together, do I put the #40 glue <Not a glue... a
solvent... melts the panel material together.> on the inside and the
out side on the tank. Is the #40 better that the #3 and #16.Below is
what I saw in the article on the web site... 1) Clean the wound. 2)
Push the crack together. 3) Glue with #3 solvent to make a good seal.
4) See if the fracture extended into the sidewall and seal that if
needed. <Depends on the width of the gap... if so wide you can
actually see light through the space, a more viscous model would be
better... In actual practice, it almost never matters... but if the gap
area can be "squeezed" together by laying the tank on its
side, placing a bunch of weight (finally a use for those
encyclopedias!), I would do so. Bob Fenner>
Re: 200 gallon tank (acrylic repair) I did ask one of
the people there and they told me it wouldn't work but if I was to
use it I would need to inject it on with a syringe... <Please read
over WetWebMedia.com using the search tool at the bottom of the
homepage... with the terms "acrylic", "Plexiglas",
"aquarium repair"... You need a version of the "whole
picture" which you will not get by the current process. Bob
Fenner>
Re: 200 gallon tank How do I put this stuff on, because
I hear that it is some powerful stuff.... <Ask the folks you buy it
from... read the label... not difficult. Bob F>
Re: 200 gallon acrylic tank repair Do you know if this
Weld-On 40 stuff will work on a 200 gallon tank as well.... <Yes...
this is what many (if not all) fabricators of acrylic
aquarium>
Plexi glass glue Hi there once again, I have a question
about the type of glue people use to put together Plexi glass.
<Most folks use a commercial acrylic solvent... like Weld-On> I
hear that the best way to glue two pieces together is to use a solvent
called Methylene Chloride. <This is a principal ingredient.
Toxic, flammable, not generally available to the public.> can't
seem to find it in Home Depot or Lowe's. Do you know where it might
be available? <Check with the businesses listed in your phone
directories who sell or do plastic fabrication> I also wanted to ask
if you know whether this solvent (Methylene Chloride) can be used to
glue Plexi glass+regular glass together, or is it just for Plexi
glass+plexi glass? <Only the latter> On another note, I'd
like to thank you for responding so quickly, and for being real
informative. It's advise like this, that I wish I had for
everything I come across. Your help is greatly appreciated. Thanks,
Hamilton, Riverside, CA <Glad to be here helping. Bob
Fenner>
Re: Plexi glass glue Thanks for your help, but I'm
not quite sure about what you meant by (only the latter). <The
last statement... these solvents are only for acrylic to acrylic
bonding> Can you describe this in another way? And is (Weld On) safe
for fishes. Well I guess it is since you said everybody else uses it.
Thanks for your help. <Safe after cures (a day or so)... it actually
"leaves"... melting/melding the Plexi as one piece. Bob
Fenner>
Bonding Silicone/Lexan Plexiglas Could you tell me if
silicone will attach Lexan Plexiglas to a glass aquarium or if you can
only attach glass to glass with silicone? Thanks, Amy <Silicone will
weakly bond Acrylics, but are not to be trusted in aquarium
applications of any real size/depth. Solvents for this purpose are the
route to go. Bob Fenner>
Gluing acrylic Hi, < Hi. > I am building an
acrylic sump. I have bonded the pieces together using a
chemical that welds the acrylic. I was planning to use 100%
silicone at the joints to add extra strength and help guard against
leaks, but from what I have seen here at WWM it is not recommended.
< No, but I have built lots of acrylic items and I use a very thick
(like honey) acrylic and make a bead all along each edge. > I found
a product called Lexel which is supposed to be clearer and stronger
than silicone. Has anyone at WWM heard of this or have any
experience with it? < No I haven't. But if you are using an
acrylic weld like Weldon 4, try just going over each seam with
something like Weldon 16. > Here is an online brochure for the
product: http://www.sashcosealants.com/home_improvement/pdffiles/lexel_brochure.pdf
Thanks, < May want to swing by a local plastic shop in your area to
see what products they cover. > Dave
< Blundell >
Acrylic questions part 2
3/31/05 Thanks! I'll try the flush cut saw. Does the Weld-on
seal as well? The reason I ask is that my tower extension pieces
aren't completely perfect. Should I bond it with Weld-on and seal
it with silicone? Thanks! Clint <IMO, Silicone has no place
for bonding or sealing acrylic. It just doesn't adhere well.
Weld-On #13 will bond as well as fill and seal small gaps. If you try
to fill large spaces (greater than about 1/8"), bubbles will form,
making a weak unsightly joint. In order to avoid this, you can fill
larger gaps by applying the #13 in several light layers. Just a
warning... Although Weld-On #13 will work great for the application you
described, is meant for "hobby" type applications and should
never be used for joints that need to hold much pressure. The pros that
assemble sumps, tanks, etc., use #3, which forms extremely strong bonds
but since it is watery thin, it requires perfectly machined joints.
Best Regards. AdamC.>
Appropriate acrylic adhesive for reef
tank Hello, <Hi there> I purchased an adhesive (Devcon
Plastic Welder) for my DIY skimmer and I have a quick question
regarding any problems with this adhesive. Will this
adhesive leach any harmful chemicals after it has cured 24
hours? Any input will greatly be
appreciated. Thank you. David <No worries... their MSDS:
http://www.tapplastics.com/uploads/pdf/MSDS%20Devcon%20Plastic%20Welder.pdf
Once cured there is none left... not a glue... but a solvent. Bob
Fenner>
How to unstick acrylic from plywood 7/18/05 Hi! I
have just finished the building of an acrylic aquarium and as I was
putting solvent cement <Not a cement, just a solvent... melts the
material together> in the bottom joints from outside the tank, it
ran and now the aquarium has stuck with some plywood pieces I used to
support the tank from below it. What could I do to unstick them?
Thanks. Giannis <Unstick your sentences with spaces... and use
(gingerly) putty-knife et al. hand tools to remove the wood... is going
to be ugly where all were joined... can be sanded, buffed... Bob
Fenner>


.JPG)