|
Experimenting with Kreisel
Construction
|
By Sara Mavinkurve |
With more and more aquarists thinking about captive breeding, we are
beginning to face challenges usually reserved for academics and public
aquariums. I found myself facing one such challenge after setting out to raise
the zoea released by my emerald and ruby crabs.
These crustacean larvae are fascinating for their apparent dichotomy in
being surprisingly tolerant of great swings in temperature and salinity, while
at the same time being apparently inept at simply keeping themselves afloat. A
fellow hobbyist told me that he was once able to raise them into the megalopa
stage simply by keeping them in a bucket with an air stone and feeding them
brine shrimp nauplii.
However, I had no such luck. All of my attempts to keep them in smaller
tanks, fish bowls, inverted cones, etc., with air stones for circulation,
ultimately failed. They inevitably sank, collecting at the bottom or in the
corners of the container. At one point I even resorted to constantly rocking
them in my arms in a round fish bowl. This seemed to work for them, but not so
much for me. In those intimate long hours rocking them back and forth to the
enchanting sounds of Green Day and U2, I realized that what they apparently
needed was a constant sweeping current underneath them. The only type of set up
I know to be able to provide this type of circulation is a planktonkreisel.
What is a planktonkreisel?
Planktonkreisels are nothing new. While best known for their use in
housing jellyfish, they can be used to house many different kinds of delicate
marine invertebrates. Researchers and aquaculture facilities have built their
own versions and adaptations of the planktonkreisel to suit their own needs and
ambitions.
And yet, despite the widespread knowledge and use of these types of
units, I was surprised to find a severe lack of public information on exactly
how these units work, much less how to build one at home. After constructing
this one, I later learned that similar kreisels have been built and used by
several public aquariums. Consequently, I was unsure as to if my discussion and
documentation of my own experience wouldn't be redundant.
Not knowing anyone who would know better, I asked Martin Moe if my
experience in designing and constructing this Kreisel was something worth
sharing with the coral list serve (and the aquarist community in general). He
kindly advised me that though the basic design of my Kreisel is not unique, it
is worthwhile for the availability of the materials used and for the
transparency of its construction. Even though very general descriptions of
planktonkreisels and pseudo-planktonkreisels are easily found, publicly
available (and hobbyist accessible) step-by-step instructions for the
construction of any type of planktonkreisel are virtually nonexistent. In this
article, I hope to provide hobbyist accessible step-by-step instructions for the
construction of at least one such unit.
Construction
Having hardly enough space in my city apartment for the aquariums I
already have, I needed to construct a unit that could either fit within my
display tank or in a separate tank small enough to fit on my 6-inch wide
windowsill. Some hobbyists have built small pseudo-planktonkreisels simply by
placing baffles in the corners of a small rectangular tank. The top of the tank
is left open and flat. These set-ups are reported to be successful in some cases
with some types of larvae.
However, remembering how the crustacean larvae seemed to appreciate the
rounded bottom of the fish bowl, I wanted to build something with a curved
bottom and a less exposed top. Ideally, I wanted the unit to also be able to
utilize the filtration and stability of a
much larger tank (such as my display tank).
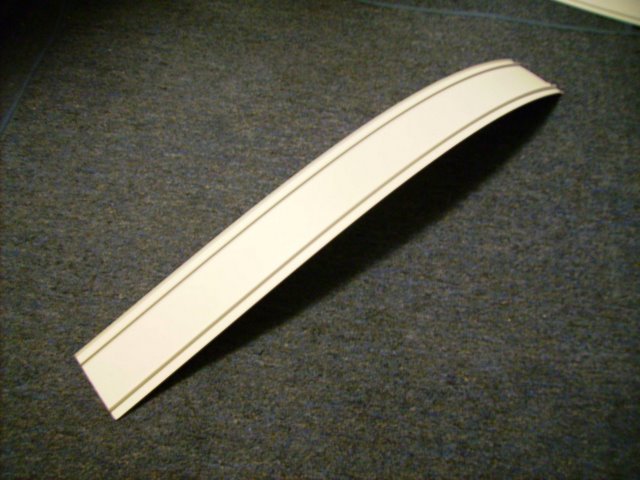
28.5-inch strip of vinyl siding
My first thought was to use a bucket as a circular baffle inside a 5 or
10 gallon tank. I soon realized this wouldn't work for several reasons (one
being that I couldn't find a bucket of the right size, shape or thickness). Next
I thought of using a large piece of PVC piping instead of a bucket. However,
being limited to the inventory of my local hardware stores, I couldn't find a
piece of piping of the right size or shape for the job.
[Note: After sharing my Kreisel with the coral list serve, a marine
biologist, Chris Maupin, told me that he had once made a small Kreisel similar
to mine by placing a piece of PVC piping between two pieces of acrylic.]
Temporarily out of ideas, I wandered around Home Depot hoping for
inspiration when it literally hit me. A piece of vinyl siding slid down from a
rack and collided with my head. As I became increasingly frustrated trying to
push this surprisingly flexible stripe of vinyl back up in its place, it
occurred to me that maybe the hardware gods were trying to tell me something.
Though it seemed like an odd material to use, it was cheap (less than $6 for an
8-foot long, 3.5-inch strip), approximately the right width, and easy to bend
into a circle. It can also be cut with a strong pair of scissors or drilled
through with a hand drill.
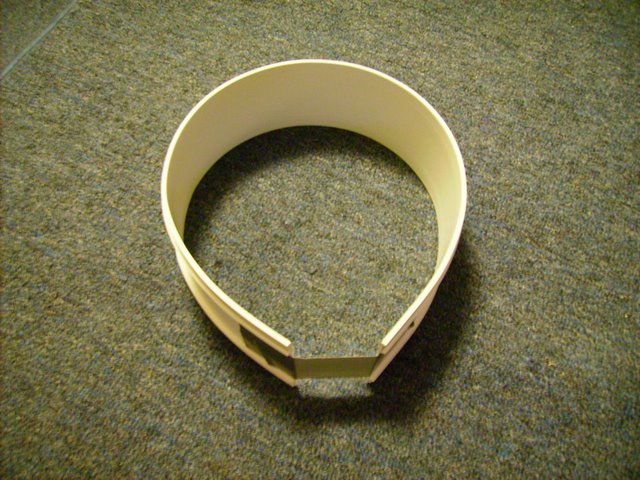
I wanted the Kreisel barrel and frame to be able to fit inside a 2.5g
tank (or possibly a 5g tank). I also wanted to be able to fit my hand inside the
barrel of the Kreisel (so that it would be easier to clean and maintain).
Keeping all this in mind, I cut a 28.5-inch long strip of siding and worked it
into a circular barrel. I then used a Dremel saw to carve out two rectangles (to
be two drains) at one end of the vinyl stripe and a slot at the other end (for
water flow into the barrel). The in-flow is approximately 6-inch from one end of
the vinyl. The first drain is approximately 13-inch down the strip from the
in-flow. These measurements might be somewhat flexible.
However, after building 4 of these units (each with a slightly different
positioning of the drain and in-flow), I do believe that the first drain and the
in-flow slot should be positioned such that when the vinyl is bent into a
circle, the first drain and the in-flow are close to being directly across from
each other as possible. In other words, the distance between the first drain and
in-flow should be approximately the diameter of the would-be circle. It seems
that this positioning results in the best, continued circular flow. The second
drain is at the very top of the barrel (to serve as a back-up drain to prevent
the barrel from overflowing should the first drain become clogged). Ideally, the
water level should not ever reach the second drain. Next, I glued a flow
diverter from a Maxijet under the in-flow flap/slot and glued a piece of tubing
into the diverter, using silicone sealant to seal off any gaps.
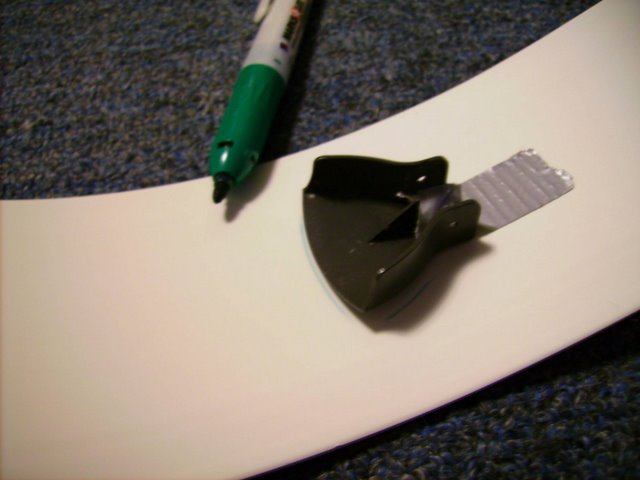
Tracing the flow diverter
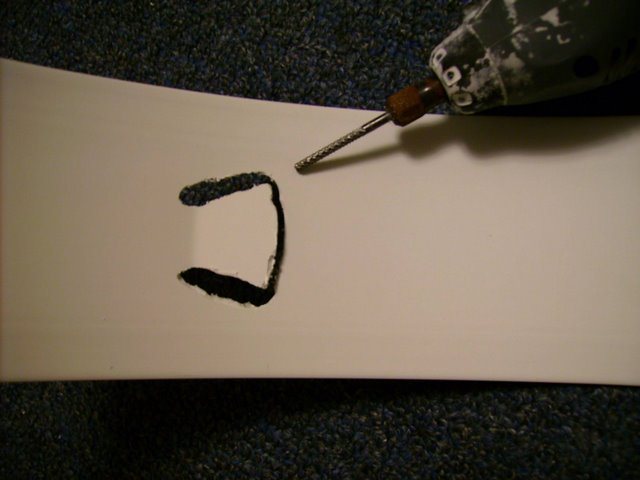
Drilling out the in-flow slot
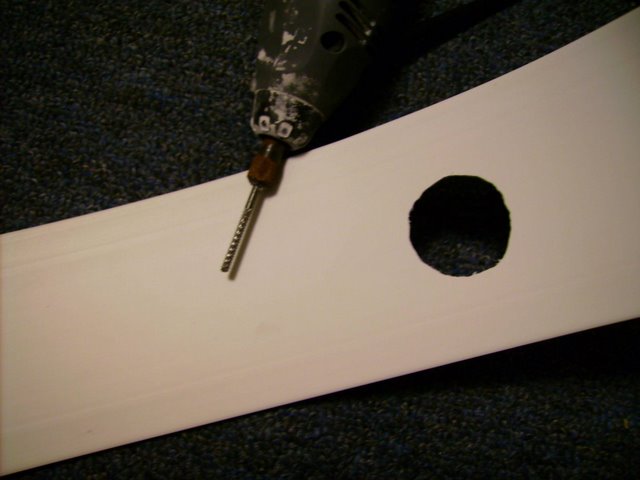
Drilling out the drains
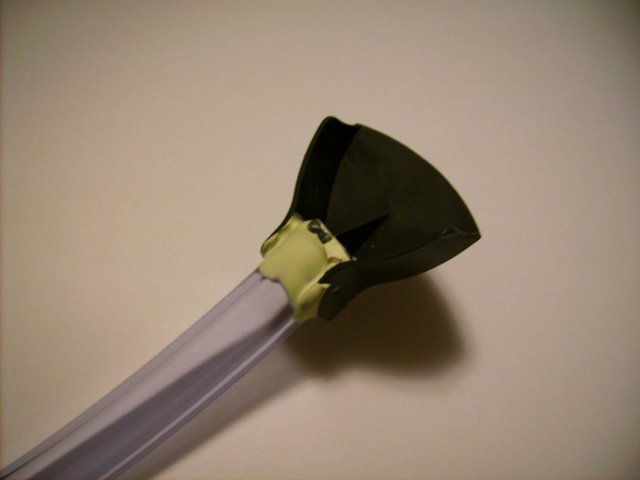
Gluing tubing to the flow
diverter
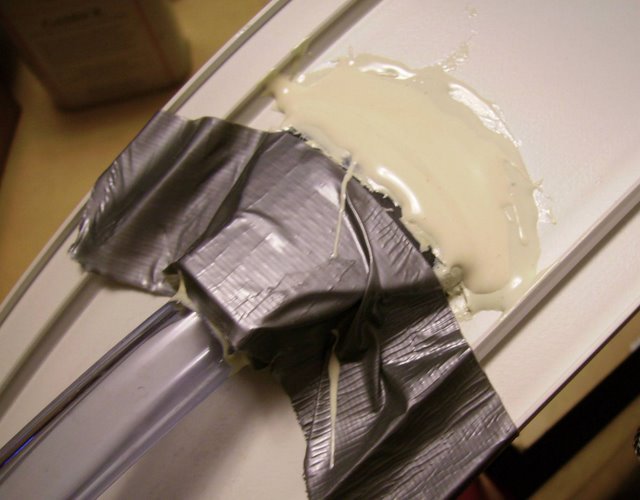
To screen the drains, I cut two rectangular pieces of rotifer sieve mesh
(65 micron) and used epoxy to seal these over the drains. Once this epoxy was
well set, I duck-taped the ends of the vinyl strip together with a gap between
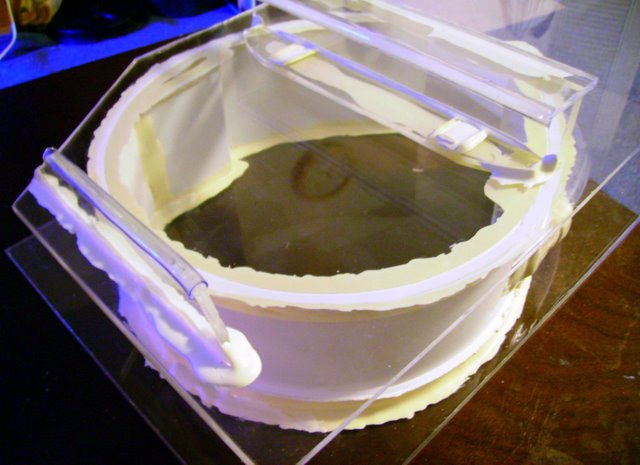
the two ends just wide enough to allow me to reach my hand into the barrel. I
then positioned the barrel between two rectangular pieces of acrylic. I measured
out the two pieces of acrylic to fit (width-wise) inside a 2.5g tank and tall
enough to cover the top of the barrel and the tubing. I cut a corner off one
piece of acrylic (on the side of the drain) to allow room for the pump.
The next challenge was joining the vinyl to the acrylic. I won't recount
all my embarrassing failed attempts at this. Fortunately, I ultimately
discovered that enough waterproof two-part epoxy will do the trick. I held
everything in place with duck tape while applying the epoxy. One of the nice
things about epoxy is that it dries very smooth. Thus, it's also an easy way to
cover up any rough edges.
Positioning the flow diverter
Securing flow diverter to in-flow
slot
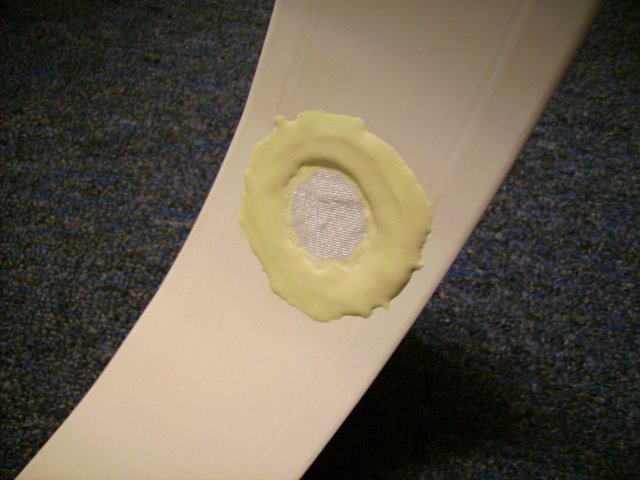
Gluing the mesh over the drain
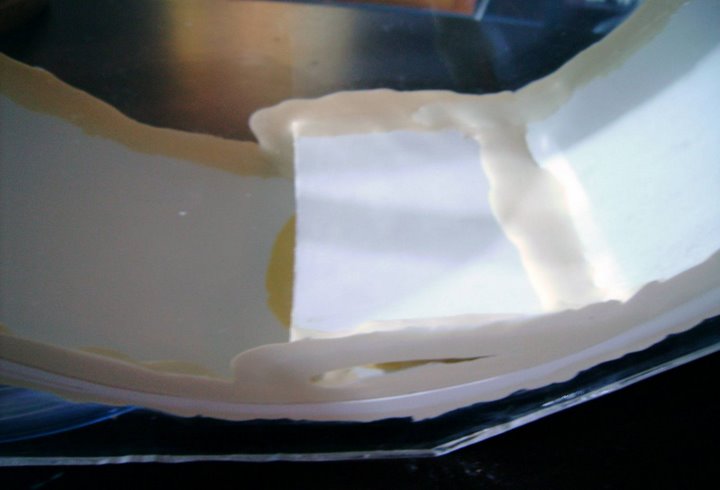
Generous glazing with epoxy just
to be certain there are no leaks
Lastly for the barrel, to protect the larvae and to better direct flow,
I made a flow directing shield out of more vinyl siding and glued it over the
Maxijet flow diverter. I'd like to note here that the order in which I completed
some of these steps might not be the easiest way to assemble this unit. For
example, it might be easier to add the shield after joining the barrel to the
acrylic. I don't think it matters much what order one cares to assemble things
so long as the end result is the same. Also, ideal dimensions of the barrel and
acrylic frame will entirely depend on where and how you plan to use the Kreisel.
Installation
After all was set and done, I was able to slide the whole thing into a
2.5g tank with a small Rio pump suctioned to the lower left-hand corner of the
front panel of the tank. I connected more tubing to the Rio pump, reaching up
and connecting to the tubing from the barrel via a flow valve. The flow valve is
important because you'll need to be able to control flow into the barrel. Flow
out of the barrel can change as the drain becomes clogged with food (or other
small particles) in between cleanings.
Holding things in place with duck
tape
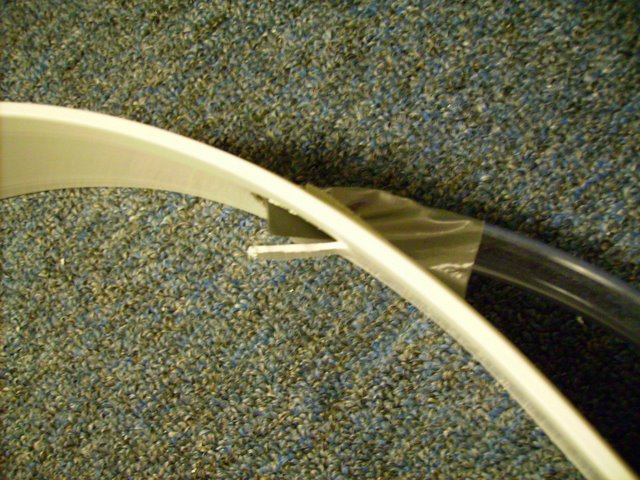
Adding "bumpers" for in display
tank set up, using split airline tubing
The setup as a whole works a bit like a sump inside of a tank. You have
to adjust the flow so that the flow through the drain matches the flow into the
barrel. This allows the water level in the barrel to be above the water level in
the holding tank without overflowing the barrel. The water level in the barrel
could also be set to match the water level in the holding tank (whatever works
best for your needs). To use the unit in any tank taller than the height from
the bottom of the acrylic frame to the top of the barrel, a hanger is needed. I
fashioned a simple hanger out of spare pieces of acrylic. Split airline tubing
can be used to make 'bumpers' by wrapping it over the edges of the acrylic.
In use
Some of the things I like about this particular Kreisel are that it is
very small; dissembles and cleans easily; and appears to lose less water to
evaporation than more open-topped units. It's lightweight, compact and can be
used in any size tank.
Having built several of these units now (and gone through at least 20
tubes of epoxy), I've learned a little with each re-build. The use of 65 micron
screening, the shape of the drains, and the addition of the second 'safety'
drain are details I learned to be important after testing the units with actual
crustacean larvae (zoea stages of Mithrax sculptus larvae).
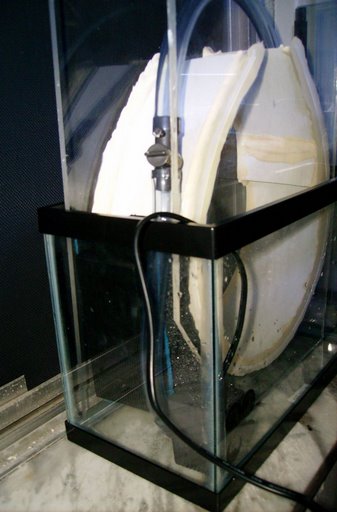
Set up in a 2.5g tank
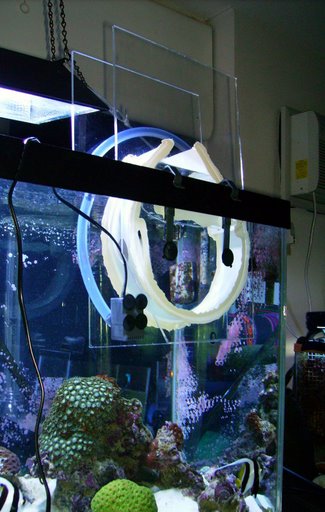
Set up in my 65g display tank
Initially I had used brine shrimp netting to screen a single circular
shaped drain. This drain design failed for two reasons: 1) circular drains
create screened 'divots' which are apparently more of a challenge for larvae to
roll over, and 2) while crustacean larvae do not pass through brine shrimp
netting, for whatever reason, they apparently get stuck in it quite easily. I
quickly rebuilt the unit using rectangular drains screened with rotifer mesh.
The remaining larvae did greatly appreciate the adjustments. At last I could
sleep through the night without having to worry that I'd wake up to find them
settled at the bottom of the unit or plastered against brine shrimp netting.
Unfortunately, they ultimately perished when I forgot to lower the water
level before plunging my hand into the barrel to clean the drains. My hand and
forearm displaced more water than my 'safety' drain could compensate for and the
larvae spilled out into the display tank where they quickly became fish food. Of
course, this became just another lesson learned.
I hope that other hobbyists will experiment with this design and attempt
to use it with other types of larvae. The greatest reward would be able to use
this set-up to successfully raise crustacean larvae past the critical megalopa
stage of development. I'm confident that it can and eventually will. Hopefully,
it will not only for Mithrax sculptus larvae, but also for other types
of delicate crustacean larvae.
|