 |
|
|
|
Related Articles: "Durso" Standpipes,
Plumbing Marine Systems,
Plumbing Return Manifolds,
Refugiums, Related FAQs:
Stand Pipes,
Marine Plumbing 1,
Marine Plumbing 2,
Marine Plumbing 3,
Marine Plumbing 4,
Marine Plumbing 5,
Marine Plumbing 6,
Plumbing 7,
Plumbing 8,
Plumbing 9,
Plumbing 10,
Plumbing 11,
Plumbing 12,
Plumbing 13,
Plumbing 14,
Plumbing 15,
Plumbing 16,
Plumbing 17,
Plumbing 18,
Holes & Drilling,
Overflow Boxes,
Make Up Water Systems,
Pumps,
Plumbing,
Circulation,
Sumps,
Refugiums,
Marine Circulation 2,
Gear Selection for Circulation,
Pump Problems,
Fish-Only Marine Set-ups,
Fish-Only Marine Systems 2,
FOWLR/Fish and Invertebrate Systems,
Reef Systems,
Coldwater Systems,
Small Systems,
Large Systems,
Water Changes,
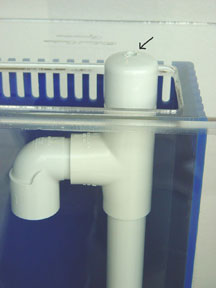
Surge Devices, DIY DURSO STANDPIPE By James Gasta A problem occurring with overflow boxes is the noise they create. The noise is created by the water flowing through the overflow weir and crashing down to the bottom of the overflow. A common fix was to cut slits or drill holes in a standpipe to minimize the noise and that is exactly what it did, minimize the noise, but never eliminating the sucking sounds caused by air entering the standpipe along with the water. A simple, economical, and easy way to fix this problem is by using a standpipe commonly called a Durso standpipe. The Durso standpipe utilizes a submerged intake thereby eliminating the noise.
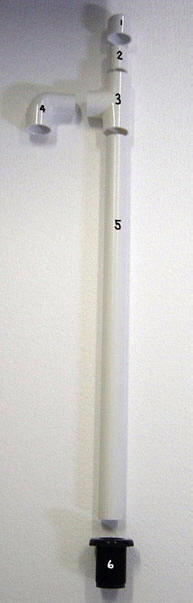
There are a few things to consider before building the standpipe. For tanks with a 1” drain bulkhead, you should use 1.25” PVC fittings. A reducing bushing will be needed at the bottom to convert the pipe to the bulkhead fitting. Using thin wall PVC pipe will also give you more volume, but not absolutely necessary to use. The desired water height in the overflow should be about 2” below the weir or overflow edge but does not have to be exact. Keep this in mind when cutting the main standpipe section (#5 see photo below). Also, since space in an overflow is limited, the 90-degree fitting (#4) should be a street ell. A street ell has a female at one end and a male at the other end. The one disadvantage of using a Durso standpipe is that uneaten food and debris can accumulate at the bottom of the overflow and in this regard I recommend the use of slip fittings. Not gluing the standpipe to the bulkhead fitting will facilitate in the standpipe’s removal for disposing of any waste that accumulates in the overflow box. When flushing the box, use some means of catching the waste so it doesn’t end up in your sump. Also be sure the pump is off when doing this.
BUILDING THE STANDPIPESee photo below for reference. 1. Cut a small piece of PVC (#2) and attach the end cap (#1) to the section of pipe and glue the assembled section to the tee (#3). 2. Glue the street ell (#4) to the tee pointing the ell directly downward. 3. Cut the main pipe (#5) so that when inserted, both into the bulkhead (#6) and the tee, the mid section of the tee will be about 2” lower than the weir. 4. You can now glue the main pipe to the bottom of the tee. 5. Drill a small hole about 1/16” in the top of the end cap. This prevents a siphon from draining the overflow too fast. This hole may have to be enlarged. 6. Insert the completed standpipe into the bulkhead. If you are satisfied with the height, turn on your pump. Watch the water level in the overflow. If it maintains a steady height around the mid section of the tee, you are done. If the water level in the overflow drops too far, you will need to increase the size of the hole slightly. Make the hole larger in very small increments; say 1/16” at a time until the water level maintains its height at the mid section of the tee. You could also install a valve in the hole and control the water level by this means.
DIY Durso Standpipe 3/27/2009
|
|
|