|
FAQs on Acrylic Aquarium Crack/Hole Repair
Related Articles: Aquarium Repair,
Related FAQs: Acrylic Repair 1, & FAQs on
Acrylic: Design, Scratches & Crazing, Leaks, Drilling/Cutting, Construction, Solvents, & Glass
Aquarium
Repair, & DIY Gear 1, DIY
Gear 2, Tanks, Stands, Covers,
Custom Aquariums, Stands,
Covers...,
|
|
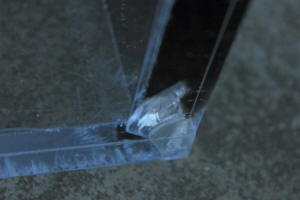
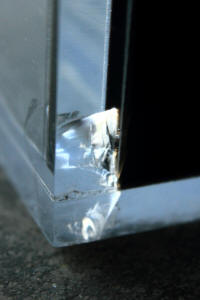
corner fracture 8/27/19
Just got a 55 gal SeaClear aquarium. UPS must have banged the box so it arrived
with a 2 fracture on one corner. The corner is a bent ¼ acrylic.
I have placed water in it and there is no leak. I was thinking I could take some
weld-on #16 and brush it on the inside covering the fracture to let it mend any
fracture edges.
Do you think this would work?
<Might... do this w/ the tank empty... IF the crack is too large, through the
joint, I'd look into solventing a squared section of acrylic dowel in the inside
corner. DO see/read on WWM re if you have doubts. Bob Fenner>
Thanks,
Jack
Re: corner fracture 8/31/19
Good news!! It appears to have worked. I brushed #16 over the entire fracture.
Let it sit for 24 hours. Filled the 55 gallons to the top outside. Let it sit
for 24 hours, no leak. It is now in our living room looking beautiful except for
the corner where the fracture is.
Thank you for your encouragement!!!
<Cheers Jack. BobF>
|
180 acrylic aquarium flat back hex. Cracked
<Lisa; small/er files please... hundreds of Kbytes, not megs>
Hello all I bought this aquarium from craigslist it was built by ATM it has
some cracks along bottom around overflow box I contacted them
they never got back to me. I am sending picks to ask what you thought I should
do.
Thank you for your time Doug.
<Are these cracks on the bottom itself? Is the bottom doubled (already)? I would
NOT fill this tank until another sheet/panel is annealed over the existing. Bob
Fenner>
|
 |
|
re: 180 acrylic aquarium flat back hex
It is in the bottom someone poured Weldon over it inside but nothing more it is
a single layer of acrylic otherwise, I appreciate your quick response. It has a
coral insert over back panel I'll have to remove to lay a panel over crack also
what thickness do you recommend and should I cover entire bottom or just around
the overflow box?
<The whole bottom... you can extend the throat of the through-puts (bulk head
fittings) if need be, to fit both bottom thicknesses. The new piece should be at
least the thickness of the current. BobF>
re: 180 acrylic aquarium flat back hex
Wow ok to thank you for you time and suggestions.
<Aye. I'd read through on WWM re Acrylic repair for cracks for more background.
Bob Fenner>
|
|
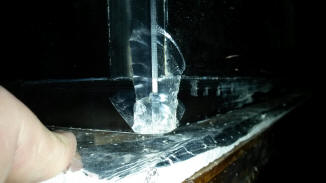
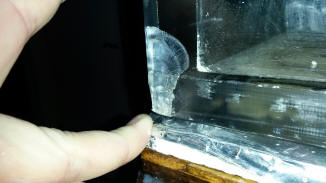
Major problem. Acrylic crack 1/12/18
Good morning to you all and thanks in advance. I bought a 750 used acrylic tank
from Bill Wann in Wisconsin (I assume you’ve heard of him?)
<Saw him give a presentation a couple months back at the Aquatic Experience in
Chi town>
last week. The tank was shipped uninsured via freight carrier.
<Ooh!>
When I finally got it home after picking it up I took the wrapping off it to
discover a damaged area.
<Ugh!>
The damage is at the bottom edge of the right side panel where the overflow is
glued to the side wall. Hopefully the pics I provide will be sufficient for your
opinion.
<Is any part of this impact discernible by touch inside or out?>
I plan on welding a 1/2” acrylic patch to the inside and outside of the area. I
was thinking that the inside patch would be actually 2 pieces of acrylic at a 90
degree angle so I can weld it to the bottom as well as the side panel. The major
concern I have is that the shattered area spreads across both sides of where the
overflow is welded to the side panel. Basically that means I have to split my
inside patch on both sides of the overflow wall. If I patch correctly do you
think I’ll be ok?
<I do hope so. What you describe is the route I would go also>
The tank is 1” acrylic all the way around. It’s 10’ long, 4’ front to back and
30” tall.
<... IF it were me fabricating this tank, I would have sized up to 1.25" thick
cell-cast acrylic... Even with a good job of top bracing there is going to be
noticeable bowing here>
It sits on a custom 2” square stock steel stand. Thank you so much for your
assistance and opinion.
<Please see our file size requirements... Folks are sending WAY too large
images. Bob Fenner>
|
.jpeg) |
|
Part 2 major problem 1/12/18
Sorry guys but the first message wouldn’t allow me to attach more pics of the
damage.
<Because you've exceeded our overall ISP storage. Argh!<>
Here they are. I also forgot to mention that the crack is on the inside and
doesn’t go all the way through. I’d say it goes about 3/4 of the way through the
1” panel. I also plan on shooting some Weldon 4 into the crack as well as the
other measures
<Good. I would do this as well... tis the reason I asked re being able to feel
the damage. B>
I mentioned in my first message. Thank you.
|
.jpeg)
 |
|
Re: Major problem; acrylic crack
1/13/18
Thank you for your email replies. Now that you’ve seen the pics do you concur
with my repair plan?
<As stated already; yes I do. >
Do you think I’m taking way to big of a risk?
<Mmm; hard to guess for sure, but not likely much of one>
Have you seen similar damage successfully repaired?
<Many times>
Thank you so much
<Certainly welcome John. Bob Fenner>
Re: Major problem 1/13/18
Bob I can’t thank you enough for your prompt replies and advice. Have a great
weekend
John
<You as well mate. B>
Re: Oops.. forgot to ask.. 1/13/18
Thanks buddy!
<Welcome!>
Oops.. forgot to ask.. 1/13/18
Hey Bob. In regards to the acrylic patches I plan on welding them down with
Weldon 16. Do I need to scuff both surfaces before applying the weld or leave
them smooth?
John
<Just leave smooth John... They will REALLY weld right on... B>
|
|
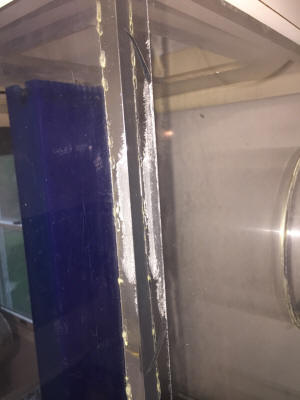
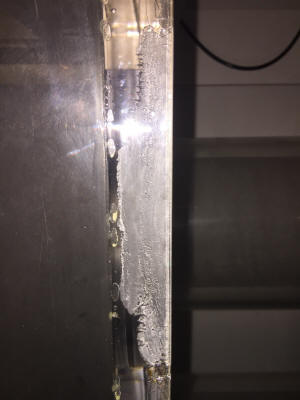
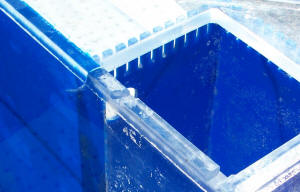
Large Acrylic Tank; joints whiting out, crack...
6/22/17
Dear WWM,
<Casey>
I would be very grateful if you could give me some advice.
<Glad to>
I recently acquired a 700 gallon acrylic aquarium. I thought it was a
real steal for $500.
<Tis; for the acrylic alone...>
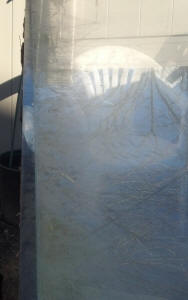
The aquarium has an area about 8 inches long at one of the seams that
appears to have been damaged judging by the visible hazing in this location.
<Yes; the weld/joint is going bad...>
There are two visible cracks on either end of this area that
may have occurred when moving the tank into my house (I'm not sure if they were
there before, the hazy area was there before, but I had not noticed the cracks
before the move).
<Mmm; more likely from before... when the tank was full. These cracks are most
often due to uneven pressure when the tank is filled, setting on an uneven
(non-planar or not level) surface/stand. Even more common in specialty tanks
(not rectangular or square on the bottom). Stands for such often have such
non-planar, non level issues. Read here:
http://www.wetwebmedia.com/aqstands.htm>
The cracks do not extend completely through the acrylic sheets so I don't think
leaking will be an issue,
<Umm; no. DO NOT FILL this tank w/o correcting these. VERY dangerous should this
tank fail catastrophically; with it MAY DO>
but I'd like to do anything possible to prevent that the cracks from growing and
become a problem. What would be the best way to repair or mitigate this damage?
<... some folks (we used to fabricate) might try applying a low viscosity
solvent... e.g. Weld-On 16 to the joints, cracks, in the hope of "filling them
in", re-joining the areas. I would NOT DO THIS, but instead have a professional
shop cut and install acrylic doweling of at least one inch diameter in all
linear seams inside. Read here:
http://www.wetwebmedia.com/acraqleaks.htm>
My current plan is to try and repair the seam by injecting IPS-4 acrylic solvent
into it using a syringe with a small gauge needle and applying light pressure
with a bar clamp.
<No need for a clamp>
I've also ordered some 3/4" acrylic right triangle rod to solvent weld into the
interior corner to reinforce the entire seam from top to bottom.
<Yes to this, but I'd make it a minimum of 1">
I'd be grateful for any advice you have as to these plans or any better course
of action. One particular question I have is what would be the best method for
welding the triangle rod reinforcement into the interior corner?
<Carefully measure, cut, practice fitting in all pieces, apply braces to keep
added pieces in position, use capillation to fill in the voids. IF all is cut
and placed properly, the solvent will fill the gaps>
Is there a particular type of solvent or method for applying it that you
recommend since the piece has to go in vertical?
<... Yes; the Weld-On line>
Would capillary action work or would it be better to try and find a more viscous
solvent that could be applied before putting the triangle rod in place?
<Capillary action will do>
What would be a more viscous product that I could use? Would IPS-40 be
appropriate here?
<For me, the lower viscosity>
Is there any other actions I could take to repair or reinforce the tank?
<Yes; to MAKE SURE the stand is LEVEL AND PLANAR; DO the repairs, bracing work
ON THE STAND if practical>
Any advice you have would be very much appreciated!
Thanks,
Casey Alexander
<Unless you're very handy (whatever this is... good mechanical skills, vision...
I no longer have), I'd seek experienced help w/ this repair. Bob Fenner>
|
 |
|
Re: Fwd: 6/22/17
Bob Fenner,
<Casey A>
Very grateful for your reply and advice. I'll let you know how it goes.
<Ah, thank you. Bob Fenner>
Thanks
|
|
Acrylic repair... 16 megs of pix... rdg.
11/31/14
I bought this used tank six months ago and I'm ready to set it up now.
It apparently was bumped along the way on the lower left hand corner.
The tank is 96x30x30 and 3/4" acrylic all around. I
haven't worked with many acrylic tanks, but I would sure like advice for
a fix. Thank you in advance.
<... you might get very lucky and anneal this splintered area w/ a low
density Weld-On solvent (or equivalent).
See WWM re. Bob Fenner>
|
 |
Crack repair on thick acrylic tank
12/14/12
Greetings, Crew,
<Dan>
I have a 28" wide x 8' long x 4' tall, 1 1/4" thick acrylic aquarium
with a long crack in the end panel near the bottom. I've read many
articles/posts about mating another panel over the crack with Weld On 3
or 4, but it would be too visible and ugly, even if I use a
full-size panel to cover the old one. Does anyone have experience
using something like Weld-On 40 or 42?
<I do... and would still go for the ugly repair>
I was thinking about using my Dremel on a low speed setting to avoid
melting the acrylic and a 1/8" or smaller diameter bit to widen the
crack just enough to inject pre-mixed Weld-On 40/42 into the gap with a
large syringe. According to the technical data, Weld-On 40 has a
strength of 4,000 lb per sq in after a week when cured at room
temperature, 5,700 at 120 degrees F, and 7,000 at 150 degrees F.
Even at room temperature it sounds strong enough to do the job. I
can use a heat source to slowly heat the area and keep it at a high
temperature for improved strength, then slowly lower it to room
temperature at the end to prevent cracking.
Has anyone on the Crew tried this?
<Have not... too much liability in the commercial side for us to do. Up
to you to try, test>
Thanks,
Dan
<Welcome. Bob Fenner>
|
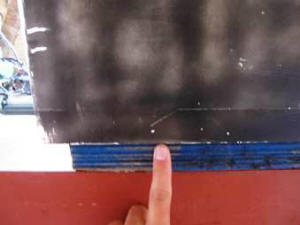
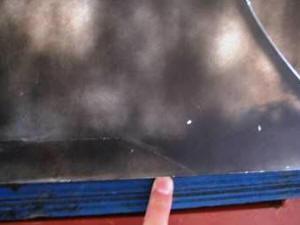
Crack in bottom corner of acrylic aquarium
5/3/12
I just purchased a used 225 gallon acrylic aquarium. Dimensions
are 6 feet long, 2 feet wide, and 30 inches high. It is 1/2"
acrylic. It holds water, but there is a significant crack in the
lower back corner.
<I see this in your excellent pix... an impact...>
Not sure if you can see clearly by the pictures, but the crack reaches
from the exterior on the side to the exterior on the back and the
exterior on the bottom of the tank, but does not reach the interior of
the tank anywhere.
After doing some web research, I have purchased some Weld-On 3, which I
plan on applying into the crack itself.
<Good. If you're fortunate, this light weight (low viscosity) solvent
will be able to flow into the cracked area... effectively sealing the
cracked area by melting the acrylic together.>
I have also purchase some Weld-On 16 and plan on buttressing the
interior of the tank. My question is how much acrylic would I need
to add to the interior?
<Actually very little... a few inches (2-3) of square doweling for the
three areas about the crack>
I originally was planning on adding 3 pieces of acrylic that are 1/2"
square rods of about 6 inches long along the side/bottom, side/back and
back/bottom to give strength to that corner. Do you think
that would be sufficient?
<Yes>
Was also considering adding a 6" by 6" block of 3/4" acrylic flat in the
back corner, then running one 1/2" square rod up about 6" from that.
Thanks!
<I'd use the doweling/rod. Bob Fenner>
|
 |
|
125 gal Acrylic tank with numerous holes
2/22/12
Hello,
<Cindy>
I have the opportunity to purchase a tank/stand/hood/filters for
a 125 gallon acrylic tank that was used as a salt setup. I
currently have a 55 gal fresh water tank and want to use this
tank for a conversion from the 55 gal (I don't have funds to
do a salt water/reef tank at this time, but do plan to use this
tank for that in the future). I have two problems:
1. There are 4 evenly spaced holes drilled in the bottom of
the tank currently (sump) approx 1" to 1 1/2" in
diameter. There are also 4 smaller
holes drilled in the back of the tank - 2 towards the top, and 2
about midway down the panel.
<I see these>
Since I want to use this as fresh water, can I safely plug
these?
<Yes... can be done in a few ways; two principally>
Someone mentioned a bulkhead with a cap, but I am not familiar
with these since I have only used fresh water setups in the
past.
I would like to plug in such a way that I can convert to salt
later.
<I see... Look closely at the through-puts... the elbows on
the back appear to have Schedule 80 thread to barb elbows
threaded into them. These can be threaded out, and threaded plugs
(Schedule 40 are fine) threaded into them instead... use a bit of
Silastic/Silicone or Teflon tape on the threads of the plugs
before inserting. Re the through-puts on the bottom; do these
look the same? That is, do they have a threaded (vs. slip) center
to them?
They can be plugged the same way. Do take care in setting this
tank on its stand... so as to not bump, nor lay the exposed parts
of the thru-hulls on the stand>
2. The owner of the tank went out and bought new filtration
systems which are still in the box and have never been
used. I don't know if they will indeed work for this
tank. They include 2 Fluval 404s, and Rena 400s.
Someone told me these would not be appropriate for the 125 gal
setup.
<They will be fine>
I have enclosed pics of the setup - tank looks in good shape with
no cracks, severe scratches etc. I can purchase this setup
for $400. Local aquarium shops want me to scrap the tank
and purchase a new $700 from them - they say you can't plug
the openings sufficiently, but I don't know if this is being
said so that they can sell me a new tank. I could use some
advice but need it soon to make a decision on this purchase which
is currently in a shop.
Thanks,
Cindy
<The other way the holes can be covered over is by solventing
(Weld-On or such, likely #16 or thereabouts) squares of Plexiglas
over the holes. Easy to do. Bob Fenner>
FW: 125 gal Acrylic tank with numerous holes
2/22/12
I sent this previously with pics - 128 kbs, wanted to make sure
it did not get kicked to junk mail. Thanks,
<Thank you for checking. Is fine. BobF>
|
.jpg) .jpg) |
Re: 125 gal Acrylic tank with numerous
holes
2/22/12
But can those pieces of Plexi then be removed fairly easily if I
want to convert it to Salt?
<No; not removed... the holes will/would have to be re-drilled.
BobF>
Cindy Cotton
Re: 125 gal Acrylic tank with numerous holes
2/22/12
Thanks for the information. I have to make the decision on
the $400 expenditure now.
<Ahh, B>
Cindy Cotton |
|
Cracking acrylic 1/30/12
Hello WWM
<Lar>
I would like to hear you opinion on what i should do to fix this
problem.
There is a crack about 3" long on the base of the aquarium.
I was thinking of drilling a hole into it and routing out the
damage area. Then filling it
in with weld-on 16. What do you think of the idea or would you
recommend something else?
<The latter... would just anneal a squared dowel in the inside
corner...
the length of the run. Read here re:
http://www.wetwebmedia.com/acraqleaks.htm
Thank You for you time,****
Larry****
<Welcome. Bob Fenner>
|
|
Re: Cracking acrylic 1/30/12
Thank you bob for the quick response and advice. I will do an
inner bracing. I was wondering. If I leave the damage as is,
it'll spilt further once the tank is full. Better off filling
in the cracks while it' empty???
Larry
<Can fill in what you can (would solvent the missing piece
back if you have it), but the likelihood of further splitting is
about
zip. BobF>
|
Hair line crack! HELP!
12/18/11
Hey guys! Hope all is well!
I was feeding my goldfish this evening when I noticed a hairline crack
approximately 2 inches long about half an inch away from the bottom in
the middle of the back pane on my 29 gallon tank. I'm
terrified of my tank exploding while I am not home. Is it a
possibility?
<Mmm, very remote. This is almost assuredly a "scratch",
caused by scrubbing a rock against the glass during maintenance, or
something hard in the way of decor placement...>
! Is there anything I can do to seal it until I can afford another
tank?
<Not to worry. Rub your finger nail along... can you feel
it?>
I'm really worried, and appreciate any peace of mind you can give
me.
Thanks for the help!!
Jessica
<Bob Fenner>
Re: Hair line crack! HELP! 12/18/11
Yes, and from the outside too,
<?! Is this a glass tank? Acrylic?>
do I doubt it's just from the rocks. I'm trying to get a hold
of a temporary tank as fast as I can, to be honest, I don't feel
safe using this tank long term.
<VERY unusual for such a break to occur w/o simultaneous breakage,
leakage.
IF glass, I would drain down now. BobF>
Re: Hair line crack! HELP! 12/18/11
I'm thinking it's probably acrylic
<...? Probably?>
considering the characteristics, and the fact that it is not leaking/
expanding. I have a new tank on it way to my house this evening, and
hopefully I will be able to transfer the fish safely. Thank you for
your help! I really appreciate your advice! Any other tips?
<Keep reading. B>
Re: Hair line crack! HELP! 12/19/11
So I verified that it is acrylic, and I CANNOT feel the crack on the
inside of the tank.
<You previously stated you could...>
I can only feel it on the outside of the tank.
<Then, again, I wouldn't be concerned... This is almost
certainly a simple scratch>
I still plan to replace the tank. And I have definitely learned to
inspect tanks thoroughly before I fill it.
<Ok. B>
Re: Hair line crack! HELP! -- 12/19/11
I do apologize for inconsistencies, I was honestly in such a panic. I
hope I isn't waste to much of your time. Thanks again for
everything! :)
<Certainly welcome. B>
|
Cracked piece off 90 gal acrylic tank
5/25/11
Cynthia*
Umm, read here: http://wetwebmedia.com/AcrylicCrackRepF.htm
and the linked files above. Bob Fenner>
|
|
|
Cracked piece off 90 gal acrylic tank
5/25/11
Please help... This is probably a first for you.
<Lo dudo... I saw your multiple e-mail images earlier. Have you
read where you were referred? Do so>
My husband purchased a 90 gallon acrylic tank and it was shipped to
the house a month ago. It arrived intact, and I stored it in my
closet, wrapped in a quilted drop cloth until my husband returned
from being deployed for 6 mo.s in the Navy.
<My father was a lifer in the Nav as well. Good luck>
I was getting things ready for his return this morning and when I
moved the tank, I found that a piece of it cracked off!!!
<Solvent it back on with a piece/panel over all on the back...
Done!>
I believe that this occurred during an inspection of my fire
sprinkler system by our building maintenance. The tank was directly
under the system, and I believe the moved it to gain access.
I need to know if the panels effected by the cracked piece can be
replaced?
<Please read...>
The manufacturer told me to throw the tank in the garbage??!!!
Really?
Even though the rest of the tank is intact?
<I wouldn't do this>
That hurts! We paid $800 for a tank we've not even filled with
a drop of water and have hundreds of dollars in accessories for it
at the house.
At best, the vendor is offering us a replacement tank for $500
because he says he feels bad for us. He said this is at cost...
I'll send pics in separate emails.
Please give us your honest expert opinion :-(
Cynthia*
<Read. BobF>
Re: Cracked piece off 90 gal acrylic tank 5/25/11
Yes, thanku! I'm reading ;-)
Cynthia*
<Do write back if this is unclear, incomplete to you. This sort
of repair, with the bit cracked out at the top is very easy to fix.
BobF>
Re: Cracked piece off 90 gal acrylic tank 5/26/11
Hi Again,
<Hello Cyn>
Well the crack an chipped off piece is on the side of tank... Right
on the cusp of the sealed edge... Where could we get more direction
on repairing?
<All you really need is posted on WWM>
Are there any videos out there?
<Perhaps... I don't know>
Why won't the manufacturers try to fix for us if this is
relatively easy to repair?
<To make another sale, avoid liability, make you happy would be
my best guess... Again, I, our company fabricated many acrylic
systems, repaired, modified others. See my bio.... BobF>
Thanks again!
Cynthia* |
|
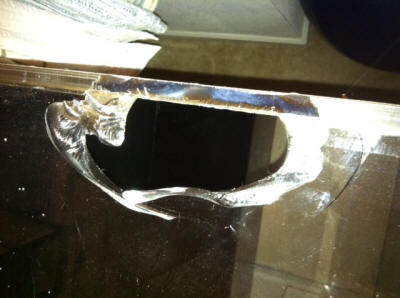
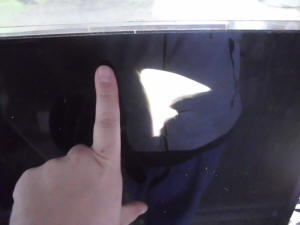
Advice On How To Repair Hole In Back Of
Acrylic Tank -- 05/02/11
Howdy!
<<Howdy!>>
I had a good find this weekend on Craigslist, a 120gal acrylic
tank with stand and lid.
<<Cool!>>
Only downside (so far hopefully) is that the previous owner tried
to cut (more like hack) into the back to put an overflow in
place. It's...not pretty.
<<Yikes'¦I'll say it's not>>
My current plan is to use Weldon to patch it inside and outside
with 2 pieces of acrylic.
<<Ok'¦though a single patch (min. 1/4'
material, large enough to lap the hole by 2') on the inside
should be sufficient>>
A member of a forum board I go to also suggested filling the gap
between the patches with polyurethane?
<<I wouldn't'¦ If you feel the need/are more
comfortable filling between the two pieces (if you go that
route), cut a piece/pieces of acrylic to fill the space as
closely as possible and then seal (in layers to allow adequate
curing) with a 'thicker' Weldon product like
Weldon-16'¦in fact, I would use the thickened Weldon
for the patch as well>>
I attached pictures of the damage,
<<I have viewed these'¦what a mess>>
will this repair method work ok when the tank is filled, or would
there be a better method of sealing this hole?
<<Laminating an acrylic patch over the hole with a good
acrylic solvent as described will do the job nicely. Considering
the nature of this damage, do examine the area closely for any
radiating cracks and make sure the patch you apply covers these
as well. Cheers'¦ EricR>>
|
|
|
|
Re: Advice On How To Repair Hole In
Back Of Acrylic Tank (Lights and Plumbing too) --
05/02/11
Thanks for the quick response!
<<Quite welcome>>
The forum member who recommended the polyurethane suggested it to
help keep the hole from expanding as the tank flexes as water is
placed in.
<<I would not use Polyurethane, it's not a reliable
acrylic solvent'¦stick to the Weldon products
'made specifically' for use with acrylic. But this
shouldn't be a concern'¦applying a 'thick
enough' acrylic patch from the inside with sufficient overlap
(as mentioned previously) will do the job. You can even
'laminate' a couple of thinner pieces together to make
for a thicker/stronger patch>>
Your method sounds a lot cheaper and easier!
<<Repairs such as these (on the back/non-viewed side of the
tank) are pretty simple to make'¦the key is to use the
correct material/solvent, and to provide enough overlap of the
patch around the perimeter of the hole/crack>>
This is my first big acrylic tank so I'm still learning as I
go here.
<<I have a 96'x30'x30' acrylic
tank'¦love it. Acrylic tanks are stronger as a rule,
and a snap to customize (drill/plumb) versus glass in my opinion,
but do also require special consideration/handling as a result
(easily scratched)>>
I also have another two questions I thought on my drive home.
<<Okay>>
First I am wanting to do 5mm LED moonlighting (blue and purple),
and I'm not sure if the acrylic will diffuse the light or let
it shine through properly if I mount them on top.
<<Should be fine, as long as the acrylic is clean (no
excessive salt creep. etc.)>>
I was thinking three holes big enough for the LED to fit into
behind and in front of the two openings on the top of the tank
(so six total on the back and six front). Would this weaken the
top, or should I try to figure out another plan of attack for
mounting the lights.
<<Simply suspend or 'prop' the lights above the top
of the tank>>
Second deals with my filtration. I am planning on running two
canisters (back up in case of something happening to one)
<<Do read up on these/their use in marine
systems'¦start here and follow the links in blue:
http://www.wetwebmedia.com/ca/volume_2/cav2i1/canister_filters/Canister_filters.htm
>>
but I only have two access holes on the top, one at each corner.
My idea is to run both out-going pipes at each back corner with
spray bars in the center top. As I have no easy access to the
center top, would a small rectangle, or two 1/2" or
3/4" weaken the top?
<<Drilling a small hole or two, positioned at least an inch
from any edge, should be fine>>
I know I'm asking a lot of questions, but I know it's
better to ask than assume and end up with a major mess on my
hands!
<<No worries>>
Thanks again!
<<Happy to share'¦ EricR>>
R2: Advice On How To Repair Hole In Back Of Acrylic Tank --
05/07/11
Quick question for the patch piece, does it need to be a solid
piece, or can it be layered pieces bonded together? I'm not
having much luck finding thick enough Plexiglas/acrylic.
<<Layering or 'laminating' two pieces of acrylic is
fine, and will even be stronger than a single solid piece. Two
pieces of ¼' thick acrylic laminated together
will be more than sufficient in this instance. Be sure to coat
the entire face of the pieces being laminated with the solvent
cement to ensure a full-contact bond'¦and as stated in
our previous correspondence, I highly recommend Weldon-16 for
this. Cheers'¦ EricR>>
|
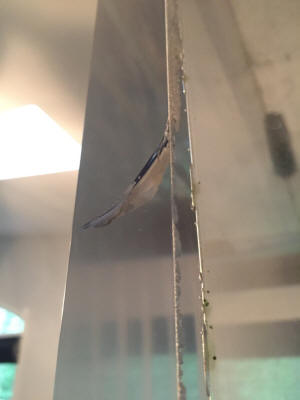
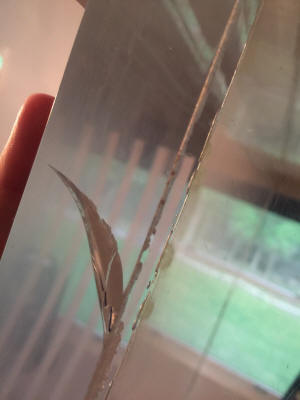
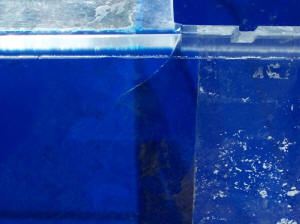
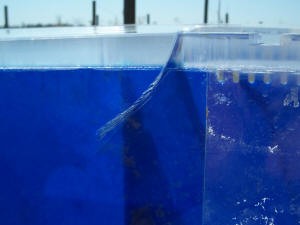
Help with crack repair on acrylic
aquarium 3/21/11
Hello -
<Liza>
I'm looking for some advice on repairing a crack in a 375g
acrylic aquarium. We purchased this aquarium used with plans of
upgrading our 180g; the crack was not present when we picked it
up so must have seen some type of stress during transit or while
cleaning.
<Mmm... I have a concern... Looking at pic tank + crack 3...
putting a straight-edge up to my computer screen... there appears
to be a significant construction defect in the cutting of the
back panel... Do you see this?
The piece is not square... It "rises up" toward the
right... and whoever has cut the top... it's about one inch
thick to the left and 1.25 to the right, over the overflow box...
a source of lateral stress (uneven tension)>
The aquarium is currently empty, one that we are working on
setting up so no concerns with impending catastrophes.
The aquarium is 96"x30"x30" and the crack is on
the top of the back panel (acrylic is 5/8" thick). The crack
is approximately 6" from the side right near one of the
corners for an overflow and extends downward at an arc towards
the middle of the tank and is approximately 2.5" (have
included pictures).
<I see this/these>
We have WeldOn 16 and 4 along with a large piece of .25"
acrylic on order - basically thinking we could weld a patch on
the back of the tank.
<Yes... solvent/anneal over the cracked area and a bit further
down>
Since the crack looks to be opened up at the top edge I'm
thinking that it is still under stress.
<Yes; this is my concern as well. Is the person who built this
tank about?
I'd like to talk with him/her>
We had also talked about drilling a small hole at the crack tip
to relieve the stress and prevent the crack from continuing to
grow.
<I would NOT do this>
Are we on the right track with this? Are we using the correct
thickness acrylic for the repair?
<This thickness should be fine. We share the concern re the
cause of this crack. I suspect that the two pieces mentioned were
mis-cut I've seen were you have recommended welding a solid
sheet across an entire panel to make repairs but the tanks were
much smaller - is it necessary to cover the entire 96" (we
were thinking more on the order of 24"x24")?
<It is not necessary to cover the entire 96"; the repair
you mention should work... IF the source of the uneven stress can
be fixed>
We would very much appreciate any suggestions or guidance to get
this tank back into useable condition.
Thanks in advance for your help.
Liza Cobb
<IF this tank was commercially made, I would have the folks
out to look at it. Bob Fenner> |
|
|
Re: Help with crack repair on acrylic
aquarium 3/22/11
Thanks for the quick reply Bob!
<Welcome Liza>
I had noticed the difference in thickness on the top panel but see
what you're talking about in regards to the back panel not
being cut even.
Unfortunately, the manufacturer of the tank is no longer in
business though still trying to get in contact with him.
<Rats!>
Did want to ask about your thinking on not drilling the crack - can
you share your thinking there? Also, any ideas on attacking the
problem of uneven stress - anything would help!
<Unfortunately, a spot/point of relief will not fix the overall
problem here. I will say a bit more re what would... That is,
cutting the top off, and the back, in essence and actuality,
re-squaring and re-solventing all these uneven pieces... I myself
would try the attached piece to the back first/ahead of this
extensive repair though... AND make sure the stand/support is not a
further source of trouble... IT must be level and planar/flat...
and I'd put a thin (1/2" or so) piece of (Styro)foam twixt
it and the tank to take out a bit of the stress on the
corner.>
Thanks again for all your help.
Liza
<Welcome. Bob Fenner |
Crack in 1 1/4" thick acrylic
2/5/11
I have an empty 540G tank made of 1 1/4" thick acrylic (96L x 27W
x 48H).
<This is a large height (four feet) for such thickness of acrylic.
The top is made of thicker material I hope/trust>
There is a crack in an end panel several inches long. My plan is to
overlay the inside and outside surfaces with new panels, using solvent
to bond them in place. I figure this is the only option, since removing
and
replacing the existing panel is not possible.
<Mmm, yes>
I have two questions: First, if I overlay the entire end panel (27 x
48) on both inside and out to strengthen it, bonding the entire surface
of each, what would you recommend as the thinnest sheet I could safely
get
away with?
<Quarter inch>
Second, if I wicked ultra-thin Weld-On into the crack, would it bond
the crack together just enough to disguise the crack?
<It might... but I'd do this "fill in" w/ whatever
density solvent you use for the added panel/s. I would also add
"doweling" (90 degrees squared toward the corners) to all
inside joints while doing this repair>
Thanks in advance.
Dan
<DO test outdoors (or in, w/ no one near the tank while being
filled)...
Bob Fenner>
Crack In The Overflow Of My Acrylic Tank --
12/20/10
I have a 125 Gallon Acrylic saltwater tank in use right now, and was
planning on adding a sump to it. It has dual overflows, and one of the
overflows has a crack around the hole about 2 inches long, right next
to the bulkhead hole. It does not extend past the overflow wall. The
main part of the tank itself does not have leaks, or cracks that I can
see. It has held water without issue for the 2 months that I have had
it. I was planning on using thin acrylic bonding agent along the length
of the crack, then testing the overflow chamber. Should I bypass this
test altogether and put a piece of acrylic over the top of the crack
and weld it on? Or will the Weld-on work enough by itself since it is a
lower pressure overflow area?
<<If done correctly, solvent welding the acrylic as you plan will
be sufficient. Make sure the area is clean and dry'¦ If
needed, press/clamp the repair to ensure a tight fit and use a
needle-type applicator to apply the water-thin solvent (Methylene
Chloride). Capillary action will draw the solvent in to the tightly
fitted crack. It doesn't hurt to apply the solvent from both sides
of the crack if possible to ensure a complete bond throughout. When
done correctly the solvent will recombine the molecules of the acrylic,
rendering it as strong as new>><RMF would cut, solvent another
piece of acrylic around the bulkhead AND crack area as well. On the
outside>
Thanks,
Andy
<<Happy to share'¦ EricR>>
Re: Crack In The Overflow Of My Acrylic Tank -- 12/20/10
Could I do the patch on the inside of the overflow around the
bulkhead?
<<You could, yes (I take it you saw Bob's comment), and this
is where I would do it to keep the bottom exterior flat>>
I am concerned about the bottom of the tank not being flat at the
bottom.
<<Indeed'¦ Since acrylic tanks are supported over the
entire surface of the bottom, any patch needs to go on the
'inside.' Something to consider also'¦will the
bulkhead you have still work with the added thickness of the patch?
Likely it will, but check to make sure'¦at worst you may
find you have to get a bulkhead with a longer 'tail' on
it>>
I have a hole in my stand, but only about the size to access the
bulkhead. I wouldn't be able to put a big patch there, without
emptying the tank and modifying the stand.
<<Go with the patch on the inside>>
Does it have to be around the bulkhead, or can I apply a patch along
the crack side only?
<<You probably can't apply a patch to 'just the
crack' and achieve overlap all around without it getting in the way
of the bulkhead fitting. I would cut the patch to fit the entire bottom
of the overflow, and drill it to match up with the existing throughput
opening>>
I was thinking about a small rectangle piece of acrylic in the corner
covering the crack, but not interfering with the bulkhead nut.
<<I would make the patch to fit the bottom interior as just
explained>>
What thickness should I use for the patch material?
<<If you go ahead and solvent weld the crack, and then solvent
weld the patch in place over its entire surface area (use a thicker
solvent like 'Weld-on 16' for the patch), ¼'
material should suffice>>
It doesn't have to be as thick as the bottom of the tank,
right?
<<Not for this type repair, in my opinion'¦but others
may feel differently [grin]>>
Great site and useful information. Thanks for the quick response
too.
<<Quite welcome'¦good luck with the repair.
EricR>>
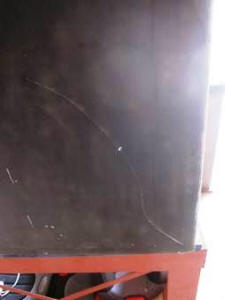
Acrylic repair or run? --
06/09/10
There's a nice 550 gallon 1.5" acrylic tank for sale locally
but it has a major through crack and two smaller ones that I can find.
I obviously would like to know if it is feasible and economical to
repair If I get it at a bargain price or run?
<Can't, won't render a high-confidence reply based on the
provided pix>
Attached are picks of the cracks, the major starts at a bottom corner
and goes up. Near it on the same side there are two small cracks that
seem be on the bottom piece:
<Are these cracks? The one large defect that begins in the corner
may be... can you feel it on the inside of the tank? The other two
appear to be superficial scratches... The repair, if the one corner
blem is serious, calls for annealing a panel of the same size, but
thinner... likely 1/2" will do it... over the entire back... Read
here:
http://wetwebmedia.com/marine/maintenance/maintindex.htm
the eighth tray down. Bob Fenner>
|
|