|
More FAQs about Overflows, Boxes and Plumbing:
Designs
Related Articles: Overflow Box Arrangements,
Plumbing Marine
Systems by Bob Fenner, Myth of the One Inch Beast
(Why Relying on One Inch Overflows... or Overflow! Is
foolhardy) by Scott Vallembois, The Flowrates through various Bulkheads
(In relation to overflow drains) by Scott
Vallembois & Mike
Kirkman, Plumbing Return
Manifolds, Refugiums,
Related FAQs: Overflows 1, Overflows 2, Overflows 3, & FAQs on: Rationale/Use,
Sizing, Through-Hull Fittings, Hang-On Selection, Plumbing, Troubleshooting/Repair...
Marine Plumbing 1,
Marine Plumbing 2, Marine Plumbing 3, Marine Plumbing 4, Marine Plumbing 5, Marine Plumbing 6, Plumbing 7, Plumbing
8, Plumbing 9, Plumbing 10, Plumbing 11, Plumbing 12, Plumbing 13, Plumbing 14, Plumbing 15, Plumbing 16, Plumbing 17, Plumbing 18, Holes & Drilling, Durso Standpipes, Make Up Water
Systems, Pumps, Plumbing, Circulation, Sumps, Refugiums, Marine
Circulation 2, Gear
Selection for Circulation, Pump Problems, Fish-Only Marine
Set-ups, Fish-Only Marine Systems 2, FOWLR/Fish and Invertebrate Systems,
Reef Systems, Coldwater Systems, Small Systems, Large
Systems, Water Changes,
Surge
Devices,
|
|
Overflows, Sumps and Pumps (Oh My!) – 08/16/12
Hello Wet Web,
<<Greetings Brenda>>
I've read a lot of your info since March of 2011.
<<Excellent…do keep reading!>>
You have helped me a lot and that is an understatement!
<<Ah! Is redeeming to know>>
I have a 55 gallon tall tank, 30’’ long, 24’’ high, and 18'' wide.
<<Ah yes…the ubiquitous 55>>
The glass is tempered, so no drilling.
<<Okay>>
I'm thinking of putting an overflow on the tank. The tank has some
corals, a few sps, lps and Zoas and mushrooms, plus a couple of fish. I
want to get a CPR overflow, but don't know which one. I would like to
get the one with 2-1.5’’ holes, I think it is a 1500gph, but am afraid
it might be too big for a 55 gallon.
<<Is more than you “need” in my opinion. Going with a smaller setup
(2-1” or 1-1.5”), and even then sizing/regulating your return pump to
provide flow equal to half the return’s capacity for redundancy/safety,
will be enough circulation yet a whole lot less headache re
noise/bubbles/plumbing issues et al>>
I also need to know what size sump
<<As big as you can fit…for many of the reasons just listed. But for
sure nothing “less” than 15 gallons>>
and what size pump?
<<For the size overflow I have recommended, something that will give
about 300gph with whatever head-loss your system will provide>>
As you can see I'm a little afraid of an overflow onto the floor with
all the water and I don't have the extra money for costly mistakes I'm
going to make.
<<Understood…but many benefits to be gained by adding a sump. Though
there are those (some here) who would say they would do without rather
than rely on a siphon-style overflow>>
Believe you me, I have made a few even with all the info I've read here
and other places!
<<Mmm, me too…even after many years in the hobby>>
Also if I don't go for the overflow which I really want, how many power
heads should I put in there and where is the best places to put them.
<<Enough sized to provide flow at some 500+ gph…and positioned near the
top to provide a “GYRE” type flow pattern>>
So what do you say guys, can you help a lady out?
<<Hope I have… Do research WWM re the terms I have used (gyre, head
loss, etc.), along with sump plumbing and design, and then come back
with more questions if you wish>>
Thank you.
<<Happy to share>>
I know you gentlemen
<<Ladies here too!>>
are very busy.
<<We’re here to help…>>
Brenda
<<EricR>>
Adding a Bulkhead Brace to an Aquarium --
11/16/10
Hello,
<<Greetings>>
I have a question for you guys.
<<Okay>>
I need to add a small piece of glass to an aquarium to hold a bulkhead
for a sump return.
<<As in to 'beef-up' the area where the bulkhead will be
installed? Not a bad idea in some instances, especially those dealing
with very thin glass panes>>
The current return drops down in the center of the tank. The problem is
I can't put a lid on it because the return is in the way and
several fish have jumped out. I was going to get lids cut with a piece
cut out of a corner at an angle then silicone a piece of glass on the
top of the tank to hold the bulkhead fitting so I can remove the lids
and still have the return in the tank.
<<Okay'¦'¦'¦'¦.me thinks I
follow you'¦>>
My question is can I silicone this piece of glass on the aquarium with
the fish in it?
<<As long as the area to which you are applying the Silicone/this
brace is clean and dry'¦yes>>
Would the smell kill the fish?
<<In my experience, when effecting small repairs/modifications on
aquaria with livestock present, the fumes from the Silicone have not
proven to be problematic re>>
The perimeter bracing is about 2 inches wide so I can't see any
other way to get a return line in the tank and still have lids on it.
Any advice or any other ideas?
<<Drilling the tank through the back or end panels near the top
(assuming it is not tempered glass), to install a bulkhead for the
return line, is one option. Another might be to use a plastic grid
material (e.g. -- plastic 'eggcrate') to cover the top of the
tank to prevent the fishes jumping out, and cutting a 'tight
fitting' opening for the return to pass through>>
Thanks
<<Happy to share'¦ EricR>>
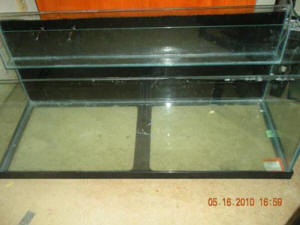
Question re. painting internal overflows
5/26/2010
Hi there. Quick question, or better yet a series of quick but related
questions. I have two black internal overflows on either side of the
back wall of my 6 foot long glass marine tank that I would like to
hide.
Ideally, I would like to replace these with a full length overflow as
Anthony Calfo describes in his book on Coral Propagation, however, I
can't see how I can do this given the 2 braces at the top of the
tank and where the tank is situated.
<Can be done, but these long overflows are far overrated. The
"surface skimming" payback is little to none in
reality.>
So.... the only thing I can think of is to "cover" the
overflows with a piece of acrylic that would extend from the top of the
overflows to the top of my live rock, in essence creating a bit of a
fake wall inside my tank.
I would use thin acrylic which will hopefully bend enough for me to get
it inside my tank, or if not, use 2 pieces to span the length of the
tank and place the seam in a place that is not too visible.
<I would either leave this or take it out entirely for larger
overflow drains. Covering it just costs you more space and in the end
will still be seen. The "teeth" of the overflow will still
need to be exposed.>
My questions....
Is this a bad idea? I realize I am creating some potential dead spots,
but intend to plumb my close loop manifold in a way that minimizes
this.
<I would not.>
If this is a bad idea, can anyone suggest a better one to hide the
overflows?
<I would replace them honestly. Drop Mike a line at info@glass-holes.com
and hash this out with him. Your overflows will not be large enough
anyway! See: http://wetwebmedia.com/BulkheadFloRateArt.htm>
I am reluctant to build up the rock high enough to hide them because
the tank is 30 inches high and only 18 inches deep.
If I were to do what I suggested above, it would defeat the purpose if
I used clear acrylic.
<It will not stay clear long.>
I am calling around for prices on sheets with a marine or navy blue
colour, but if I can't find any that are reasonable is it possible
to paint the acrylic sheet myself? In reading through your FAQ's
most advise against painting something inside the tank, however, some
message boards have indicated that there are paints that would
work.
<Honestly, by the time the tank matures you will not notice the
difference.
Save yourself some time, effort and money. Either go with the overflows
or opt for new ones.>
Thanks very much for your time. The service you provide the hobby is
truly amazing!
Andrew
<Welcome, Scott V.>
|
Reef tank flow with Calfo-style overflow
5/19/10
Dear Crew,
<FM>
It seems that at this point in time, hardly anyone has a
Calfo-style (end to end) overflow, so information given out of
experience is too sparse - hopefully someone among you will be
able to speak from experience. I do have to give a very special
thanks to Anthony Calfo for setting the example for use of this
type of overflow -- I'm hopping thrilled to have one
finally.
<Ok>
So here is the background information. I put a Calfo-style
overflow into a 75 gallon tank.(see attached picture), and need
to figure out how to do my returns. I have 2 of 1.5" drains
behind the overflow, but did not drill for returns
<Mmm, best to have drilled through the weir glass ahead of
installing it... if your intention was to run the return/s
through the back>
(wanted to limit risk to drain holes). I will be using the same
equipment that I currently have in use for my 65 gallon tank. The
pump for flow is a Gen X rated for 1,578 gph (my return pump is
rated just 258 gph and is in my refugium/DSB tank). My Gen X is
currently feeding a WAV Action Pro (these are manufactured by a
fellow WAMAS member Bruce, so you may haven't heard of
them... could give his website a visit perhaps), which together
give me enough good flow in the 65 gallon tank that I have not
had to use powerheads.
Since I have not drilled for return holes, the 2 returns that
come from the WAV, will have to go over the back of the tank. To
limit visual distraction, I am considering drilling return holes
in the overflow wall as a sort of proxy - that way I would still
have just the nozzles showing, as would be the case if the tank
itself was drilled for them (I can replace the overflow glass
easy, but not a tank...)..
<Can be done... but much easier before install as
stated>
So all that background information leads to my big question
(finally).
Since the Calfo-type overflow will have the surface of the water
in non-stop continuous sheet-like motion towards the back of the
tank, would having returns coming from holes drilled in the
overflow wall, a few inches below the top of the overflow, create
a proper type of wave-like flow for a hard coral reef tank?
<Likely enough so... though the more popular method by far is
to have interior pumps (Vortechs, Tunzes, Korallias...) and use
such outside sumps, refugiums for less flow purposes... not lose
space with such large overflow appliances>
Any suggestions of feedback for anything I haven't yet
considered (other than suggesting new equipment, because I
can't afford it)?
Thanks in advance my WWM friends!
<Mmm, if it were me, mine, I'd cut out the overflow
entirely, use the holes by themselves for intakes, drill another
for a return or run this over the top of the tank. Take a/the
long read here:
http://wetwebmedia.com/marsetupindex2.htm
the third tray down.
Bob Fenner>
|
 |
Re Overflow Pipe diameter question <<ScottV chiming
in>> 12/31/09
Hey guys, First I wanted to say thanks for the great write up on
overflow art!
<Dang! I kept hoping ScottV, the author would see, respond>
<<Scott here, missed this, sick dog yet but again....this danged
flu is kicking my butt!>>
I have designed my plumbing from your flow rate page, but had a quick
question.
<Ok>
First, my tank is a 75 gallon with a 50 sump and a 20 fuge. My return
pump is giving me about 700 GPH at head pressure. From this data, it
appears that I would want a 1.5" diameter pipe.
<Yes... even two>
<<Fo sho.>>
I have designed my
plumbing based on that, but I'm getting feedback on the forums that
the 1.5" drain line is not what I want, and I should go with a
1" (which seems to small based on your data.)
<Definitely too small...>
<<Way too many people in the forums nowadays are advocating for
using siphons in overflow lines. A 1" can flow 1200 gph in this
case, but it is just not reliable, nor wise. It WILL fail in
time.>>
Feedback
<... try it and see. If something we're important (like your
health), would you listen to "feedback?"... or people who
know what they're doing?>
is telling me that I should be just fine with a 1" drain line, and
that with a 1.5" drain line running out of a 6" by 9"
overflow box, that there might be too much air in the system, and that
could cause my overflow box to not drain properly and to back up and
overflow (due to the large volume of air in the system.) Do you think
this is a concern?
<... No. I KNOW it wouldn't. Wow, that's big!>
It would be bad to have my tank overflow out of the overflow box.
<<It would, the reason for the need for a larger, ideally
multiple, line.>>
I've bought my pipes and fittings from Lowe's (which I
could return if needed.) I bought a 1.5" bulkhead from marine
depot, but I could discount the cost and stay on a 1" pipe if I am
going to have issues with the system not draining properly.
<The larger and more numerous the overflow/s the better>
The overflow box came with a hole size for a standard 1" bulkhead,
and I was going to drill it out to make it bigger for a 1.5" (but
I have not done this yet.)
<<I surely would, and drill another while you are at
it.>>
Any info from you guys on this would be awesome, as I'm now getting
a lot of conflicting information on using 1" vs. 1.5" and the
fact that my overflow box might not be large enough to efficiently run
a 1.5" drain line without overflowing issues.
Thanks a lot!
Rob
<Keep reading, learning... Bob Fenner>
<<I know there is quite a lot of "info" out there re
overflow rates. I urge you to ask any that give you advice how they
have measured the results. Many in forums just speak from experience
claimed by others, some just make stuff up! I can tell you I have
personally spent many hours, days, even into weeks of my life setting
up, testing and actually quantifying (hence the article you looked at)
these numbers. They are real, those that run more (not think they do,
but actually do) should invest in several mops, maybe a large
shopvac.>>
|
Building External Overflow into Tank Wall --
11/26/09
Hi WWM,
<<Howdy Jason>>
I'm new to the hobby and planning my first reef tank, so I
apologize in advance if my lingo is not up to par. :)
<<No worries mate>>
I would really like to have an external overflow box, but I
don't want to rely on siphons to feed it.
<<Okay>>
I saw an example of the overflow 'teeth' built in to the
tank wall and this is what I would like to do.
<<Mmm, yes'¦I have seen photos of a couple
different such systems, and even considered doing this with my
own 375g reef tank before deciding on a more simple 'side
bulkhead' system of overflow drains, due to space constraints
on the 'outside' of my tank (is built in to a
wall)>>
I have attached a jpg which shows the teeth position relative to
the overflow box.
<<I see this'¦and though you don't say, I am
assuming this is/will be an acrylic tank?>>
I'm not finding much info on this design.
<<Do try a search of the forums on Reef Central. I know
this has been done (in acrylic) and discussed there
before>>
Is this feasible?
<<If we are talking an acrylic tank then yes, it
is'¦if you want to do this with a glass tank it is still
possible I think, though it will be more difficult and
expensive'¦assuming you can even find someone willing to
take on such a project>>
Any drawbacks to this method?
<<Not if well thought-out/designed>>
Do you know of any companies out there that could do this?
<<A good acrylic tank manufacturer should be willing to
work with you on a 'custom' design such as this. I would
try contacting a company like Tenecor and explain what you want.
Do also query the aquarium forums for information from folks who
also may have gone this route. If you can find the thread, I do
believe there is mention on Reef Central of an acrylic tank
manufacturer who can do/has done this>>
I am going to continue my search, but I may just go with a
horizontal internal overflow box.
<<What you want to do 'can' be done'¦just
up to you to decide how much trouble/expense it is worth to
you>>
Thanks,
Jason
Chicago, IL
<<Happy to share'¦ EricR'¦Columbia,
SC>>
|
 |
|
Re: Building External Overflow into Tank Wall --
11/27/09
Thank you Eric for the detailed answer. This will certainly help
in my quest. :)
Jason
<<Quite welcome... Good luck, and please do let me know how
it goes. EricR>>
|
Re: Current USA chiller, pb, overflows 11/3/09
Hello again,
My understanding is that a second overflow would be more ideal. I am a
glazing contractor so i do work with glass. I can cut, drill etc.. What
if i were to oversize my single 1-1/2" drain to a single 2"
?
<This would help... but two (holes and heads) are better than
one!>
After trying a pump head loss calculator my Poseidon pump is giving me
a flow rate of 1186.2 GPH
and with a 2" drain pipe with a straight shot will give me 1365
GPH. Do you think this would work with the incorporation of my chiller
in which my chillers output would be directed back to the tank instead
of the sump?
<Mmm, I REALLY wouldn't do this... Ed, after decades in the
business, seeing many set-ups, at least my own share of spills (sans
thrills) I can't encourage you enough to get going on adding the
"other" overflow. Having just one? Even w/o the added transit
volume from the chiller recirculating pump... is too much like risk for
me. Invariably, something will occlude the one intake... and yep, water
over the edge!>
What are your thoughts and what would you do? By the way i would be
using a CJ standpipe for drain. Much quieter than the Durso.
Thanks again
<I do agree... Please add the other overflow. BobF>
Re: Current USA chiller, pb, overflows, drilling glass,
grasping flow logic
Thank you, Bob, i guess my next step is to see if the bottom of my tank
(glass) is tempered or not so i can begin the drilling process.
<Run the lines over the top>
In my glass experience i know that when glass is tempered it has a logo
etched in it and you can not drill it. In your experience are most
glass bottoms tempered or not?
<Some are>
and do they have the distinctive logo on them?
<Not always, unfortunately, no>
Also if i add another 1-1/2" drain it appears that might be more
than i will be returning back to the tank. I would probably have to put
a ball or gate valve as not to drain more than i can return.
<? No... the amount returned will be determined by what you pump
up... B>
Thanks
Re: Current USA chiller, overflow box sel. --
11/04/2009
Thank you very much for your patience. One last and final question. So
can you recommend a good quality external overflow box that would be
ideal in my situation.
Thanks again
<Oh! Indeed I can and will. Please see our own ScottV (and partner
Mike's)
website: Glassholes.com. BobF>
Re: Current USA chiller, overflow box sel. --
11/04/2009
Bob,
<Hey Ed, Scott V. butting in here!>
This is perfect i believe the 700 kit will work in my situation. I am
sold.
Now that means with my existing 1-1/2 bulkhead that is giving me about
975 GPH will be implemented with an additional 700 GPH giving me 1675
GPH. Do you think this will work with the set-up i originally was
trying to achieve?
<I would just give Mike a call at the number on the site. Depending
on the placement of your existing hole he may be able to make you a box
that can incorporate both, combine the flow. As for what the bulkhead
will actually flow, it can do about 975 max in a perfect setting. Our
aquariums are rarely that. With plumbing combined with buildup in the
line I do not recommend more than 750. The G-H overflow is rated even
more conservatively at 700. And do not forget redundancy!!! But yes,
two 1.5" throughputs can serve a 180 fine. Do you have any
supplemental flow such as closed loops or powerheads? If you are going
to run both of the pumps discussed below I would even opt for dual
2" here. Call Mike and he can square you away.>
Thanks,
Ed
<Welcome.>
Re: Current USA chiller, overflow box sel. --
11/04/2009
Scott,
Thanks for butting in especially what might be late for you.
<Na, 7 pm here.>
I am just racking my brain and anxious to get my tank going. It is a
125 gallon. I only plan on having soft corals, live rock and some fish.
The only flow i will have will be the return (my PS4 Velocity Poseidon
pump) and the Sen 700 GA pump in sump for my 1/3HP Current USA chiller.
In tank i will also have a
Koralia 4 turbo pump rated at 1200 gph. also the Mag 9 that is in sump
for my in sump Aqua -C EV- 180 skimmer. Thanks again for all the
patience your crew has given me. Could not do it without you guys.
Ed
<For what you have planned the powerhead and return will be
sufficient.
Welcome, Scott V.>
|
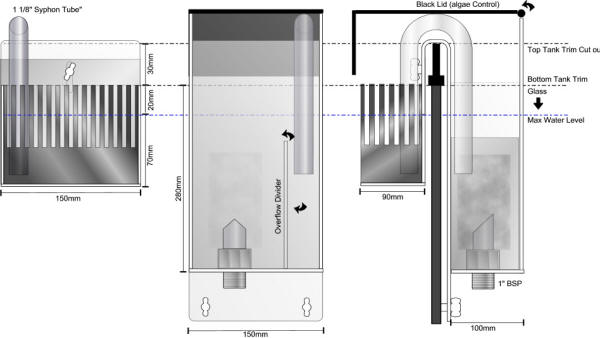
Overflow Box (for undrilled tank) Overflow box
selection and design 8/8/2009
<Hi Andrea.>
I should begin - the tank is not drilled and I'm afraid I
really am not in a position to do that now due to the massive
rock structure I have on the back wall.
<Understandably.>
I can see you guys are no big fans of these overflows but it is
what I am limited to. I am aware of the pitfalls and am quite
pedantic at cleaning / maintenance.
<I use them myself, as my tank is not drilled either. They are
fine as long as certain precautions are taken.>
I started my system with the AquaOne MariSys 240 and am ready to
upgrade my sump/refugium/skimmer etc. Big problem - the overflow
box that comes with the MariSys has been set quite snuggly within
my rock wall and the available off the shelf designs will not
fit.
<OK>
I have also read enough now to want to move away from the channel
style OFB (MariSys / CPR / Reef Octopus etc) and go with the U
tube design.
<That is the design I have and am quite happy with it.>
The one I have decided on (based on feedback and general positive
comments I've researched) has been the LifeReef design.
This is the link to the LifeReef website - product pages will
outline their pre-filter boxes.
http://www.lifereef.com/frame.html
I have read nothing but good reports on these OFB's. I will
contact them to see if they can make me this one but I'm
thinking the shipping to Australia is going to be a killer and
then what if something doesn't fit?
<Wouldn't worry so much about shipping, but fit could be
an issue. I would provide very accurate measurements of how large
you want it, and then as an added precaution, give him a
tolerance measurement: i.e. 100mm +\- 1.5mm >
I'm having nightmares thinking about all the drama I could
encounter dealing with a company on the other side of the
world.
<In the days of internet, cellular communication, and next day
shipping, it is not nearly as difficult as it once was.>
I'm pretty sure I could get it fabricated here. To me the
idea looks pretty straight forward in terms of acrylic work.
<True, nothing too difficult about it.>
When I built my rock wall (made with black foam / dried coral
rock etc) I was working around the MariSys inner box not really
thinking I would ever want to replace it.
<Hehehe, the only constant is change.>
As you can kinda see in the pic below - its all pretty tight room
wise.
It's ugly too (see attachments Plus a link to
Photobucket)
<Hmm, not too bad, You could go with clear acrylic in the tank
and it would vanish a bit better.>
http://i477.photobucket.com/albums/rr135/MadDogNoz/DSCF5626.jpg
I've tried to put something together that works with the size
limitations - more reliable and not so intrusive visually.
http://i477.photobucket.com/albums/rr135/MadDogNoz/AndreasOverflowDesign.jpg
<I cannot see any glaring faults in your design except if your
sump permits it, I would have two drain lines rather than one,
and also if possible, I would use something larger than 1'
(25mm) 1.5" or 2" (38mm and 50mm respectively) would
offer much more flow than a 25mm line will. It will also be
significantly quieter. Do read here:
http://www.wetwebmedia.com/SystemPIX/PlumbingPix/Oneinchart.htm
http://www.wetwebmedia.com/BulkheadFloRateArt.htm
http://www.wetwebmedia.com/plumbingmarart.htm >
I also wanted to add a lid/cover to slow some algae growth in the
siphon tube. If its too noisy, there's a good DIY site that
has a silencer for these OFB's.
<A lid would be a nice addition.>
The problem I have is, I'm not sure if I've left out some
crucial detail in terms of 'workability' in terms of
basic siphon principles? I get the basic idea (in theory) the U
tube should remain full unless it accumulates
air bubbles.
<Yes. I would also add a second tube just as a safety
measure.>
This design with adequate flow (rated at around 2400L/h) should
work well with the AquaBee 2000I return pump I plan to run in my
refugium What I am not sure about is how critical the height of
the divider in the outer box needs to be set at?
<Divider isn't really necessary, it may help abate some
noise, but I would be in favor of having it lower rather than
higher.>
Likewise, the U tube setting height wise etc.
<In as far as it will go, so both ends are always completely
submerged.>
Likewise in terms of the inner box ---- (there is an adjustable
butterfly nut to set the height but other than that, is this the
only method of setting the water level inside the tank?
<There are other, more complicated methods, but the butterfly
works just fine.>
As you can see, I've drawn in the absolute maximum water
level and the heights at which my tank trim comes up.
<I see this. Very nicely detailed drawing.>
I was wondering whether you have anyone there that has some
intimate understanding of these overflows to see whether
there's anything glaring that raises a red flag?
Other than what I've mentioned above as possible
improvements, I see no fundamental errors in the design.>
I plan to run a float limit switch that will cut the return when
the sump gets below a certain level to help safeguard a
blockage.
<A nice addition.>
Thank you for your wonderful reference site --- I have had a
really good search for this info both on here and other forums /
Google etc but am alas turning to you for some guidance.
<Happy you found it helpful.>
Kind Regards
<My pleasure.>
Andrea - South Australia
<MikeV - Central Florida.>
|
 |
|
Re: Overflow Box (for undrilled tank)
8/15/09
Many thanks to you MikeV for taking the time to give me these
ideas ... but if it's okay with you, I just wanted to be sure
I understand a few things?
<OK, Scott V. with you this go round.>
You mentioned:
<<<I cannot see any glaring faults in your design except
if your sump permits it, I would have two drain lines rather than
one, and also if possible, I would use something larger than
1' (25mm) 1.5" or 2" (38mm and 50mm
respectively) would offer much more flow than a 25mm line will.
It will also be significantly quieter.<<<
*** Okay that makes perfect sense to me. Once I've come
closer to working out how much room I have in the outer box, the
plan is to increase the outlet. Thank you!
<I will reemphasize Mike's comment. DO go larger and more
on the overflow drains. See:
http://wetwebmedia.com/BulkheadFloRateArt.htm and
http://wetwebmedia.com/SystemPIX/PlumbingPix/Oneinchart.htm>
>>> Yes. I would also add a second tube just as a safety
measure.>>>
*** Here is the confusing bit. I thought by adding an extra tube
I would effectively be reducing the speed the water travels
through the tubes.
I've done an awful lot of Google work trying to figure out
this all out so forgive me if the info I have is wrong, but
I've read where reefers have experienced some problems with
the U tube type OFB's due to (what I think was alluded to) as
inadequate flow (return). From what I can gather, the faster the
water travels through the U tube, the more likely any accumulated
air bubbles will flow right through. So my understanding was that
it was best to try to keep the flow at around what the overflow
tube is designed for - that being the 1 1/8" being about
600G or 2400L.
<More flow does help in this respect, but you really need two.
It is way too easy for one to become occluded or for the siphon
in the tube to fail.
As for bubbles building up in the tube, well, these types of
setups do require maintenance, periodic re-priming if
necessary.>
Mike, I have read enough on WWM to see where 2 tubes are
recommended for a back up. I thought too that was sound reasoning
should one block. Then as I continued my research it all got a
little jaded. I am worried that my pump won't be enough for 2
tubes ... and at some stage I need to consider the refugium and
the amount of water going through that. So there are limitations
right?
<I would worry far more about having just one tube rather than
the minor problems that come with lower flows through two. If the
one tube fails it will be instant, with two you will have time to
catch it.>
I guess I could put 2 smaller tubes in but then I would wonder
whether that is wise given smaller tubes are more likely to block
up? So if you could help me understand this then I'd feel
much better adding another tube.
<Stick with the tube diameter you have, I would not go any
smaller than this.>
>>>Divider isn't really necessary, it may help abate
some noise, but I would be in favor of having it lower rather
than higher.>>>
*** Okay - the baffle / divider I thought was there to ensure the
outer box tube end remained under water at all times? Can you
explain why it would not be necessary and why you think reducing
the height would be better?
<NO, please, this divider IS VERY NECESSARY. The box will not
work without it! Leave it be!>
>>>I see this. Very nicely detailed
drawing.<<<
*** Thank you! I made a few changes today --- added a coarse
sponge above the waterline to discourage snails from climbing in
... changes the lid to a cover that meets up with the inner box
and sits over the outer box ... increased bulkhead (that may go
bigger yet) and also decreased the height of the teeth of the box
to give me a little more depth in the inner box. Someone
mentioned the possibility of a vortex where air can be sucked
through in shallower water (inner box) so I figured I should make
that as deep as I can.
<Can be an issue.>
The backbone now comes all the way into the tank and the inner
box has 2 butterfly screws to attach directly. Finally I changed
the U tube to one that is more like a J - and that being so it
sits in the outer box deeper.
Updated picture added.
Sorry to be so nit picky but I really want to understand the
'whys' so I can sleep when this thing is running. I feel
like I've covered most what ifs but would love that extra
tube in there if only I could rest assured 2 tubes won't end
up giving me grief by not running through those tubes fast
enough.
<Two tubes are necessary to sleep well, two bulkheads to drain
the box too for that matter.>
Again, thank you
Regards
Andrea - South Australia
<Welcome, Scott V.>
|
|
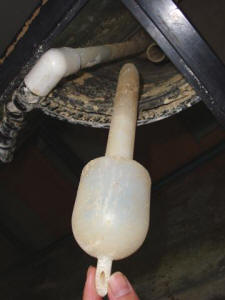
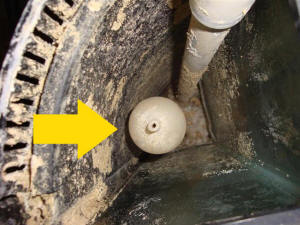
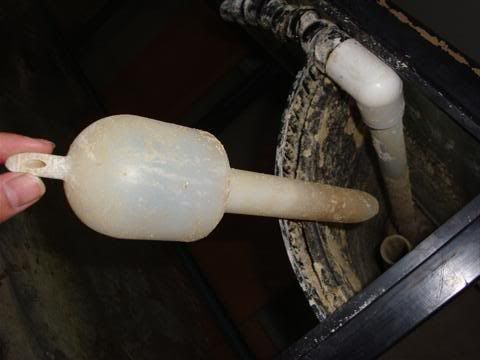
Unknown tank part in built in overflow
4/7/09
Hi!
<Hello Gretchen.>
I just purchased a very much used AGA brand 125g, with 2 built in
pre-drilled overflows. I am still in the process of cleaning it.
I found a piece in the overflow and I don't even know where
to being searching for
what this item is since I have no clue what it is called, nor
what it does.
<Hmmm...it was likely at one time tied to the drain on the
opposite overflow aspirating the line. It appears to be a
"resonator chamber", used mostly in engine type
applications. The idea is it smoothes out the air flow and quiets
things down.>
I posted on a forum that has some of the more knowledgeable fish
folk that I've seen, and they don't know what it is
either. I don't even know if it belongs in the drain
pipe.
<Not a drain, a component of one, like I said, it was most
likely tied into the opposite overflow line.>
It's a plastic bulb with an airline-sized hole on top, and a
hollowed stem which fits in the drain pipe. I attached 2 images,
and here are the links for the purpose of making it archive
friendly:
http://i722.photobucket.com/albums/ww227/wontonflip/125gallon/DSC00050Small.jpg
http://i722.photobucket.com/albums/ww227/wontonflip/125gallon/DSC00051Small.jpg
It is only in one of the overflows. The other one is missing.
I'm hoping one of the crew could identify it and tell me what
its purpose is.
<Skip it, run this line and the larger one in the other
overflow box both as drains with "Durso" type
standpipes.>
Thanks in advance!
Gretchen
<Welcome, see
http://wetwebmedia.com/diy_durso_pipes_jg.html
and
http://wetwebmedia.com/SystemPIX/PlumbingPix/Oneinchart.htm
for more on this plumbing and how to do it. Scott V.>
|
 |
Overflow advice request and quarantine story
4/6/09
WWM crew,
<Hello.>
First, I would like to say thank you for the knowledge I have gained
from this site. It has helped me immensely to both enjoy the hobby, and
also to improve the quality of the environment for the wet friends in
my home.
<Great!>
I have a unique problem that I have not seen a solution for while
searching the information available at WWM. I recently came into the
ownership of a 180 gallon tank. This tank appears to have been
originally manufactured as a fresh water tank which was then modified
to work as a saltwater tank. There is a 1-1/2' overflow and a
1' water return hole drilled into the back of the tank. There is
also a 3/8' thick glass overflow weir about 18' long installed
diagonally in the left rear corner of the tank.
<Okay.>
The previous owner of the tank was circulating the water with a Mag
1200, but I am planning on running the tank with more circulation than
that. I will be upgrading to a Reef-Flow dart, which should provide
about 2200 GPH flow (rough calculation based on the return head
pressure). The problem is that the tank has a central brace and the
height of the water when flowing with the Mag 1200 is currently
touching the brace which prevents the water on one side of the tank
from reaching the overflow. So I am looking for suggestions regarding
how to lower the water level in the tank. Is it possible to cut a notch
about 1' deep and about 8' wide in the overflow weir with a
diamond saw?
<It is, but I do realize that a single 1 1/2" overflow
throughput is good for 750 gph or so. With the water raising higher in
relation to the throughput it can flow more, but it is a balancing act.
Is the water level this high because of the weir or is the water level
high above (more than 1/2") above the weir?>
Or maybe it would be possible to cut a hole in the overflow weir to
lower the water level?
<In all likelihood it needs more draining, larger or more holes to
the sump.>
Ideally, I would like a solution that involves minimal impact to the
tank. There are complicated logistics dealing with the contents of the
tank, and water, however, since there are currently no fish in the tank
(see quarantine story below) maybe it's not a bad time to empty the
tank and deal with this issue. If I were getting a new tank I would
look for a better design, but since the tank is now in my basement,
that is not really an option.
<Understood, really though, if you need to tear the tank down to do
this it is worth it....we will see depending on your answers to the
questions above.>
I would like to share my recent and still ongoing experience with your
readers regarding quarantine tanks. I recently acquired 3 Bartlett
Anthias, and a Firefish for my tank. They were all happy in a 10 gallon
quarantine tank. After about 2 weeks one of the Anthias was dead, and
instead of following good practices -- which would have been to test
the water, or at least change the water in the quarantine tank, I
thought the best option would be to acclimate the fish to the main tank
water and put them in the big tank. REAL BAD IDEA!! Especially since I
had not determined the cause of demise for the Anthias. 2 days later I
noticed some white spots on the Anthias as they were swimming sideways
past me, I also noticed the Flame Angel rubbing himself against the
rocks and substrate. SO, I have now extracted almost all of the fish (
I still have to trap the 2 yellow wrasses) into my old 72 gallon, now a
quarantine tank where they will reside for the next 6 to 8 weeks, after
the wrasses are extracted. I have started Cupramine treatment, and
within 24 hours the fish are already looking better. It is important to
do the right thing (ie a quarantine tank) , but it also needs to be
done the right way, and every decision needs to be thought through. In
retrospect, I would have been better off to lose all the new fish
rather than risk everything in the main tank, but at the time I thought
I was doing what was best. Here's the timeline of events: The dead
Anthias was noticed in the quarantine tank on Wednesday morning, the
spots were noticed on Thursday, and the decision and action to move the
all the fish into the big quarantine tank was done on Friday night and
into Saturday morning. It is now Sunday morning as I am writing this.
Experience is such a hash teacher, hopefully this time I'll learn
something.
<A great witness for quarantine!>
Thanks again for a great site and sharing your knowledge.
<Welcome, do write back and we can go from there. Scott V.>
Re: Overflow advice request 4/7/09
Hello Scott,
Thanks for the reply.
<Hey Kirby, my pleasure.>
I'll try to clarify the points as requested. When the pumps are
turned off, the water is about 1/8" to 1/4" below the centre
brace. When the water is flowing it is about 1/2" above the top of
the weir, and almost at the top of the glass brace and therefore also
the top of the tank.
<Yep, I would lower this.>
The top of the weir is a straight glass edge.
The overflow outlet from the tank is near the bottom of the tank.
I have installed an elbow and a length of pipe to raise the water level
in the overflow to a point about 8" below the top of the weir.
The sump is on the floor in a utility room beside the room where the
tank is.
From the outlet of the overflow there is about a 4 foot drop in
elevation to the sump inlet. The tank overflow pipe outlet is below the
surface of the water in the sump, it always stays wet.
The tank inlet is between 5 and 6 feet above the pumps in the sump.
I have in tried supplementing the flow of the Mag 1200 with a Mag 950
and the 1-1/2" pipe from the overflow to the sump has no problem
handling the flow rate.
<It will handle it, yes.>
In fact there is a valve at the sump end of the overflow pipe that I
have used to throttle the flow from the tank to the sump to maintain a
slight level of water above the water intake strainer in the overflow
to eliminate the gurgling noises.
<Hmmm, this is a recipe for trouble....do not restrict the overflow
line. Just add an elbow or two to the standpipe you have to have the
inlet facing into the water, this along with a siphon break in the line
will stop the gurgling.>
Maybe a Durso setup would be a better idea, I'm not totally
comfortable restricting the flow out of the tank.
<Yes, exactly, see:
http://wetwebmedia.com/diy_durso_pipes_jg.html>
There is still some capacity for more flow through the overflow piping.
It may be possible to install a 2" bulkhead in the existing tank
overflow connection, but I am not sure. The hole for the 1-1/2 bulkhead
was bigger than needed, but I did not check to see if it was large
enough for a 2" bulkhead.
<It would be nice if there is.>
However, a 2" outlet may not be needed since the existing piping
has the more capacity to handle the flow as it is.
<Not much more.>
I think the water level can be lowered by lowering the weir, but if
there is a possibility that the weir could break and transfer that
break to the main tank then it's not a risk I'm willing to
take.
<Well, there is always the possibility of cracking the weir, but it
will not transfer to the tank
unless it is major error!>
If the tank is torn down to make the modifications, (which is really
the right thing to do)
<Yes.>
perhaps the best idea would be to just get a new piece (s) of glass and
make a new overflow weir, with "fingers" where the water
overflows.
<You certainly could. You also could indeed cut the weir down a bit
using a Dremel with one of their diamond bits. You can just set
yourself up a straight edge to guide the cut and just go slow.
This can even be done with the tank up and running, you will just want
to lower the water level a bit and tape some plastic bags around the
area to cut all the glass dust from the cutting. There used to be a
YouTube video that showed how to do exactly this, but I cannot find it
now. Just Google "cutting glass with Dremel" and you will see
many videos that give you the general idea.>
If (when) the tank is torn down, how long will the sand be ok with
minimal water on it?
<It will be fine for the time you will need to do all of
this.>
What's the best way to minimize the health effects to the corals
while any modifications are done to the tank? If I were to modify the
tank this way, the minimum time frame would be 48 to 60 hours out of
the tank, for the corals. That allows 12 hours for draining the tank
and making the changes, and 48 hours for the silicone to cure.
<Rubbermaid bins my friend! Put them in a bin or two, add
circulation and a heater and they will be fine for the
duration.>
Thanks again for your assistance.
Kirby
<Welcome, have fun!>
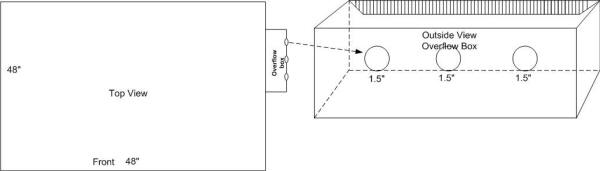
3-drilled holes in 120 gallon 2/20/09
Dear Crew,
<Hi there Gary.>
I love your site and have spent many hours browsing. Thanks for all you
do'¦
<Thank you!>
I inherited a 120 gallon 48x24x24 aquarium that has never seen water.
It has a custom overflow (right-side/middle) with 3 one-inch bulkhead
size holes drilled on the back glass at the bottom of the tank. These
holes are approximately 2' apart.
My question is what do I do with the 3 holes?
<Ok, how's about running water through them....joking!>
Option 1:
Use 1st hole as a drop with Durso to the sump (300-500gph?).
<300 at best, see:
http://wetwebmedia.com/SystemPIX/PlumbingPix/Oneinchart.htm>
Return would be the 2nd drilled hole with an Eheim 1250 or so pump.
Could I then use the 3rd drilled hole as a closed-loop with an
over-the-top return?
<You sure could.>
And, if yes, what size of pump would you recommend?
<1000 gph or so with this size input.>
Option 2:
Close up 1 of the drilled holes and use the other two as standard
in/out with a slower return.
I can move water in the tank with already-owned and modified
maxi-jets.
<A good option, but I would not plug any up. If anything make one an
extra drain to your sump for some redundancy.
I am personally a huge fan of powerhead use due to energy cost, they
just pump far more water for the money than
external pumps.>
Option 3:
Enlarge the holes somewhat -- please know that this scares me to death
as I am hundreds of miles from a LFS.
<This can be a bit scary, but not all that difficult. You will want
to fabricate some sort of template to guide
the bit. You can see one here in the video:
http://reefercentral.com/videos/flashinstalllarge.html. It all really
depends
on how close the holes are...you do want them to be a reasonable
distance apart. General rule is one hole width
between holes.>
Thank you very much.
Cheers
Gary Russell
<Welcome, Scott V.>
|
|

