 |
|
| Home | Marine Aquariums |
Freshwater Aquariums |
Planted Aquariums |
Brackish Systems |
Ponds,
lakes & fountains |
Turtles & Amphibians |
Aquatic Business |
Aquatic Science |
Ask the WWM Crew a Question |
| Please visit our Sponsors | ||||
Universal Pond Issues: Design
All ponds need to be thought through… fully considering what they’re
intended to achieve in sights and sounds, livestock accommodation,
growth, possible reproduction. The basin/s should be as large as
possible: to provide maximum stability, discounting variation in
temperature due to sun, wind. The setting should be drawn out on a
scaled drawing and space made available all around the water feature to
allow for human passage, landscaping and maintenance.
System size and shape are per all types of biological systems: the
bigger the better, with steep sides unless liability is an issue, to
again discount environmental variability and prevent animals getting in
or out of the basin/s.
The placement of a pond is of critical importance. Touching on the above
paragraphs, you want to site yours near structure (buildings, walls,
shading trees) to cut down on the influence of sun and wind, but don’t
want the basin edge/s to be too close such that you can’t get yourself
and tools around the edges to work on and in the system.
Universal Pond Issues: Construction
There are several useful, tried and true ways to build ponds; liner
only, liner with reinforcing mesh and concrete of some sort, block and
mortar, wood and liner, fiberglass, plastic molded; containers; all with
their up and downsides, pro-advisors and detractors. I urge you to
investigate these possibilities thoroughly before setting on one method.
Our businesses installed commercial and residential ponds in Southern
California, and almost always employed a liner with reinforcement and
concrete methodology. Why not liner only? These simpler constructs just
don’t hold up to the vagaries of heavy use; folks and animals getting
into and walking in the pond, poking the liner with sharp objects.
Having a poured, hand-packed, or (air powered) shot concrete shell over
the liner, and some reinforcing mesh for it to hang onto is the
simplest, fastest way of assuring strength, beauty and permanence to the
pond.
Basic installation of liner ponds involves:
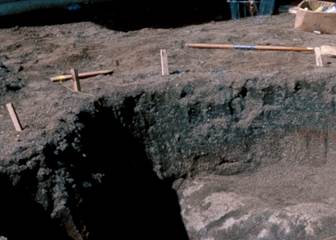
1)
Excavation: the removal of soil, rock, roots… making holes for the
basin/s to be constructed. These should be as steep and deep as
practical; allowing a shallow water bench and or just one or two areas
for easy entry and leaving the pond. Sharp rocks and roots that stick
out of the ground should be covered with old carpet or such to prevent
them from puncturing the liner.
2)
Staking up the edge/berm with wood pieces that have been sharpened
on one end to allow pounding into the ground.
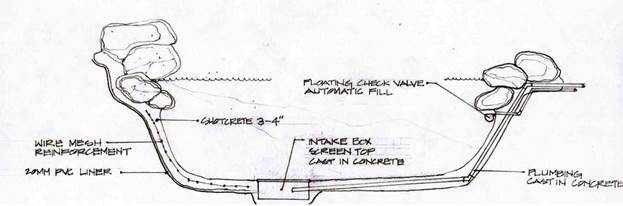
3)
Hanging of a flexible (pencil diameter or so) of rebar onto the
aforementioned stakes; with tie-wire, hog-rings…
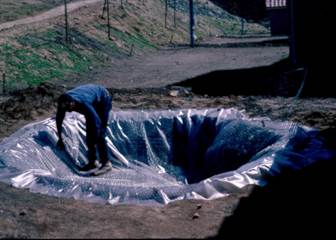
4)
Draping the liner loosely over the rebar hanger, attaching it
permanently by crimping hog rings over and through the liner with
pliers. IF a waterfall is being installed, it’s a very good idea to
either have part of the liner extend up and over the rock of the
functional “trough” or place an overhanging piece in said trough, having
it drop several inches into the basin it will service. Think about this:
the water never leaves the liner-covering… thus denying any chance for
leaking.
5)
Lying in the reinforcing mesh over the liner… Usually chicken wire
or stucco mesh (sans paper) for home-size basins; this material comes in
rolls, that you want to start by attaching via hog rings over the rebar
hanger and liner and loosely rolling into the basin. Take care that
loose ends (at the end of rolls), sharp wire points are left “rolled in”
to prevent their puncturing the liner. Successive widths of reinforcing
mesh are hog ringed together or overlapped to help them lie flat.
6)
Plumbing and any electrical conduit should be laid next; and yes,
INSIDE the liner. Flexible PVC may be used, and this too can be tied in
place or simply lay down. If you’re employing pre-made intakes of any
sort, or simply pipe terminations to be screened later, MAKE SURE and
fill the plumbing ends with paper, cloth… taped over; to prevent
concrete from getting in the lines.
7)
Emplacing the concrete (cement, sand, water and crushed rock
aggregate, plus maybe coloring agent, adjuncts like fiber, glue) is
next… either hand-packed (laborious) or accelerated via compressed air
(“shot-creted”). DO get plenty of help; professional if it’s within your
budget here. Wear old clothes… TAKE your time. Part of the greatness of
using liners is that all concrete work need not be done in a day; all at
once. Ease off if your back, arms, legs are fatiguing.
8)
Cure: keep the surface lightly damp by misting with a hose,
covering with canvas/bags… let the ionic solid, lattice-crystal
structure of the cement et al. gain strength by surface drying over a
few days.
9)
Lightly acid wash the basin, rock et al…. We used diluted (about
ten times…. “Doing as we oughta, adding acid to water”) HCl,
Hydrochloric Acid… swimming pool strength (3 molar); via water cans; but
you can use straight vinegar (Acetic Acid); food grade, straight. There
will be fumes that you want to largely avoid inhaling; hence, sprinkle
the acid down-wind. What you’re doing is removing a good deal of the
excess alkalinity; even if you used “plastic” cement in your concrete
and mortar mixes; as well as prettying up the surfaces, removing excess
material.
10) Rinse,
remove, rinse, remove the water from hosing down the now-cleaned basin;
fill up, and the hardest part; be patient. Don’t add livestock for now.
Instead:
11) Test the
equipment; pressure test the plumbing lines, check for leaks….
About Gear:
Unless you intend to have a plain reflecting pool that lacks
circulation, filtration lighting et al, you’re going to need a place to
sequester your pump, related plumbing and electrics. Better by far in
general that these mechanicals are mounted above grade (versus below) to
prevent water damage. It is still advisable to conceal them in some sort
of cover to prevent weathering and reduce noise, and best to situate all
behind
About Electrical:
Ah yes; water and electricity do NOT mix. All electrical outlets,
connections must need be run through or begin (at the circuit breaker)
with a Ground Fault Circuit Interrupter device; an electronic electron
counter if you will, that will cut the circuit should it detect less
electron flow coming back than flowing out. Operationally you’re
familiar with GFCI’s in your bathroom and kitchen outlets. They prevent
electrical shock and worse through your being grounded, and will do the
same for your outside circuits as well. Not only are their use a good
idea; in most places, their use is mandated by law. Get and use them…
now available for both 110-120 and 220-240 voltage circuits.
About Waterfalls:
In rainy areas one should pay especially close attention in building
sufficient support for rockwork, including basin-surrounding boulders,
but particularly for massive waterfalls. The latter really need a firm
foundation to prevent their weight settling into the ground, likely
breaking the material holding the rock together and stream/s intact.
Shown below is a basic form, reinforcing rebar and “stand-offs”
supporting these rods to allow the tamped concrete to span around them.
In some settings a “Class Two” foundation is preferable, with a base of
a few to several inches of crushed rock placed under the above
structure. In essence, this is a further-dug out whole that is
back-filled with (usually) ¾” nominal crushed rock of four inches or so
depth.
Means of Preventing Water
Intrusion:
Raised Berm: The simplest, most effective
means of keeping run-off and who knows what else in it (soil,
fertilizers, pesticides…) out of your pond basin/s is by not allowing it
to flow into them in the first place by building up an edge of along the
pond. As described above in the section on basic construction and shown
in detail below, the staked berm, re-bar edge, liner and reinforcing
mesh are purposely built up above grade, including any surrounding
rock-work, such that water flowing over landscape is diverted around the
pond and not into it. Of course, the overall grade must allow for
drainage away from the area.
Moat Diversion:
Just as around a castle, a moat can serve to take in and/or divert water
from inadvertently entering a pond. Many folks enjoy purposeful
landscape about their basins, so just providing a deeper, porous
planting area there can easily function as a working diverter. An added
bonus here is the dual work of the moat/planter in keeping folks and
non-human animals from getting into the pond itself.
Subterranean Drainage:
Various drain strategies around the pond can preclude water running in
from outside. French drains, or simply placing four inch diameter
periodically perforated corrugate/flexible line in a trough around the
pond, with batting (Dacron polyester) material atop, this covered with
crushed rock… allows percolation of water into the ground, and you
leading this in turn to drainage further downhill. If the ground, area
about is very level, you might need to employ a sump, pump and float
switch to blast water elsewhere under pressure.
Cloze:
A water feature can be an important part of almost all landscapes; even
ones in rainy settings. One just needs to take the lay of the land, do
some careful planning, and construct the basin/s such that what goes in
them is what you want, and not (usually) run-off. The ways for
accomplishing this are of a few variations on a theme of creating a
barrier and drainage away from the pond. There are good reasons to want
to control your water quality; including algae et al. pest control, as
well as preserving water quality for your intended livestock.
|
|
|||||||||||||||||||||

|
Features: |
|
| Featured Sponsors: |