|
FAQs about
Overflows, Bulkheads/Through-puts,
Stand-Pipes, Holes vs. Boxes... Sizing, Number,
Placement 6
Related Articles: Overflow Box Arrangements,
Plumbing Marine
Systems by Bob Fenner, Myth of the One Inch Beast
(Why Relying on One Inch Overflows... or Overflow! Is
foolhardy) by Scott Vallembois, The Flow rates through various Bulkheads
(In relation to overflow drains) by Scott
Vallembois, Plumbing Return
Manifolds, Refugiums,
Related FAQs: Through Puts Placement/Number/Size 1,
Through-Puts 2, Through-Put
Sizing/Number/Placement 3, Through-Put Sizing/Number/Placement 4,
Through-Put Sizing/Number/Placement
5, & Overflows 1,
Overflows 2, Overflows 3, Overflows 4, & FAQs on: Rationale/Use,
Through-Hull Fittings, Hang-On Selection, Plumbing, Troubleshooting/Repair...
Marine Plumbing 1,
Marine Plumbing 2, Marine Plumbing 3, Marine Plumbing 4, Marine Plumbing 5, Marine Plumbing 6, Plumbing 7, Plumbing
8, Plumbing 9, Plumbing 10, Plumbing 11, Plumbing 12, Plumbing 13, Plumbing 14, Plumbing 15, Plumbing 16, Plumbing 17, Plumbing 18, Holes & Drilling, Durso Standpipes, Make Up Water
Systems, Pumps, Plumbing, Circulation, Sumps, Refugiums, Marine
Circulation 2, Gear
Selection for Circulation, Pump Problems, Fish-Only Marine
Set-ups, Fish-Only Marine Systems 2, FOWLR/Fish and Invertebrate Systems,
Reef Systems, Coldwater Systems, Small Systems, Large
Systems, Water Changes,
Surge
Devices,
|
|
|
Acrylic Coast to Coast Overflow 12/19/17
Good Day,
I'm building an acrylic tank 60" x 60" x 30" out of 1" cast with top
bracing. Instead of 1 long opening on the back, I have 2 cutouts, 2-1/2" x 18"
for a semi coast to coast overflow.
<Mmm; am concerned re the structural integrity of the back now....>
They have a 6" gap between them. The top will attach in 3 places for added
strength.
<Good for the top; what about the back?>
I made the overflow box 40" x 12" x 12" . 1" thick material. Inside dimensions
are 38" x 11" x 11". I plan on having it 1/2 to 3/4 full of water when running.
My question is about the support needed for the box.
Will welding it to the tank be enough support or should I weld triangular
support gussets under it. If so will 2 work (one on each end) or will it be
better to put 3 under it?
Cheers,
Dana
<Good questions (whew!). I would add the gussets you mention. As large and as
many as you deem reasonable. Bob Fenner>
Re: Acrylic Coast to Coast Overflow 12/19/17
Bob
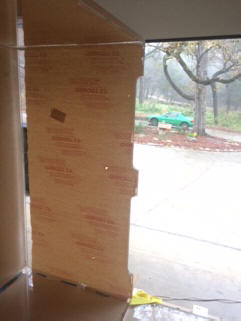
Here is the tank on its side. I took a picture of the back so you can see the
cutouts.
You think the back will be a problem even with the top having those 3 places as
attachment points?
<Too much stress on the remaining span... I would not have cut this tank like
this...>
Cheers
Dana
<I do hope there aren't (catastrophic) problems here. Bob Fenner>
|
 cutouts on right vertical
 |
Recommendation of pipe size to use from tank to sump
3/2/17
I am setting up a new Marineland 93 gallon reef-ready tank
and have a question on what size to use on the overflow line
from the tank to the sump.
<Oh, are these units still about? >
The overflow pipe that came with the tank (from the top of the tank to
the bottom outlet bulkhead) is 1 1/2" PVC but goes into a reducer at the
bottom that takes it down to 1" to go through the bulkhead.
<Uggh! Too small to be of real use>
My sump has single inlet that is also 1" pipe. The return plumbing is
all 1" pipe.
Is there any advantage for either increased flow or quieter water
movement if I use anything bigger than 1" PVC from the overflow to the
sump?
<Oh, yes... what's the formula for an area of a circle; pi R squared?
Try some examples>
Or is it the same if I just plumb everything using 1" PVC?
<The same what? Read here:
http://www.wetwebmedia.com/SystemPIX/PlumbingPix/Oneinchart.htm
and the linked files above; re options... My long and short: DO most of
the circulation in the tank... USE the sump as a too-small refugium,
gear holder. Bob Fenner>
Thanks!
Plumbing issue 6/15/15
Hey guys question for you... I just got the new 90 up and running yesterday but
today I have a problem... I have a 90 gallon deep blue RR system
<Not the one inch plumbed MarineLand system I hope/trust>
all hard plumbed, reverse duroso in the sump and the stock duroso in the
overflow, I am running a Mag 9.5 with a manifold running my uv, carbon and gfo
reactors plus the return. I installed 2 RW-8 pumps this is my problem I think.
They are placed on opposite ends of the tank, the one near the overflow is
pointed downward and the other is pointed straight across the
tank back at the overflow, I have them running in "C" which is alternating
pumps. My problem is as they are alternating, the level in the overflow drops
and rises and so does my pump chamber which is causing my vent on my reverse
duroso to shoot out water. How can I fix this and have you ever heard of this
before?
<Yes; I'd try moving the internal pumps first.... to another corner, perhaps
just a bit lower in the tank... away from the overflow. I would put a piece of
pipe (riser) on the Dursos, and maybe a reducer to like 3/4 or 1/2" w/ a small
piece of pipe (just pushed in, no need to solvent) in this/these in turn... to
quiet down, reduce splash and spray...>
...I have already drilled bigger vent holes for 1/2 flexible pipe and it did
make it silent but no help on the surging water levels...
<And a note again re the diameter of overflows... yours may well need to be
larger, re-drilled, or at least added to here... the 9.5 will overwhelm 2 and
more 1" IDs. Bob Fenner>
Fluctuating Sump Level; one inch drain line/s
11/9/14
Dear WetWebMedia,
<Mich>
Thank you so much for your service to the aquarium trade. I have
successfully kept a reef tank for seven years. My original fish are
still alive and thriving. I owe it to following the advice I've learned
on this
website.
<Ahh>
I apologize in advance for my lack of physics knowledge. I also
apologize for the lengthy email as I don't know what information is
important. A couple months ago I moved and had my reef tank upgraded to
a 120 gallon tank at the same time. It is a room
divider tank and visible on three sides. The overflow is located on one
side of the tank. It currently has one 1" drain
<Mmm; too small... needs to be... "over-sized"... at least 1.5 inch for
this volume system, sump... in fact, two drain lines would be preferable
to one... Oh, I see below...>
with a Durso, one 1" drain that is unused,
<I would use this drain as well>
and a 3/4 inch return. The return is rated at 1200 GPH. There have been
problems from the start. The Durso appears to be tuned correctly with no
flushing. To start, the drain line vibrated/shook and sounded
like a dishwasher.
<Yes; overwhelmed... siphoning intermittently.... maddening noise wise>
We attempted to solve it by cutting the drain line shorter to allow it
to hang straight down and just below the water level in the filter sock.
The noise and shaking continued.
<Ah yes>
We then drilled a few holes in the line to allow air to escape. This
greatly reduced the shaking and noise, but did not eliminate it.
<Won't do so... either have to slow the rate of flow down (by pumping
less), OR adding another drain (of size), OR re-drilling the present
drain line, fitting a larger through-put/bulkhead fitting and larger
diameter
pipe>
I have an auto top off unit in the sump/refugium that beeps if the water
level rises above the sensor. At least once a day the water level in the
sump rises and sets off the alarm. Tonight when it happened, I watched
the sump water level go back down to below normal. I then noticed that
the water level was unusually high (by a couple inches) in the overflow.
The water level was higher, but not "flushing." It also seemed like the
drain line was substantially quieter. I turned the pump off to check for
an obstruction in the drain line, but couldn't see anything. When I
turned the pump back on, the level in the overflow was back to normal,
but the level in the sump was too high again. It makes me nervous having
the water
level fluctuate like that.
<Ah yes>
Do you have a guess as to what the problem is?
<Indeed I do... very common w/ undersized plumbing as you have here...
the system is oscillating twixt flow and siphoning down the one drain
line... when the water is backed up in the upper tank, the sump is
drained sufficiently to set off the auto top off alarm...>
I'm assuming the problems have something to do with the drain not being
able to handle the return rate. Is that correct?
<Ah yes>
If so, would it help to utilize the extra 1" drain?
<I would employ it and hope it does so>
If so, is it ok to have two dursos in the same overflow?
<Yes>
I already inquired about making the drain holes bigger, but was told the
holes were as large as they could be with there being three holes in the
same small area.
<Yes; an engineering/design defect. There have been quite a few
commercial systems... and custom with this mistake>
Thank you in advance for any help you can give me.
Michele
<I would first try using both one inch drains... IF this doesn't "do
it", I'd slow down the rate of flow to/from the tank... and provide more
flow INSIDE the main/display tank with submersible pumps (see WWM re);
using the sump less... IF this doesn't satisfy, the present holes can be
abandoned, a piece of material placed over them and the tank/drain area
re-drilled, WITH one larger drain line (2" if it were up to me) and a
one inch return. Bob Fenner>
Re: Fluctuating Sump Level
11/10/14
Thank you so much for your help! We opened the second drain line and
added another Durso. So far so good! It looks like it is now draining
properly. And the tank is so much quieter!
Thanks again, Michele
<Ahh; good news. Thank you for your report. Bob Fenner>
Water Flow/Volume... <<RMF addenda>>
5/13/13
Your site is awesome, not enough hours in the day to sit and read all
the information that is available. I also think my wife is starting to
feel a little neglected. oops. As for my questions, I have a
6' long 125 gallon aquarium with an additional 75 gallons in a sump and
a refugium. My goal is a reef system with limited fish,
mostly inverts and corals. I am particularly drawn to LPS coral and some
polyps. The display tank is on main floor, and
equip is in a dedicated basement room. If "dilution is
the solution" for reducing pollution would my tank benefit from adding a
175 gallon poly tank in my basement. I have plenty of room. I
currently have a Mag 36 pumping water from sump to DT, gravity
would provide flow from DT to poly tank then sump with skimmer, then
refugium and then to pump chamber in sump. I would raise the poly tank
off the floor so I could drain some water from bottom to remove any
settled detritus from the tank. The pump is reduced to 2200 gph because
of head pressure, and reduced more due to plumbing size restrictions.
I'm not sure final actual water circulation. I don't have any
other pumps or power heads running, I was relying on the Mag drive.
My tank is drilled and has overflows in the 2 back corners and 2
additional bulkheads installed near the top also on back wall. I
believe all 4 bulkheads use 3/4 pipe fittings which are too small I know
but its what I have. This creates a lot of water noise due to
volume moving thought small piping.
<<Yes; I'd abandon or drill out these fittings, through-puts... replace
w/ 1.5", or 2" ID>>
I am wondering if I would be better served by replacing the Mag 36 with
something smaller like around 750-1000 gph after head pressure
adjustment, returning this water to DT thought the 2 bulkheads in the
middle of the back wall, then add another circulation pump attached to a
closed loop system with 4 or 6 outlets.
<<Yes; much better served. Along w/ the (still) redrilling of the
overflows (and as large a fitting diameter as the discharge on the
volute of the pump you settle on for the sump/main tank return). I would
definitely do this>>
Water only escapes the DT from the top of the water column in the overflow
boxes, should I be removing water from near the bottom of the tank also?
<<Mmm, not likely of use, much benefit, IF you're adding sufficient
'in-tank' circulation... this latter will "stir up" the bottom water
enough...>>
If so how is this safely accomplished.
<<.. Can be done in a few ways... a "tee'd" (aspirated to the air at the
top to break/disallow siphoning) line that has an extension to the
bottom area is likely best for this sort of hobbyist setting). Again, I
wouldn't do this>>
I plan on using a DSB soon.
<<Good>>
Also I use 3 -175 watt MH lights, do you feel this is enough for LPS like,
frog spawn, hammer coral, bubble coral and so on... I have been
considering switching to 250 watt MH... thoughts?
<<Mmm... I wouldn't likely switch from the 175s... better to just raise
the LPS, other "light intensity loving" corals to higher levels on
rock... use a PAR or PUR meter to ascertain light energy.>>
or maybe consider LED
<<Ah yes; if you can afford the initial investment... look to units that
can be modified, adapted to another (likely larger) system>>
instead. I'm thinking I need to do something different with lighting
because my frogspawn is not opening big for a while now and also my
zoo's haven't been opening either.
<<See WWM re allelopathy... the better chance of what's going on here.
Bob Fenner>>
I tested and have 0 ammonia, 0 nitrites, 10 nitrates, (down from 20
forever.. finally progress) 8.3 pH, 425 calcium, don't have alkalinity
or phosphate test. Thinking its water flow or lighting. I sincerely
appreciate what the staff at WWM does, living in western Iowa there
isn't much for LFS here. Plus never get same answer twice. Thanks
again for giving of your time and opinions.
Thanks
Shawn
<Hi Shawn,
I'm Darrel - I usually answer reptile questions and although I have a
Marine tank, I usually leave the aquaculture questions to the real Pros
like Bob, James, Neale, etc. When I do chime in, it's on the
engineering level at which I am very well qualified.
The reason your letter caught my eye is because I, too, like doing
things in a large scale and rely heavily on the engineering aspect to
solve the technical problems -- so for that reason only, I want to chime
in on one, tiny concern I have ... just food for your consideration --
AND NOTHING MORE -- then leave the real answers to the real pros.
Yes, Dilution is a great solution or at least a really great
asset in our systems. With enough back-tank storage, you can
make a 125 gallon tank carry the bio-load of a 350 or 400 -- we just
think of it as a 400 gallon tank with all the fish residing in the same
125 gallon portion of that much larger amount of water.
It's a cool and elegant solution.
Until the power or the pump fails -- and suddenly the 350 gallons of
bio-mass are now stranded in the 125 gallon portion of the tank where
the toxicity now increases exponentially. Since the bacteria of
the nitrogen cycle grow on virtually ever wet surface in your system --
and they grow to the limit of their food source. What I'm saying
is that in the proposal you mention below (125 gal tank and then 75 + an
additional 175 in the basement) maybe as much as 2/3 of your nitrifying
bacteria are now cut off from the system in which the bio-mass resides.
My concern would be that completely separate circulation systems are
absolutely necessary in a situation like that and in reality there
should be a third, totally separate circulation system that uses a low
volume, low power pump that is fed from a backup UPS system like we use
in home computer systems. >
Water Flow/Volume – 05/13/13 /EricR
Your site is awesome,
<<Thanks…a collaborative effort>>
not enough hours in the day to sit and read all the information that is
available.
<<Indeed>>
I also think my wife is starting to feel a little neglected. Oops.
<<Uh-oh>>
As for my questions, I have a 6' long 125 gallon aquarium with an
additional 75 gallons in a sump and a refugium. My goal is a reef system
with limited fish, mostly inverts and corals. I am particularly drawn to
LPS coral and some polyps. The display tank is on main floor, and
equip is in a dedicated basement room. If "dilution is the solution" for
reducing pollution would my tank benefit from adding a 175 gallon poly
tank in my basement?
<<It would…as long as you don’t overstock the display beyond what can
“get by” for a couple hours in the event of a power outage>>
I have plenty of room.
<<Go for it!>>
I currently have a Mag 36 pumping water from sump to DT,
<<A big pump…>>
gravity would provide flow from DT to poly tank then sump with skimmer,
then refugium and then to pump chamber in sump.
<<Ok>>
I would raise the poly tank off the floor so I could drain some water
from bottom to remove any settled detritus from the tank.
<<Good idea>>
The pump is reduced to 2200 gph because of head pressure, and reduced
more due to plumbing size restrictions. I'm not sure final actual
water circulation.
<<Easy enough to test if you can direct the output on to a container of
known volume and “measure” how long it takes to fill>>
I don't have any other pumps or power heads running, I was relying on
the Mag drive.
<<I personally prefer to not run large volumes of water through my
sump/refugium/et al, and use “propeller” pumps (e.g. – Tunze Stream
Pumps) to create flow within the display. Not only are the
propeller pumps much more efficient re…reducing transient flow through
the display/sump greatly reduces or eliminates issues with noise,
bubbles, etc.>>
My tank is drilled and has overflows in the 2 back corners and 2
additional bulkheads installed near the top also on back wall. I believe
all 4 bulkheads use 3/4 pipe fittings which are too small I know but
it’s what I have. This creates a lot of water noise due to volume moving
thought small piping.
<<I have no doubt>>
I am wondering if I would be better served by replacing the Mag 36 with
something smaller like around 750-1000 gph after head pressure
adjustment,
<<I think you could even get by even with 500 gph after head-loss>>
returning this water to DT thought the 2 bulkheads in the middle of the
back wall, then add another circulation pump attached to a closed loop
system with 4 or 6 outlets.
<<You could do the closed-loop…but you will use a lot less power with
MUCH better flow by dispensing with the CL and going with a couple
propeller pumps>>
Water only escapes the DT from the top of the water column in the
overflow boxes,
<<As it should…to help keep the organic film that develops at the
air-water interface cleared away>>
should I be removing water from near the bottom of the tank also?
<<Not in my opinion…you don’t want to drain the display dry in the event
of a power interruption. In fact, your overflows at the surface should
be set so that your sump can easily handle/hold the transient water
volume in such an event>>
If so, how is this safely accomplished?
<<It isn’t>>
I plan on using a DSB soon. Also I use 3 -175 watt MH lights, do you
feel this is enough for LPS like, frog spawn, hammer coral, bubble coral
and so on...
<<yes>>
I have been considering switching to 250 watt MH... thoughts?
<<Not necessary here>>
or maybe consider LED instead.
<<Is an option>>
I'm thinking I need to do something different with lighting because my
frogspawn is not opening big for a while now and also my zoo's haven't
been opening either. I tested and have 0 ammonia, 0 nitrites, 10
nitrates, (down from 20 forever… finally progress) 8.3 pH, 425 calcium,
don't have alkalinity or phosphate test.
<<Do get a test kit and check this…low Alkalinity may well be the issue
with your corals>>
Thinking it’s water flow or lighting. I sincerely appreciate what the
staff at WWM does; living in Western Iowa there isn't much for LFS here.
<<We’re happy to assist>>
Plus never get same answer twice. Thanks again for giving of your
time and opinions.
Thanks,
Shawn
<<Happy to share… EricR>>
Re: Addended: Water Flow/Volume 5/13/13
Thanks Bob
In your opinion then would I be better served using a pump and closed
loop with multiple openings or just use a couple propeller pumps in the
DT.
<The latter by far... See WWM re... closed loops are passé for several
fundamental reasons.>
In 125 g tank what volume of water should I be looking at moving.
<Also gone over and over... Do you need help using the indices, search
tool? B>
Shawn
Overflows, Sumps and Pumps (Oh My!) – 08/16/12
Hello Wet Web,
<<Greetings Brenda>>
I've read a lot of your info since March of 2011.
<<Excellent…do keep reading!>>
You have helped me a lot and that is an understatement!
<<Ah! Is redeeming to know>>
I have a 55 gallon tall tank, 30’’ long, 24’’ high, and 18'' wide.
<<Ah yes…the ubiquitous 55>>
The glass is tempered, so no drilling.
<<Okay>>
I'm thinking of putting an overflow on the tank. The tank has some
corals, a few sps, lps and Zoas and mushrooms, plus a couple of fish. I
want to get a CPR overflow, but don't know which one. I would like to
get the one with 2-1.5’’ holes, I think it is a 1500gph, but am afraid
it might be too big for a 55 gallon.
<<Is more than you “need” in my opinion. Going with a smaller setup
(2-1” or 1-1.5”), and even then sizing/regulating your return pump to
provide flow equal to half the return’s capacity for redundancy/safety,
will be enough circulation yet a whole lot less headache re
noise/bubbles/plumbing issues et al>>
I also need to know what size sump
<<As big as you can fit…for many of the reasons just listed. But for
sure nothing “less” than 15 gallons>>
and what size pump?
<<For the size overflow I have recommended, something that will give
about 300gph with whatever head-loss your system will provide>>
As you can see I'm a little afraid of an overflow onto the floor with
all the water and I don't have the extra money for costly mistakes I'm
going to make.
<<Understood…but many benefits to be gained by adding a sump. Though
there are those (some here) who would say they would do without rather
than rely on a siphon-style overflow>>
Believe you me, I have made a few even with all the info I've read here
and other places!
<<Mmm, me too…even after many years in the hobby>>
Also if I don't go for the overflow which I really want, how many power
heads should I put in there and where is the best places to put them.
<<Enough sized to provide flow at some 500+ gph…and positioned near the
top to provide a “GYRE” type flow pattern>>
So what do you say guys, can you help a lady out?
<<Hope I have… Do research WWM re the terms I have used (gyre, head
loss, etc.), along with sump plumbing and design, and then come back
with more questions if you wish>>
Thank you.
<<Happy to share>>
I know you gentlemen
<<Ladies here too!>>
are very busy.
<<We’re here to help…>>
Brenda
<<EricR>>
|
Re still having trouble with layout and believe me I have
read...and read..... SW overflow pb... 6/25/12
Appreciate all you do. I am setting up a new tank, 60" x 18" x
26",
visible from 3 sides. I want to use a Beanimal <check your spelling
here>
version of the coast to coast overflow. At the same time, I
would like to install a closed loop manifold.
<... these are really not the more/most useful, best available
arrangements nowayears... Better by far to use internal pumps
for most circulation, a minimum of overflow tech. to convey water out/in
of systems...>
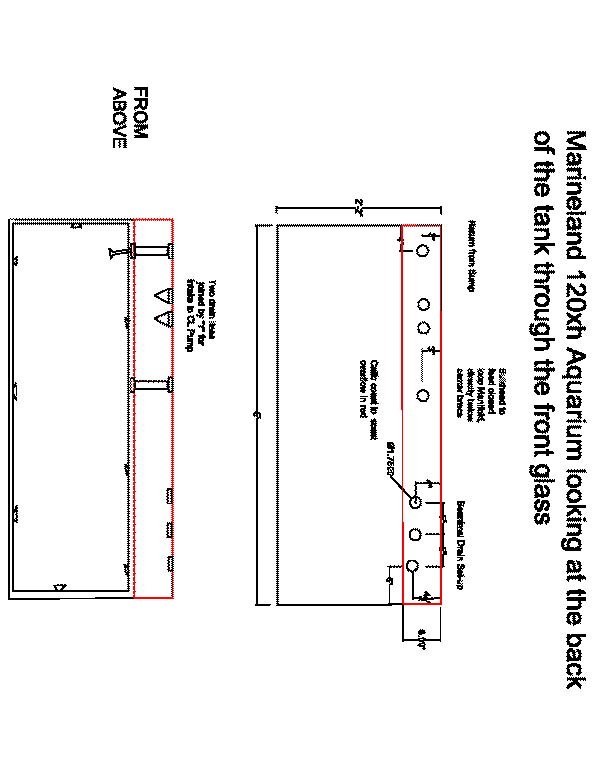
A. The problem I am having is, Where
and how many holes do I need to drill into the back of the tank.
The "where" is an issue for me because of the coast to coast design.
If I make the overflow a true C2C, then the return from the sump would
empty into the "trough". Don't think that's acceptable ;)
<... Please read here:
http://www.wetwebmedia.com/thrhullsiz6f.htm
and the linked files above>
Available options I see are:
(1) Delete the drilled sump return and come over the top, not really
what I want to do. {the red line is the C2C}
<I would definitely NOT do this>
(2) Drill an additional hole for the same size bulkhead in the front
panel of the C2C directly perpendicular to the Sump Return in the back
wall and span the C2C with a short section of PVC to the second Bulkhead
[see attachment ] and into the tank. This same process would have to be
repeated for the CLM Plumbing and I would have to figure out a way to
attach the Manifold PVC to the top front of the C2C Front Panel,
since I could not zip tie it to the tank frame here. I would also be
forced to cut across the sump return with the manifold plumbing [see
attachment from above]
<A possibility... >
(3) Make the Coast to Coast an Almost C2C by cutting its length short of
the Sump Return. not my favorite idea. Clears the return, but doesn't
alleviate EITHER the manifold still needing to be attached to the front
glass panel of the C2C OR the manifold requiring the plumbing to come
through the C2C.
My question is, am I missing something, a better way perhaps?
<Read where you've been referred... there are other possibilities>
B. As for my dilemma with the number of
drilled holes in the back glass, based on my research I need 7. [See
attached drawing] Will this endanger the structural integrity of
the tank?
<More holes, more poss. problems... I'd keep these to a minimum... like
two>
I would really appreciate any guidance you guys can give me.
Thanks,
Darrell
<Just my opinions, personal et al. experiences. BobF>
|
 |
New custom build - 05/11/2012
|
|
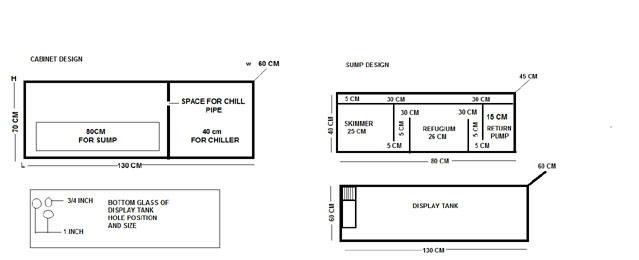
Hi crew! Hoping to trouble you again with my questions, this time about a new
build I am planning. I am looking at a 130 by 70 by 60 cm tank with orphek LEDs,
a reef octopus extreme 200 skimmer, 2 vortech mp40s and a 3 pump doser. I have
sketched out a design and was hoping to get your thoughts on it. In particular,
I am unhappy with the sump and fuge but not entirely certain how to improve
these. I am already looking at increasing the size of the sump by removing the
space allocated to the chiller.
|
|
wwm: Good
|
|
Doubt I will need the chiller given the temperature of the room. I was also
looking at changing to a central overflow with a split return to improve flow.
|
|
wwm: The
position you show here (in the back corner) is fine... I'd likely settle on one
overflow line of 1.5" ID, rather than the two one inch ones shown... pi r
squared will show you that the single larger will accommodate much more flow,
and there's less likelihood of crack issues
|
|
I would appreciate any other suggestions you have as well. Cheers, Paul
|
|
wwm: Do scan
here:
http://www.wetwebmedia.com/marsetupindex2.htm Bob Fenner
|
 |
|
Re: New custom build
– 05/13/12
<Ahh, please do>
Thank you. I will revise and run it by you if you don't mind. Have a few new
ideas.
Cheers,
P
<And you, BobF>
|
|
HOLES 4/13/12
BOB ,
The tank builder has drilled a hole through the base of DT the
glass of which has then been toughened and tempered.
<Really?>
Its in an inside weir compartment so can only drain that
overflow/weir.
Knowing your professed antipathy to holes in base I ask you - should I
be concerned?
Robert
<Not really. B>
Cube 1100x11000x600
Refugium Upstairs 2000x750
75 gallon help, hole drilled too
low 4/5/12
Hello Wet Web Media Crew. I recently purchased a 75 gallon and
proceeded to drill the back of it with 1 1/2" hole. I am using a
DIY 20 gallon long sump and a 700 gph overflow box. However, my
aquarium problem is that I drilled my overflow hole too low and do not
have enough room in my sump to hold the excess water when the return
pump is disengaged. I have created a flood situation. So do you think
that I could drill another hole on the other side of the tank that is
higher up for the overflow and use that 1 1/2" hole for the
return?
<Can/could be done. Do elbow up the discharge... such that it is
near/above the water level... lest it too serve as a source of water
below when the power or pump goes out (Do NOT rely on check
valving)>
If going that route how would I ensure that the return line be
positioned higher within the tank so that it would not siphon out 10
extra gallons into the "too small" sump?
<See above>
I understand that some tanks have low return lines, but how do
they keep their tanks from completely draining when the return pump
gets turned off?
<Discharges higher than water level...>
I was also wondering if I was to drill two return holes, and put
the overflow in the middle, would that help if I thought my pump in the
sump was too strong and was returning the water faster than what the
overflow was draining?
<Mmm, no... Read here: http://www.wetwebmedia.com/thrhullsiz6f.htm
and the linked files above till you understand, feel confident in your
plans. Bob Fenner>
Thank for the help!
Tank Volume Pump Output Overflow
Capacity 1/20/12
Begin forwarded message:
> Crew. Hello.
<R>
> With two 2" overflows according to your <ScottV's>
tests able to drain 1350 gph with a tank volume of 190 would you aim
for a calculated return pump output of a little less than 1350gph or
5000 litres to ensure that a single 2" overflow would cope if the
other failed? <Yes> This would give a x7 or less tank volume
through the sump per hour assuming that in rank pumps would be employed
to push circulation volume is this kind of thinking about flow on track
?
<About>
> Regards>
> Robert
<B>
drilling/plumbing new 180 g acrylic
12/17/11
Hello, crew. I recently acquired an un-drilled 180 g acrylic (6x2x2)
and am new to this wonderful hobby. My years of scuba diving finally
led me to start my first reef setup.
<Ahh! A good source of momentum, instruction>
The tank has been sitting in my garage as I have been doing research on
gear and getting everything I need. I have a Berlin-style sump being
built (30x13x14), which will use a BlueLine 40 HDX Pump
(http://www.aquacave.com/blueline-40-hd-x-externalbr-aquarium-water-pump-brby-pan-world-534.html).
I also had a refugium built that would just fit in the cabinet space
next to the sump. My skimmer (still in box) is a Reef Dynamics (i.e.
Euro-Reef) 180
(http://www.reefdynamics.com/INS180-Protein-Skimmer-p/ins180.htm ),
which will be in-sump. I am having a local LFS guy do the drilling in
plumbing as soon as the gear is all in order.
<Ok>
The Sump/Refugium manufacturer has finished early and is asking me what
size plumbing I will have done on the tank so they can have the correct
sump inputs and return manifold. The manufacturer (LifeReef) is
recommending only 1" to 1 1/4" drain holes
<Mmm, a mistake... these (more than one) need to be larger. Read
here re:
http://www.wetwebmedia.com/SystemPIX/PlumbingPix/Oneinchart.htm
and as much of the linked files above as it takes to inform you>
and .75" return
<Mmm... whatever the diameter of the discharge of the pump (on the
volute) is>
holes (4 total), and my local guy (who will do the drilling/plumbing)
is on vacation right now and will be unreachable for 2 more weeks.
Although I have done a good deal of research on various aspects of
keeping a reef tank, I have been extremely busy and done little in the
way of drain hole recommendations and subsequent flow rates. From what
I have read, it seems many here feel that bigger is better (like
2" drain holes). I have done some research on circulation and plan
to get the appropriate water movement for this coral setup (plan on a
few SPS in the mix) through several Tunze powerheads.
<Good>
My question is should I follow the sump manufacturers advice for the
two 1" drain holes or go bigger?
<Bigger>
I know the fact that I don't even know exactly what overflow system
I will use yet probably doesn't help any. I can have the holes
drilled to whatever size is recommended, but the sump manufacturer
needs this info before my knowledgeable local guy is back. I inquired
today at the LFS but the staff there that day couldn't offer much
as their main guy is on vacation, as well.
Sorry for the newbie question, I just didn't expect to have to know
this until I was able to do more research. If you need any more
information I will gladly provide it.
Thank you so much,
Kevin
<Do first read where you've been referred to above. Take your
time. Cheers, Bob Fenner>
Re: drilling/plumbing new 180 g acrylic 12/17/11
thank you so much. I am calling him now to have the 1.5" drain
holes.
<Ah, good. BobF>
Regards,
Kevin
Re: drilling/plumbing new 180 g acrylic, overflow f'
12/18/11
Hi WWM crew. So sorry to bug you again. I just need to make sure I am
doing the right thing here and am getting contradicting information
from my sump manufacturer. This is the response I received when I
replied that the drain holes drilled into my new acrylic tank would be
1 1/2". Initially, it was my mistake as he recommended 1"
drain holes and I didn't know enough to tell him any differently.
Then, I read your article and called him asap. Please give me your two
cents so I know what to tell him.... (his response below)
"I've already glued in the two 1" inputs to the sump,
which is ok for this sump and pump setup and pretty standard for many
manufactured aquariums.
We'll never come close to what two 1 1/2" fittings would flow
and it would be too fast, noisy, turbulence, etc for this sump and we
certainly don't need the faster flow rate through the sump.
<What? No... idiocy. Refer this person to the relevant parts of
WWM>
You are putting in some powerheads or wavemaker pumps in the
aquarium?
This is what most do to get the needed in-tank water circulation and
currents.
See if your tank guy can get two 1 1/2 x 1 reducer bushings to go into
the bulkheads and then 1" tubing can be plumbed to the sump.
What size are the two return lines?"
<... See where you've been referred to>
...should I insist on the 1.5", and, if so, would I still use
3/4" return lines? Is what he is suggesting regarding the reducer
bushings in the bulkheads fine, or should I insist on different inputs
on sump.
Please help as I am pretty new to the hobby, not wanting to make a
mistake, and paid a good deal for this sump/refugium combo. Thank you
so very much.
Kevin
<Please... Search, read before writing us. B>
Drain Question, overflows, SW, RR...
11/20/11
Hi WWM posse!!
<Yee hay!>
I have a question on drainage/return on my 180g RR tank.
<Ugh... NRR... Not Reef Ready more like it>
The tank has dual
overflows on the back panel, I have a Eheim 1262 with flex hosing going
to a 1" PVC return in each overflow.
<Oh, this can work>
I was hoping that I could have just one single Durso drain in the left
overflow and make an emergency drain for the right overflow.
<An emergency overflow... for what? An ATOff system error? I'd
use both for overflows to your sump>
Do you think that this will be okay or should I have a drain in each
overflow?
<The latter. Am a much bigger fan of downsizing the flow to and
through the outside, and using internal pumps for circulation. Do
scroll down here:
http://wetwebmedia.com/marsetupindex2.htm
the third tray>
Thanks in advance, you guys rock!!
Brent
<And roll! BobF>
Plumbing/Draining Question. Bulkhead
size... 7/14/11
Hi WWM!
<Hello Mike>
Thanks for having such a great resource to use with an awesome bank of
knowledge.
<You're welcome.>
You helped me with a lot and I just had a question that elaborates
further on what someone had asked already. Here it goes....
First is what my setup is now. I have a 60 gallon
acrylic tank without any internal overflow boxes or
holes drilled yet. My plan is to plumb it to a 20
gallon sump I have down below which will have a filter sock,
protein skimmer and one internal return pump to one 1" return back
to the tank. I am only planning to do one return but don't mind
later when I get a stronger pump. I also have a 10 gallon refugium
which is on a stand higher than the sump to gravity feed it. My
question has to do with what the best option for my outlet(s) to the
sump would be. I was going to go the siphon overflow route until I
started reading all the troubles with that type of setup on the net so
now I want to drill my tank. That had a 1 1/4" bulkhead, Is that
appropriate for my tank?
<Is this for 1 1/4" hose or just the size of the bulkhead
mounting diameter? Generally, 1 1/4" bulkheads are for 1"
slip or NPT and this would only give you 350gph at most provided there
are no restrictions such as elbows, etc.>
I also read here I should have two in case one gets clogged. Should I
put one on each side?
<I would.>
The second part of this is that I had an idea to cut the back of my
internal side of the siphon overflow's back off (also acrylic) and
leaving about a 1/2" or so rim around it. Then I would glue it to
the inside of the back of my tanks with acrylic glue. Do you think this
would work?
<That sounds like a nightmare, go the bulkhead route, you will be
glad you did.>
However this only has room for one bulkhead inside. I read somewhere
that people use elbows but I'm worried they won't skim enough
of the surface.
<Not good.>
If you do think that this is a good idea would it be better to do the
drains in two separate smaller boxes (such as 6 x 4 x 4) or would it be
better for a long one (such as 15 x 4 x 4) in order to house both of
the bulkheads. I will contact www.wetdryfilter.com with specs of your
recommendation if you think this is a good idea or not.
<Best to have two corner overflows with bulkheads. If you go with
one, use a bulkhead fitting that will accept a 1 1/2" drain hose
or PVC pipe.
Might want to look here for flow rates on bulkhead fittings.
http://www.wetwebmedia.com/BulkheadFloRateArt.htm
Also read here and related articles/FAQs found in the header.
http://www.wetwebmedia.com/plumbingmarart.htm>
Thanks!!!!
<You're welcome. James (Salty Dog)>
Mike
Re Plumbing/Draining Question 7/14/11/7/15/11
Thanks for such a fast reply!
<You're welcome.>
1 1/4" is the size of the bulkhead which goes to one hose. After
seeing your response, two seems like the way to go for drains.
<Is better for larger tanks. A 1 1/4" bulkhead accepts a
1" PVC if a slip bulkhead, so we are back to a 1" drain
hose.>
Do you think these are big enough?
<Yes, two 1" drain lines should give you a minimum of 600gph
flow into the sump.>
What size would you recommend? I would eventually like to get a
stronger pump than I have.
<Depends on the pump you want to upgrade to. Generally a flow rate
of 10-15X the tank size is recommended if this is going to be the sole
source of water movement.>
I think I may have not been very clear about the overflow box idea. I
wanted to cut away the back and glue it to the inside of the tank in
order to use it as an overflow box with a bulkhead.
<Mmm, one of our crew members produces complete kits to do what you
state.
The kits are very reasonable and work quite well. Might want to take a
look here, I think this is what you have in mind. http://www.reefercentral.com/whyglassholes.html>
I do not want to siphon at all from all that I have heard. This would
be just to save money since the tank I bought came with a siphon
overflow but I do not want to use it.
<Yes, seems like you are always fiddling with them.>
I am essentially trying to do a "through-the-back" overflow
that your article in the first link speaks of. That leads to this
following question... Is it ok to have two drain holes in one long box
or should they each have a separate box?
<Will all depend on what the weirs are capable of flowing.>
Also what do you think an appropriate drain setup would be? I was
thinking I would do two bulkheads that feed to 1 1/2" drain tube
evenly spaced apart in one 15"x5"x5" through the tank
overflow box.
<I would prefer individual drains to the sump. Should you want to
clean one or do maintenance, you would always have the other drain to
feed the sump.>
Is it inherently more noisy if the return pump is only pumping with
300GPH to start with?
<How could it be noisy, explain.>
Also you had mentioned using corner overflows. Do you mean the full
length ones drilled at the bottom?
<Yes, but the overflows I linked you to will work just as
well.>
Do you think they are better than smaller boxes at the top?
<Obviously the boxes give more room for aquascaping and if I were to
order an acrylic tank I would not want it built with internal boxes,
would go with the Glass Holes design. The choice is
yours to make.>
That should be it for the questions I swear. =)
PS Thanks for the links. A lot of additional great info there I
didn't see.
<You're welcome.>
The last question I forgot was how far down from the top of the tank
you should drill for the bulkheads when using a small overflow box at
the top?
<I'd want 1" between the top of the tank and the top edge
of the hole.>
THAT is the last question for sure. Promise.
<Promises are meant to be broken. :-))>
Thanks again,
<Yer welcome. James (Salty Dog)>
Mike
Re Plumbing/Draining Question 7/14/11 7/15/11
7/16/11
Thank you tremendously! EXACTLY the link I've been trying to find
on the internet to see if anyone has done or I was going to try and
make it, but they even sell them!
Thanks again,
<You're welcome Mike. James (Salty Dog)>
Mike
Water Flow/Water tower
2/23/11
Hello Crew, fantastic site, thanks for the wealth of information.
<Thank you.>
Here's what I'd like to do if it's at all possible, I want
to create a water tower that is filled by draining water into it from
the bottom. The tower fills and then overflows.
<Okay.>
Here's the scenario: I have a 500 gallon tank (8'x2x4), it sits
on a 3 foot stand. Because of a space issue, I'm building a
filtration rack that stands 6 feet tall and has four levels. Without
using a pump, I'd like to get the water in the water tower to rise
to the top and spill over into the top of the filtration rack and of
course at that point, flow back down to sump level (ground level) where
the return pump is located.
My idea of how I can get the water to fill the water tower is to have
the water from the tank flow into the bottom of the water tower (made
out of 2 3' foot plastic barrels ). The water tower will have a
2" bulkhead located 6" from the bottom. The two 1 1/4"
overflow lines will be tee'd, the out portion of the tee will be
2". The barrel will sit 2 feet off the floor, so it's opening
will be appx. 1 foot lower than the bottom of the tank.
(Finally, here's the question) Will the barrel fill to the top
(where there is a spout (if you will) that will allow the water to flow
directly into the top of the filtration rack.
Or, am I dreaming
<So long as the level in the barrel is lower than the tank the water
is draining out if it will be fine. For what it is worth I would
definitely go larger for the tank drains if you can. 1.25" lines
will give you about 500 gph each at best. Also, route the overflow from
the tank to the containers as direct as possible. Many bends and elbows
will take away from the line's flow capacity quite quickly.>
Can't wait to read your response, thanks Lee
<Welcome, Scott V.>
Making a peninsula out of a RR tank,
overflows, plumbing mostly 2/22/11
Hey guys I am looking for an opinion and of course some good advice
which you always offer. I currently have a 150 RR tank established for
7 years or so. We moved and now the way our house is we decided we
would like to have a peninsula tank to divide a couple rooms.
<Okay.>
So I came across a very nice 265g perfecto with corner overflows. I
would have rather had a non drilled tank but the opportunity came along
and I jumped on it. Just want to know how you feel about converting
these types of tanks into a 3 peninsula style display?
<Fine, but the overflows are likely the lacking 1"
variety.>
I initially intended to:
1. Remove overflows, use bulkheads and cap them. Then drill one end and
make an external overflow maybe implementing a Herbie style
overflow.
2. Remove overflows and use the holes for a closed loop. Use street
elbows and run a pipe to the center, hide it under sand and rock and
have a couple closed loop returns in there. And drill the one end like
previously stated.
3. Remove only one overflow, cap the bulkheads and use the remaining
overflow and not drill the tank at all. This seems easiest and if I
ever decide to revert the tank back to its original glory, it will not
be too hard. Only problem is I imagine that one corner overflow will be
a little unsightly.
Ahh decisions decisions. What would you do if it was yours?
<Not option 3. You will need to drill no matter what you do IMO. One
1" overflow just is not enough. And I would skip the Herbie idea
all together. They sound nice in the forums, but are a recipe for
disaster.
Drill and drill for redundancy. See:
http://www.wetwebmedia.com/BulkheadFloRateArt.htm
If you intend to run a closed loop I would use the existing holes for
this.>
Thank you, keep up the great work!
<Welcome, Scott V.>
Re: Making a peninsula out of a RR tank 2/22/11
Scott thank you for your advice.
<My pleasure!>
One more thing about the option 3 that I forgot to put in the
description, sorry. I would be using both 1" holes as overflows
and then run my return from the sump up over the non visible side of
the tank. Indeed they are the lacking 1" but do you think 2 would
be sufficient?
<They could be. Here is my deal. The real world practical limit for
a 1" is 300 gph. Have two, flow what one will flow for true
redundancy should one plug up for 1000 reasons. Even then I like larger
overflows, they are much less likely to plug. In many hours of actually
testing overflows I have thrown the dumbest stuff into the tank to see
what happened.
Something simple like a paper towel that makes its way in easily plugs
a 1" 95% of the time, where it will flow straight through a
1.5" 99% of the time. Larger bulkheads not only provide more flow,
but more security that the water will stay where it should!>
If not I will be drilling for 3x1.5" overflows
<This is exactly what I would do. It also keeps the visible corner
looking good!>
Thanks again
<Welcome, have fun!>
1 inch over flow bulk heads.
2/11/11
Hello
<Hey there.>
I have a question for you. I am one of the lucky ones that have 1 inch
bulk heads the found you site and discovered there actual flow
rates.
<You are not alone, the whole reason the testing was done!>
Is there any way to increase there flow rate?
<Sort of. I have been working (for 3 years now) on a follow up on
doing just this. It is just a semi-complex DIY procedure. Basically
taking your 1" bulkhead and using plastic epoxy to attach
1.25" PVC fittings to it.
Gets you another 100 GPH or so.>
I thought of venting the over flow return to the sump.
<Any overflow should be.>
I know in a house if your vent is plugged the flow is cut in half. Also
would increasing the over flow return hose have any effect on the
amount of water going through the bulk head e.g. 1 inch bulk head tied
to 1-1/2 inch pvc pipe. Any experience or suggestions.
<If you have access to it I would drill the back of the tank inside
the box for larger bulkheads. See:
http://glass-holes.com/>
I have 150 gallon tank with a 60 gallon sup.2 1inch overflows and a Mag
18.
Thanks I wish I found this out 8 years ago, Would have used bigger over
flow bulk heads.
<Well, we have all been there! I am sorry to tell you the flow rates
listed in the article you are referring to were vented! People hate to
hear it, but it is what it is! Scott V.>
1 inch over flow bulk heads. 2/14/11... double
posted... idiot
Hello
I have a question for you. I am one of the lucky ones that have 1 inch
bulk heads the found you site and discovered there actual flow rates.
Is there any way to increase there flow rate?
<Not really; no>
I thought of venting the over flow return to the sump. I know in a
house if your vent is plugged the flow is cut in half. Also would
increasing the over flow return hose have any effect on the amount of
water going through the bulk head e.g. 1 inch bulk head tied to 1-1/2
inch pvc pipe. Any experience or suggestions.
<Folks have been writing re these trials the last few months, but
they're not realistic modifications, nor safe>
I have 150 gallon tank with a 60 gallon sup.2 1inch overflows and a Mag
18. Thanks I wish I found this out 8 years ago, Would have used bigger
over flow bulk heads.
<Do read here:
http://www.wetwebmedia.com/thrhullsiz5f.htm
and the linked files above, till you're satisfied that you're
aware of your choices here. I'd bite the proverbial bullet and
get/use internal water movement mechanism/s, and the existing two one
inch through puts for the sump/refugium, run it on low enough that one
line can/will suffice, and rig a return over the top of the tank. Bob
Fenner>
Number and size of holes it is safe to
drill on an acrylic tank `12/27/10
Hello and thanks for providing me with many hours of informative
reading.
My tank is a 40g SeaClear (36"h x 15"w x 16"h) with
1/4" thick acrylic.
Before setting up the tank I drilled a single 1.5" hole for a
drain to the sump. Obviously I should have drilled a few more. I'm
considering drilling additional holes now and am wondering how many
1.5" holes it is safe to drill in the back of the tank at the top
without weakening the tank to a point that would cause concern.
<Quite a few.>
I'm thinking that I would like to have 5 total (1 sump return, 2
sump drains, and 2 in/out for a canister filter).
<This will be fine, though I would opt for 1.5" lines (actually
require 2.5" hole) for the drains.>
Also, I'll probably empty about half of the water from the tank to
do this.
Am I courting disaster by doing the drilling with water still in the
tank?
<Well, I will advise you to empty the tank. But I personally do not
always practice what I preach.>
I have an unused tank that I could have on stand-by, but if a big crack
formed it would still be a big mess.
<Yep, for the time it takes to tear down a 40 I would do it
empty.>
Thanks for any advice you can provide.
-Brett
<Welcome, Scott V.>
>
Drilling Acrylic/Plumbing
12/10/10
<Hello Sanford>
I've reviewed what I can on the site. Can't find anything
regarding my specific question. I want to drill a drain hole in the
bottom of an acrylic tank (60 gallons, 1/4", bows a lot when
full). I plan to build an overflow and have a standpipe inside. How
close to the edge can I drill. I saw you tell another enthusiast
1" from the edge. That would work for me and my particular plans,
but it would be a better solution if I could get a little closer. It
seems to me that drilling through the bottom would give me some leeway.
The stand top is a 3/4" sold piece of particle board.
<I would put a couple of coats of polyurethane on this
board.>
Granted, I will need to cut through that to allow the drain pipe access
to below. But it seems to me that there will still be a substantial
amount of support to the bottom of the tank since it lays flat against
the top of the stand. Any input would be great.
<First, I'd like to recommend you install a 1-1/2"
standpipe. A one inch standpipe will only allow about a 350gph flow
rate. See here. http://www.wetwebmedia.com/BulkheadFloRateArt.htm
With a 1-1/2" bulkhead fitting, I doubt you could get any closer
than one inch from the edge. You have to allow room for the bulkhead
fitting nut with molded flange
Thanks
<You're welcome. James (Salty Dog)>
Sanford
Mag 12 / 100G / 1.5 stand pipe (Durso)
12/6/10
Hello Crew,
<Hello.>
Just one quick question, Is Mag 12 too much for a single overflow with
1.5" (Durso) stand pipe on a 100 G reef tank?
<Once all the plumbing is accounted for a 1.5" will technically
handle the flow of a Mag 12, but you will be right on the edge of the
overflow's capacity, with no redundancy. The slightest little
occlusion will lead to your tank overflowing!>
Thanks/ Jun
<Welcome, Scott V. Do take a look here:
http://www.wetwebmedia.com/SystemPIX/PlumbingPix/Oneinchart.htm>
Overflow flow rate
11/08/10
Evening crew
<Good evening.>
I have a plumbing question for you.
<Okay.>
I have a 155 tank with dual overflows on the sides. When I purchased
the tank, the overflows came predrilled with 1" slip bulkheads so
would assume that the hole is drilled at 1 3/4" to accommodate a 1
1/2 inch thread. I'm trying to figure out a way to increase the
inside diameter of the pipe. In a perfect world I would have a 1 1/2
threaded pipe on either side. which would probably make my id 1
1/4". Are you aware of any such bulkhead or idea that could allow
me to do this?
<Yes, a few DIY options.>
An option that I have been considering is to get a threaded plastic
nut/washer and use PVC glue to seal it about halfway down on a standard
11/2 threaded PVC. Have you heard of anyone doing this in the past?
<I have done basically the same thing a few times over the
years.>
I've tried all my local plumbing guys and Google searches trying to
find such a product with no avail. Might be a good new product for a
PVC company to offer to the trade (wish I knew one so I could get a
kickback).
<Haha, I thought so too a while back. After writing a how to for a
certain forum and promptly being kicked off that forum for saying a
1" bulkhead will not flow a zillion gallons an hour I realized
such a product may not be well perceived in the market (and now that I
look it appears the post was removed for my witchcraft). After years of
selling overflows that do indeed flow I now know that most either
believe a 1" bulkhead does flow an infinite amount of water or
they think that the pump is flowing way more than it actually does.
This does not even take into account the many times I have beat my head
into the wall trying to get people to consider the value of overflow
redundancy! All that being said, PVC cement can work. Do realize that
many of the bulkheads sold in the trade are actually ABS (yeah, I know,
everybody uses PVC cement, but for a butt joint I would not at all!). I
ended up using the two part plastic epoxies available from hardware
stores to bond an 1.25" slip fitting to the 1" bulkhead on
the end inside the overflow. The outside is a bit trickier to do
reliably. Some of the 1" bulkheads out there will actually allow
you to screw on a 1.25" threaded fitting to the outside of the
bulkhead. None fully, they are not pipe thread (on which they taper to
a thicker thread the farther you screw onto). The HydroAir brand works
well, you can get 4-5 turns onto one of these. Typically you can find
these at spa supply companies, Custom Aquatic used to and may well
still carry these. If you can find a 1.25" female pipe fitting in
steel (not so common around here), you can use this to "clean
up" the threads on the bulkhead, allowing you to screw the PVC
fitting on even further.>
Anyway, let me know your thoughts Chris
<Scott V.>
Overflow meas. requested
9/21/10
Salutations once again,
<Hello Richard.>
As always, the research in the marine world includes/comes back to The
Crew. I am attempting to locate info regarding the overflow
surface-skimming portion of the design, and have hit a wall.
<Okay, I will either help you in a great way or confuse you into
oblivion.>
The calculators/explanations for measurements regarding the
placement-distance and depth vs. actual size of the teeth at the
surface of the water, along with number of teeth per surface area of
tank appears to be sadly missing.
<This is because calculations do not work here. The calculations out
there (they are) are for large scale weirs, such as those crossing
large rivers.
When applied to even the largest of aquariums there is really zero
relevance due to the surface tension, the cohesion of water. If it were
not for this property water would not form a drop on the kitchen
counter.
But it does, while at the same time it will not take such a form as a
puddle. Volume does count in these calculations, something lost on many
that advocate for "surface skimming".>
I have read in the site's FAQ sections a reference to
ozreef.org
<<RMF just checked... it IS gone. A shame. A collection of very
useful and inspirational DIY info.>>
but the site appears to be gone.
<The reference I believe you refer to is indeed still there, though
vague.>
Is there a calculator/explanation showing "flow through
teeth" vs. "number of teeth and size per foot" that
could be passed on please?
<Not really. At the scale we deal with in aquariums a 1/16" of
in inch can be a mile. Any calculation here is a blanket, not based in
what will really happen. The reality is every single overflow
throughput calculator
on the internet falls to the same downfalls.>
Although you are probably tired of hearing it - your patience and
assistance is greatly appreciated.
<Totally ignore "surface skimming". I do realize there are
certain authors (one in particular) out there in the forums that has
made a name for themselves by advocating surface skimming. Reality? Two
examples. Think about the 20000 gallon pool, not all that large for
your typical built in pool. Skim that surface for an hour or two per
day with the typical built in weir. Nothing on top after. All that
sinks lower happens when the surface skimming is not happening. These
are not hydrophobic, merely floating of the surface due to cohesion.
Once the cohesion is broken they sink. If leaves in a pool were truly
hydrophobic they would easily be skimmed in that time frame. The other
example is that of a 1000 gallon tank running 100 gph through the sump.
Nobody would do this! But think about it. At that rate you would be
running 2400 gallons per day through the sump, plenty of surface
skimming in 24 hours! Many relate surface skimming to dwell time in a
skimmer, these are completely separate issues.
Do also consider the increased flow we do (for good reason) run in our
marine tanks today. The surface is not stagnant! Although the compounds
we seek to take out are hydrophobic, it does not mean they just sit on
the surface no matter what. By agitating the surface we do mix them
back in.
The compounds will eventually end up back on top, assuming the surface
is smooth and dead! Forget surface skimming, if it were to work like
those have proposed in the forums a tank would be way too sterile
anyhow!>
Thank You.
Richard J.C.
<Welcome, sorry for the lengthy reply. I just feel a need to set
this subject straight! Rather than just making claims, I have the
numbers to back this one up! Scott V.>
Re: Overflow meas. requested 9/21/10
Hiya Scott,
<Hi Richard!>
Thank you for the prompt and informative reply (big grin here). Lengthy
in this instance is good... as with skimming, more is good. And please
pardon my comments as an attempt at clarification for my (and
hopefully, other's) benefit.
<Okay!>
My take on the supplied (and appreciated) information, is that the
"teeth" relevance are subject to the effects of pressure and
gravity more so then actual mass transported at one time?
<Actually, yes!>
By this, it could be assumed that a larger pass-through area (the
teeth), either by size of opening - or quantity, would only supply an
advantage of a smoother flow and/or quieter operation... but would not
effect actual volume?
<Well more/larger/longer teeth will flow more if more is suppled.
But at a given volume more teeth will result to the water running
lower, smoother, quieter within, yes.>
Is this why some in the hobby suggest a trough-style overflow
(especially for external overflows) as opposed to a single standpipe
style?
<Haha, I guess. I have yet to figure out that one, some don't
even want an overflow inside the tank!>
If my take on this is accurate (insert judgment here :)
A 65gal tank with a surface skim overflow of 4in x 4in with a method of
breaking the surface tension (say, a rotating powerhead) would have a
greater effectiveness then a larger overflow with no surface tension
being broken?
<Not really, but in reality they will function the same in this
application.>
If this is accurate, the "teeth" could then be the mentioned
1/16in (an example, I realize) but a greater benefit would be to extend
them to - say - 1/2in deep instead of say 1/4in to allow for more draw
from 'deeper' in the tank. But the overall length of the
'teeth' (linear total) is actually not relevant.
<Well here is where that cohesion property of water makes linear
calculators almost useless in these applications. The water will flow
3/8-1/2" up into the teeth even at the slowest of flows. I really
can't quantify to you if it is taking the top 1/16" or the top
1/4", what I can say is the very surface itself is effectively
skimmed.>
You mention dwell time. From what I have read (and yes, the sources are
in suspect pending confirmation), that refers to the relative amount of
time the particulate remains in contact with the bubbles within the
skimmer (not the overflow) to bond and be transported to the
ever-fragrant skimmate (sp.?) cup. I believe I now understand that
surface skimming refers to the amount of particulate removed at surface
level, with regard to volume of water passing over the overflow. Am I
correct in assuming that the amount of 'scum' would only
increase marginally if the surface tension was not broken?
<Yes, the increase would be very marginal in my opinion. Most
advocates for surface skimming with long weirs do it in hope to get a
more concentrated surface water to the skimmer. With the washing
machine type flow most use today this is all a nice thought, but not
the make or break of a system.>
The long and short of this is: I plan a 48x30x20h sys - full reef,
peninsula style. My overflow could then have the teeth measuring at
1/2in deep and 1/4in wide (the gaps)... and to reduce flow
pressure/noise, I could do say 20-22 linear inches with the surface
tension being broken in the main body of the tank, and there would be
little or no measurable difference reversing these teeth dimensions in
a system of this size? As long as the volume of water passing over is
consistent with a system <1/4" is a good size for tooth gap. It
allows flow and keep out critters without being too loud.>
this size - I believe 600gph is sufficient?
<600 gph is fine for this system through the sump. I would
personally set you tooth height a bit taller. You will find at around
20 inches of 1/4 teeth and this flow your water level will be about
1/2" up from the bottom of the teeth.>
I'm certain at this point, your comments are going to be needed to
clear this jumble up - not just for me - but for those poor souls who
will have read this in the future.
<Haha, you stepped into a subject that is a passion of mine for some
strange reason!>
As for your comment regarding 'setting this subject
straight'... I couldn't agree more. Thank you for your patience
and concern towards this issue.
If the above is not even close... just roll up the newspaper and
swing!
Richard J.C.
<Welcome and thank you. It sounds like you got it, build that
overflow!
Scott V.>
Drilling/Plumbing an Oceanic
120'¦and a WWM Book on Such? -- 08/28/10 <oh
yeah!>
Hey Guys your site is awesome.
<<We (guys and gals) are happy you think so>>
I have read many emails and answers on this subject but still need some
specifics.
<<Okay>>
I am attempting to assemble a fairly high end 120 Gal after the
installer at the LFS quit right after most of my equipment was
delivered.
<<Mmm, bummer'¦ But if you are a little bit
'handy' and willing to do your research, this can be quite
rewarding for you>>
This will ultimately be a high end SPS tank and while money is always a
consideration I have already spent around 6K on this project so I want
to do it right the first time.
<<Indeed>>
I have a brand new Oceanic 120 (reef ready)
<<So 'they' say'¦ The 1' through puts are
lacking re their size--but you can make do>>
and large high flow sump 41"L x 24"W x 30"H. The return
pump is a Dart Gold.
<<This is way 'too much' pump (3800gph) for the existing
1' stock gravity drains (600gph-700gph--combined!)>>
After reading on your site about the dangers in undersized drain
bulkheads it sounds like I need to drill the drain holes from the
existing 1" to 2".
<<Yes'¦ And install a gate-valve on the output side of
the pump to temper flow even further as necessary. But, have you even
considered the 'noise' that flushing this much water through
your system/sump will make? '¦not to mention the
plumbing/bubble hassles? It's your system and certainly your
call--but I always recommend folks limit flow through their sump to
only a few hundred gallons, and utilize the many makes/models of
'prop-pumps' available today for generating water flow within
the system. You won't realize much if any initial money savings
versus purchasing one over the other (in fact, the prop-pumps will
likely cost more to start with), but the savings re reduced plumbing
hassles, reduced operating costs, much better water movement, and lower
'piecemeal' replacement costs more than make up the difference,
in my opinion>>
Of course this is a very heavy tank and I would prefer not taking it to
a glass guy to have it drilled if that can be avoided.
<<You can avoid drilling it altogether, re my previous
argument>>
Can I drill this myself?
<<I do think the Oceanic aquariums are 'non-tempered'
glass so yes, you can drill it yourself (do check with the manufacturer
to be sure before you begin)>>
I have a full shop
<<Hey! Me too!>>
and have been doing DIY stuff for years and am fairly competent.
<<Ah, okay--I feel better about this then. You should need little
more than to look up/review the process/steps involved>>
Can you suggest a source for the proper bit?
<<Well my friend, you can spend a whole lot or a whole little
here. If you are only going to drill a few holes then the cheap bits
suffice quite well in my experience. I find I can get 8-10 holes out of
one before it needs to be replaced. Simply do a search on the Net for
'diamond core drill bits,' and let your pocketbook be your
guide>>
Assuming I go to a 2 1/4" hole what do I replace the existing
plumbing pieces in the overflow with?
<<Not sure I am following you here'¦ If you mean you are
drilling the larger holes in 'new ' locations and need to plug
the existing drains, then I would silicone a glass 'patch' over
the existing drain holes (be sure to use glass of the same thickness as
the panel/bottom, and overlap all edges by 1-inch'¦2-inches if
there is room>>
Is there room for to enlarge the 1" hole to 2 1/4"?
<<You will have to determine whether the existing overflow boxes
are large enough for this (you may bell have to remove and enlarge
these), but be sure to keep the edges of any new holes at least
1.5' from the edge of any panel you drill through to reduce the
chances of 'cracking to the edge'>>
Should the 3/4 bulkhead return holes be left the same size?
<1' would be better if you stick with the pump you describe and
wish to maximize flow'¦but the ¾' returns can
'work'>>
Second question. This tank will eventually be installed in a different
location with a basement fish room containing the sump.
<<Ah--I see>>
For now (about a year) they will be installed side by side in the
basement.
<<Okay>>
The top of the sump is above the level of the bottom of the tank. As a
result, the drain lines will have to come out of the bottom and then
rise up over the sump top before going into the bottom of the sump
which is about 18" below the bottom of the tank. Would it be
better to drill the side of the sump and install (2) 2" bulkheads
to allow the drain lines to feed directly into the sump instead of up
and over utilizing the two existing bulkhead holes in the sump top?
<<That depends on your desired flow rate through the sump. The
first configuration will limit the flow from the gravity drains--if you
wish to 'maximize' capacity then yes, you will need to
configure the drain lines so the water will 'fall' the entire
route to the sump>>
What is the title and topic(s) of the book that one of you has written
on this and related subjects?
<<Uh-oh!--did Bob put you up to this? [grin] He has been after a
couple of us to do just that for several years
now'¦<<I'll say!>> which of
course, we haven't. Your best bet is likely to do Net
searches/search the aquarium DIY sites as I don't rightly recall a
good 'book' for what you wish, at the moment>>
Thanks in advance!
John C
<<Happy to share, mate--and do let me know if you wish to discuss
any of this further'¦ Eric Russell>>
Gyres, Bulkheads and Flow Rates/Marine
Set-Up/Marine Plumbing 8/28/10
Hi Guys,
<Hello David>
It is some time since I have been here having set up a 50g five years
ago.
We are now in the process of building a new house and I have the
opportunity to build a 5ft x 2ft x 2ft in wall tank. Ideally I would
like to design a tank that did not require any internal powerheads or
pipework.
<Sounds nice.>
I have been researching the build on WWM and elsewhere and have come
upon the idea of gyre flow. However there is a limited amount of
information out there and wonder what your feelings are on this?
I am considering using a vertical gyre with a "spine"
arrangement of live rock down the midline of the tank. An inlet would
be positioned around 12" high and 4" in from the front and
back on each end corner of the tank allowing alternation of the gyre
direction. Is one inlet per "corner" sufficient?
<Yes, more to follow below.>
My specific questions relate to flow rate, overflow design and outlet
bulkhead sizing. Various calculators and sites provide different
estimates and figures, theoretical or practical, I don't know.
While the viewable tank length will be 5 ft I can extend it by up to
6" at one end and use the entire width of the tank, 24", as
the weir, or up to 4" at both ends and have two 24" weirs and
overflow boxes.
The volume of the tank is nominally 150 US gallons.
For my sump, to achieve a turnover of 3x-5x,or 450-750gph what size and
how many bulkheads should I use?
<For reef systems, the recommended flow rate should be at least 10X
the tank volume and I would size the pump for at least 20-30% more than
anticipated to allow for any head loss. If the sump and pump are to be
located in the basement, I'd size even higher and use a pressure
type pump rather than a circulation type pump. Ball/gate valves can be
used to
control the flow rate on each return. I would have the tank constructed
with built-in overflows at each rear corner of the tank using 1
1/2" drains, one per overflow box. A 3/4" return line in each
corner will provide the necessary flow rate and most tank manufacturers
will incorporate the return line inside the overflow box. Seeing as how
you want no internal plumbing, I would suggest the use of a rotating
return device such as Sea Swirls. Take a look here.
http://premiumaquatics.com/store/merchant.mvc?Screen=PROD&Store_Code=PA&Category_Code=&Product_Code=SEASWIRL
The use of a device like this will
provide flow to all areas of the tank.>
I have been looking at the Calfo overflow setup, any thoughts?
<If it were mine, I'd go with the corner overflows.>
Does the use of a comb significantly reduce the flow rate over the
weir?
<No, as long as the total square inch area of the gates in the weir
are greater than the inside area of a 1 1/2" PVC pipe.>
I know I should have a turnover rate of 10x+ through each pair of
inlets on the closed loop but what flow rate should I aim for at each
inlet? i.e. should I balance the flow between them or set one high and
the other as a booster to maintain the gyre?
<I'd shoot for equal flow from each return.>
Could I place the outlets for the closed loop in an overflow box? Will
I get enough water over the weir fast enough to feed the outlets?
<A closed loop system shouldn't be necessary with rotating
return devices and offers a little more peace of mind eliminating
possible sources of leaks.>
Should I just use bulkhead sizes to match the inlet size of the pump to
be used?
<No, as mentioned above.>
If not the above can you advise?
I apologise for the number of questions. I have researched but the more
I look the less consistent the information and would appreciate you
input.
<No problem on the questions, is what we are here for.>
Many thanks,
<You're welcome. James (Salty Dog)>
Re Gyres, Bulkheads and Flow Rates/Marine Set-Up/Marine
Plumbing 8/28/10 - 8/29/10
Hi James,
<David>
Thanks for the swift reply and the sound advice.
<You're welcome.>
Could you address the use of gyres in a reef tank, whether it is a
useful approach and the best way to implement it. I have seen Bob
advise it in a few posts but there is little information out there
describing its practical application in a tank.
<I have no experience whatsoever with gyres so I cannot comment.
There is some information on it in this article, scroll down a bit.
http://www.advancedaquarist.com/2007/1/aafeature>
Regards,
<Ditto. James (Salty Dog)>
David
350G 48" diameter, 48" tall, 3/4" inch
thick acrylic tank with 8" square center overflow that's
in need of some love. 7/21/10
Hi,
<Hello there Rob>
I have just bought home a used 48" diameter, 48" tall,
3/4" cylindrical acrylic tank with 8" square center
overflow that's in need of some love.
<Okay>
It has a large decorative coral center that looks to be epoxy or
resin in "aged" condition. See pictures below.
<None there>
I plan to cut the top acrylic spar that runs across the top of
the overflow so that I can remove the decorative coral to
refurbish it and make it easier to drill holes in the bottom of
the tank to re-plumb it for better circulation. I was going to
use a Tenryu blade (#PC-18560CB)
<A plastics/acrylic blade... this will work>
with a 15 Amp Framing saw and a clamped angle iron guide- and
then have a new 1.25" Acrylic spar machined and beveled to
overlap the outer rip and 1" solid acrylic pins to keep it
in place.
<Nah... if you're sure this is a one-time do, just solvent
the new overlapping brace atop the partial olde>
I dont know yet if the coral is bonded to the acrylic bottom, but
I guess I'm going to find out.
<Almost assuredly it is not bonded... such constructs,
particularly in these settings, are after-market,
other-manufacturer "drop ins". Should lift straight out
in one piece if not too "gunked in" currently>
I also planned on using a Starret brazed diamond hole saw to cut
sixteen (yes, 16) 2" holes in the bottom of the tank for a
closed loop recirculator.
<Mmm, I definitely would NOT do this. closed loop
recirculation is really olde hat, not efficient, noisy... Instead
look into internal magnetic drive motorized pumps like Tunze,
Eco-Tech et al. Read here re:
http://wetwebmedia.com/marsetupindex2.htm
the third tray down>
The intricate decorative coral is going to be a PITA to clean of
detritus,
<Nah... take it out, soak it in a mild bleach solution... See
WWM re...>
so I want good slow moving turbulent motion with no dead spots.
To re-inforce the bottom of the tank, I was trying to figure out
how to sandwich solvent weld a 1/4" Acrylic sheet cut to a
48" circle.
<You can/could "weep" one of Weld-On's lower
viscosity solvents through all those cut outs, but I would not
drill through the bottom as you propose above. IF there are
returns and overflow/s that are already in place in the
center 8" square, use these to plumb all underneath. In
other words, don't drill more openings!>
The holes would penetrate both layers and the whole thing would
sit on plywood on the existing circular steel framed base. The
original setup had the bulkhead nuts on the back of the ply,
rather than overdrilling the ply with the nut on the back of the
acrylic.
<This is a mistake that I definitely would correct
here/now>
Based on the badly corroded steel stand frame and ply scrape
marks, I think they must have had leaks. I'd hate to have 16
leaks plus the 6 holes that are already in the tank bottom. In
the event of a major earthquake, I am thinking that schedule 80
tank bulkheads aren't going to keep the tank on the stand
anyway.
<IF the ground moves this much, the sch. 80 fittings will be a
small worry>
I want to avoid an internal bottom manifold with fewer holes -
unless you can find someone with 4 foot arms that can adjust/fix
them later as needed.
<Ah, no>
The overhung coral makes it near impossible to work on the bottom
of the tank after the water is in and the tank top is 7.5 feet in
the air.
<Ladder and tools, possibly a friend to guide you>
As I contemplate doing this, I remembered that if I write off
this tank, my 3 and 4 year old kids will likely lose respect for
their Father, which could lead to a substantial long term
psychiatric bill in later life.
<Lo dudo>
And then there's the punitive wife damages that I don't
care to think about after the icy stares she gave me for showing
up with this tank on the back of a trailer unannounced -
"hey honey, if I'd discussed this with you first, you
would have said 'no', so why say anything?".
<You're treading on very thin ice here for sure>
For my children's sake, can you give me some advice?
Thanks a bunch,
Rob
<Make it known if you'd like more input, rationale re my
position here. Have you watch friend Jim Stime's LA Fish Guy
video... on you tube, re such a tanks install, operation?
You'd do well to do so. Bob Fenner>
Re: 350G 48" diameter, 48" tall, 3/4" inch
thick acrylic tank with 8" square center overflow that's
in need of some love. 7/21/10
Thanks Bob. Having looked at Jim on YouTube, I think he's my
neighbor. Not kidding, I live in Westlake Village, Thousand Oaks,
CA.
<Neat!>
With regard to a ladder and a friend, I've attached a picture
which I think best describes how your procedure would translate
to this tank.
<I see the bottom pic>
The opening on each side is 12" wide at it's widest
point one way and 24" in the other.
I take back the "best describes" bit. Please mentally
substitute a small malnourished boy for Houdini.
<Maybe two, one for me, t'other for you>
So let's imagine for a moment that I had in my possession
four low power/noise 1750 RPM Reeflo and Dolphin AmpMaster pumps
for filter return and recirculation, a high speed pneumatic valve
actuator (AKA wavemaker)
together with a subfloor cavity close to the slab that the tank
is going on that could house all said noisy equipment with
adequate ventilation, cold & hot water, drainage, electrical
supply and physical access for maintenance.
<I still wouldn't drill the bottom>
In such a circumstance, I might be really tempted, at least
conceptually, to drill (and reinforce if necessary) the bottom of
the tank and have nothing with moving parts in the display
tank.
<Mmm, moving parts aren't really such a big deal... I do
wish you had another 1.5" hole for running electrical
conduits from inside and above (lights) the tank down
through>
Hypothetically speaking, from an engineering perspective, how
would a competent fabricator do this? Then, same question, only
for a software engineer pretending to be a competent
fabricator.
<Do... what Rob? Again... one recirculating pump outside... of
good size if you want... up to a 1.5" ID discharge!>
I've included a scale drawing of the tank bottom that shows
the overflow box in yellow, the existing holes in white and the
proposed new holes for the wavemaker pipes in red and orange.
<Yeah...>
I'm OK, with heck no - just need to understand the reasoning
behind what the risk/barrier is to drilling the tank ... other
than "people don't do that" or "are you
nuts?".
<The chances of leaks, breakage, and just the lack of benefit
from making more holes is simply overwhelming. I am also a
long-time content provider in the dive (as in scuba) travel
interest... and have had my experiences with through-hulls on
boats/ships... the less the better is my rule>
I'm also OK with "Jim charges $80/hour, quit bugging me
and call him to come over so he can tell me in person that I am
nuts".
<Heeeee! Do say hi to him for me>
Thanks again for humoring me.[image: Aquarium Holes.jpg]
Rob
<Be chatting further I hope/trust. BobF>
2.25" hole in the middle, all others 1.5" ID, 8 in'
square overflow box in the middle |
Question, overflow drain size, placement
6/21/10
Hello All, I have a 250 gallon reef tank I am building. I was wondering
if I can put both drains in one overflow and both return lines in
another.
<Assuming the drain lines and box are sized appropriately for the
flow you want you sure can. See
http://wetwebmedia.com/SystemPIX/PlumbingPix/Oneinchart.htm
for the line sizes, leave yourself some redundancy!>
Would this be bad to do for any reason, I never see anyone setup this
way for some reason?
<Many do not do this because they use predrilled tanks with 1"
drain lines.
There is one drain line per overflow. The other reason is with multiple
outputs on opposite ends of the tank it helps to disperse flow. If you
will have other flow in the tank you can still do this.>
James
<Scott V.>
|
Re: Setup Critique, thru hull diameters mostly
6/17/10
Eric,
<Mmm, he's out with a medical issue.>
Attached a photo of the tank with newspaper rock to think of
aquascaping ideas. Any downsides you can think of or any
improvements u would implement to this?
<Am not a big fan of such rock stacking m'self... How
about bommies instead?>
Also, buying the PVC parts and I forgot to ask you- I was
thinking of putting disconnect unions at the drain lines by the
sump and by the tank just in case I need to remove the sump, is
that a bad idea?
<A good idea. True-unions>
I don't remember if we discussed this but BOTH my drains and
returns are 1.5" bulkheads.
<I'd make these 2" ID>
I am going to keep the 1.5" to the drain and reduce the
return PVC to 1", are you OK with that setup?
<Not I>
Hope all is well and again
thank you for helping me.
Mike Z
<Read here Mike: http://wetwebmedia.com/SystemPIX/PlumbingPix/Oneinchart.htm
and the linked files above. Bob Fenner>
Re: Setup Critique 6/17/10
GEEZ sorry to write you so many times but that is the burden of
being a genius, is it worth it to you guys?? Anyway, I have
attached 2 schemes.
Being that all the holes drilled in the tank are 1.5"
bulkheads (weird isn't it???),
<Nope>
do you think I should do the standard one drain one return per
overflow (scheme 1) or both drains in one and both returns in the
other overflow (scheme 2)??
<Two larger drains one return per overflow>
Scheme 2 would reduce head length on the pump and be a joy to
plumb. What do you think?
<Scheme 2... and bump the inside diameter of each to 2".
BobF>
|
 |
Re: Setup Critique
6/17/10
Hi Bob, I hope Eric is OK. SO you don't like the 1.5" for
drainage even thought they do 1500gph which is 7 times flow for
this tank?
<Yep>
Upgrading the holes will be a nightmare, there is not enough room
in the overflow to put the 2 2" bulks in.
<Rats!>
as far as the returns are you against doing the 1" ( I know
the article said not to use it for drain but didn't mention
return) ?
<Whatever the pump discharge ID is... is what I would
use>
Also, do you think I could plumb the sump with 2 drains in one
overflow and both returns in the other?
<Could... if there's room, yes>
It would make plumbing so much easier , is would reduce head
pressure and would equalize return outputs....Please say this is
OK!!!!
<Head?! Who said head!?>
HAHAHH, anyway take car <care?> of yourself Bob good to
finally get the legend himself. I want to thank you for the years
of education you have given me.
Mike Z
<Glad to have contributed... B> |