|
FAQs About Sump/Filters Design/Engineering 8
Related FAQs: Sump Design 1,
Sump Design 2, Sump Design 3, Sump
Design 4, Sump Design 5
Sump Design 6 Sump Design 7, &
Sumps/Filters 1, Sumps/Filters 2,
Sumps 3, Sumps 4,
Sumps 5, Sumps 6,
Sumps 7,Sumps 8,
Sumps 9,
Sumps 10, Rationale,
Construction, Sump Components,
Pumps/Circulation, Maintenance,
Refugiums, Plenums in Reef Filtration,
Marine System Plumbing, Holes
& Drilling 1, Durso Standpipes,
Overflow Boxes, Bubble Trouble,
Plumbing Noise, Make Up Water
Systems,
Marine Aquarium Set-Up, Algal Filtration
in General, Mud Filtration 1,
Related Articles:
Pressure Locking Sump Baffles; Welcome to the World of Versatility!
By Joshua McMillen, Refugiums,
Marine Filtration, Reef Filtration,
Mechanical, Physical,
Marine System Plumbing, Fish-Only
Marine Set-up,
FOWLR/Fish and Invertebrate Systems, Reef
Systems, Coldwater Systems,
Small Systems, Large Systems,
Refugiums, | 
|
Improving Nano tank
sump/DSB 2/26/10
Hello Crew,
<Hi Stan>
I have a question about "fixing" the shallow sand bed in my sump, but
first a brief system description...
<Ok>
I have a 29g display with around 40lbs of live rock and base rock, with
an overflow into a 20g (long) sump. The sump has an Aqua Remora skimmer
in the first chamber, then a refugium area that is about 18 inches long,
with a 5-6 inch layer of (very) live rock rubble suspended on an egg
crate rack over a shallow (1-2 inches) bed of live sand. Water flows
over this area, and the live rock rubble is covered with tunicates
<Nice!> and small feather duster-like worms. This spills over into a
pump chamber housing a Marineland 3000 pump, which goes to a SCWD that I
have estimated to be flowing around 450gph. Display is lit by a set of
65w PC bulbs for 11 hours a day. The sump is not lit.
<Really? Your system might benefit from this.. have you read WWM re?>
Primary inhabitants are a single purple Condy (which is large and
beautiful), a few Mushrooms, one Gorgonian, a single Rock Anemone, a
Green Brittle Starfish, a few Hermits and Snails, and a huge bristle
worm. <No fish? Unusual>. I will not add any more livestock other than
either some Peppermint Shrimp or a pair of Coral Banded Shrimp.
My question is what is the best course to take regarding the sand in the
sump? I don't want to compromise the fauna on the rock there, or risk an
event with the sand that's already there. I feel like the shallow depth
is a time bomb of sorts, and I am leaning toward adding sand (1mm or
smaller) an inch at a time, covering 50% of the bed at a time, until I
get it to an acceptable depth (is 3" enough, or should I go deeper?).
<I would either remove an inch, or, better, add several inches, one inch
at a time, a month at a time. To a total of not less than 4 inches,
preferably 5-8>
If removing the sand altogether from the sump is best, I will go that
route.
<I would not. This is a habitat for a multitude of animals>
My display is 1" or less.
<Fine>
Thanks for all your efforts at putting together and maintaining such a
super website!
<No problem, although most of the work has been compiled by ‘older’
crewmembers than me!>
On a personal note, you were very helpful a while back in setting up
what has been my favourite tank in my past 20 years of aquarium keeping,
and it is looking very much like the Caribbean biotope I was going for.
<That’s marvelous news!>
I did cave when I saw the Anemone, but have been resolute in not adding
a fish to the aquarium as I feel it would be irresponsible.
<Could indeed be. I am not an expert here, but I don’t think this
Anemone is easily paired with Clowns, and is definitely a danger to
other fishes>
I committed myself to waiting for the tank to mature, and this has made
all the difference!
<Patience pays!>
The fun my family and I have watching all the tiny creatures in and
around the rock has more than compensated for the lack of fish and heavy
coral stocking I see in similar tanks.
<Outstanding Stan! There certainly are several different ways to ‘skin a
cat’>
Stan
<Simon>
Sump And Skimmer Question, des./sel. 1/21/10
Hello, Hope all is well today.
<Is OK now that my annual physical is done with. I think my doctor had a
large ring on when he did a particular exam. Yuk.>
I have a 55g FOWLR and a 34g reef tank. I am in the process of upgrading
and I have two 135g tanks that are in the planning stages of becoming my
new FOWLR and reef tanks. I am trying to decide on what
skimmer/skimmer's I want to use before I pick out my return pumps. I've
heard that you want the same flow through the sump as the skimmer pumps
flow rate, for the skimmer to be at max efficiency. Is there any truth
to this?
<Not that I'm aware of. Most decent skimmers do not process that much
water per hour, at least compared to what a required pump would put out
properly matched with your size tank.>
I am playing with the idea of doing a large stand alone DIY skimmer and
have it feed both sumps. I haven't really seen any pros or con's of
doing one skimmer for two tanks. So my options are set up both tanks
separately, 135g tank with 75g sump each and have two skimmers. One
large DIY skimmer stand alone (as mentioned above), or I have an acrylic
180g that I could setup as the sump and plumb both tanks to it, and use
one giant skimmer.
One last question, if I did both tanks plumbed separately, could I use
the ASM-G1X off of my 55gallon setup on one of the tanks, or do you
think that the ASM would be too small for a 135g setup? Sorry for the
long set of questions.
<The problem I have with a community sump is that if a disease outbreak
should occur in one tank, it can quickly spread to the other tank. I'm
in favor of a separate
sump and skimmer for each tank. The other negative factor is if you have
a problem with the skimmer, both tanks suffer. The ASM-G1X is rated for
a 150 gallon tank and is powered by a Sedra 3500 pump. This should be
fine for a 135 provided the tank is not heavily stocked with fish.>
Extremely thankful for your time,
<You're welcome. James (Salty Dog)>
James
Sump design thoughts 9/2/2009
Dear Crew,
Thanks again for having such a wonderful site. Perhaps one of these days
when I stop buying aquarium equipment I can make a donation =).
<Heeeee!>
I have been considering a better way to improve my filter system in my
125g reef tank. Right now it has a 2"-3" live sand bed, about 60lbs of
live rock in the display tank, (working on getting another 70+lbs when I
can...here and there) and a 30g aquarium baffled out with one empty
chamber (water input also gets siphoned out when waste accumulates), one
chamber for the skimmer, and one chamber for a refugium (about 13" long
with a 3 - 4" live sand/miracle mud mixture planted with various
Caulerpa, mostly prolifera, lit 24/7). It has been working....though I
don't think my wife's stocking ideas are helping matters any (sometimes
its frustrating to come home and find a new "tank mate"
swimming/crawling around....especially when its a CC Star in a reef
tank!!) .
<Ah no... Perhaps taking your spouse about when you both can visit LFS,
even to local to regional meetings, a conference...>
We have enough outside sources causing issues in our tanks...one could
always do with one less...but I don't really want to get rid of my
wife...
<Ah, no... better to incorporate, amalgamate your interests, values,
goals... by far. Elements of your relationship>
so I am hopeful things settle down as she learns. So I went on a mission
to try and put something better together to help augment my wife's
habits until one day she figures it out.... hopefully soon.
<Maybe she could/would like a system of her own?>
Anyway, I came across some excellent deals to start my new filter
system:
1 Little Giant 4-MDQX-SC $2.00 (not a typo...actually $2.00. It even
still works and looks brand new)
1 Oceanic Trickle Filter 250 sump $20 (going to require me to install
baffles, since it is basically an empty tank, but surely worth every
penny, since it has the bulk heads already factory installed, and glass
for my baffles with cost me a fraction of a new $300-$400 sump) so
naturally I started planning everything out in my head, and wanted some
input, and I thought "who better to go to than WWM?" So, I really hope
you guys can give me some input.
Question #1. Now I have been spending a lot of time here, and decided in
my new sump design to stay away from the bioballs due to the negative
response in most cases (of course my brother argues left and right that
they are the staple in any quality wet/dry system, or they wouldn't be
there....yadda yadda...I told him to go read =).
<Good>
Anywho, my question is: can I/should I use something else in it's place?
<I would, yes>
Something along the lines of refugium rubble/smaller chunks of live
rock, SeaChem's De-Nitrate, or Eheim Substrat. Will these still lead the
designated chamber to an eventual "factory"?
<Mmm, no... these materials are different than the two dimensional
material called/labeled "balls" in being 3-D, having small spaces that
are hypoxic-anoxic where organisms that live in low to no oxygen "do"
the opposite reaction series: denitrification>
I plan on having a filter sock on the water input to the sump, as well
as building a shelf (egg crate with some finer mesh to stop the media
from falling through the holes) for said media to rest on with a
powerhead underneath to push water up in the hopes that the added flow
will continue to keep more of the particulate matter the sock might have
missed, suspended in the water column to be either be skimmed out or
removed via a Lifeguard mechanical filter on the return line after the
sump.
<Do plan on frequent disassembly, cleaning of the cartridge... at least
weekly... with a substitute cartridge to clean, let air dry twixt
cleaning cycles>
I don't remember coming across anything addressing this, but I am prone
to mistakes, and maybe I just over looked it. With an additional 70lbs
of LR am I going overboard with bio filtration?
<Indeed, not>
Question #2. I am planning on getting a few additional components from
Lifeguard systems - the mechanical and chemical modules.
<Mmm... I would interject a comment: I am not a fan of this line... for
a few reasons I'll state: For one, their design is flawed in making
water flow through two 90 degree turns per module, requiring a good bit
of pump pressure; two, they're limited in volume for inserting/using
media... lastly, they require too much time, effort to service... I
would instead just rely on the filter sock, and place other media in
area/s of your new sump, in Dacron bags, that can be re-used>
I want to run a ball valve in between the mechanical and chemical
module, so that when I run the carbon, I can turn the valve on and off
(really to use it on an "as needed" basis, while still allowing whatever
particulate matter missed (from the above mentioned) to be filtered out
through the mechanical filter. Am I taking this concept to far, over
thinking, and actually causing myself to have more headaches, or is this
somewhat of a good idea, and worth investing the money?
<I wouldn't go this route>
I guess I am just not a fan of "filter socking" carbon, and I feel much
more at ease when I know there is virtually no water bypassing any step
of the filtration process.
<Enough flow can/will get through if such media is bagged, placed in a
flow area twixt baffling...>
Question #3. Should I just forget about question 1, and build a larger
version of the one I have, with 1 chamber dedicated to skimming, and the
other for the refugium (though this time I think I will stick to
Chaeto), ensuring that none of the water passing into the fuge makes it
past skimming?
<Could, but I wouldn't necessarily>
Thanks for taking the time to read/respond. I just really needed some
other outside input, before I can fully justify it to my myself....and
my wife (she always thinks I am doing something wrong...lol). I am sure
if there is a flaw in my plan you guys will certainly let me know.
Thanks again,
Justin
<Enjoy the process. Bob Fenner>
|
DIY Sump: A novel idea, but with a few pitfalls. 8/28/2009
Hi guys
<Hi Mike>
I'm looking to construct a new reef tank. I've decided to sump it rather
than use canister filters as I have done on my much smaller reef tanks.
<Sounds good..
My tank is going to be well stocked and about 200 litres in volume.
<53 gallons for our readers challenged by the metric system>
I have enclosed plans for a sump I've designed, I wondered if you could
look over it and see if it has any shortcomings?
<It is a novel, space saving design, but I can see one glaring problem
and three that could be either serious or an annoyance, depending upon
your view: A top down view would have been very helpful in this case to
help visualize as well.>
1. As you have drawn it, with water entering the top skimming area and
then dropping down a sluice to a refugium, there is going to be a fair
amount of suspended weight which could deflect or fail at some point
without additional reinforcement or thicker acrylic than you may have
planned for.
2. The sluice between the skimming area and the refugium will be
extremely difficult to clean, as will the live rock area.
3. It may be difficult to get the proper amount of light to the
refugium.
4. I don't see this as something that is going to be easy to assemble
Cheers guys
<My pleasure.>
Mike
<MikeV>
|
 |
Baffled about baffles 6/23/09
Hi friends.
<Hello Jason.>
I am delving deeper into my inconsistent skimmer production. A year ago
I bought a 125 gallon tank with a 30 gallon sump. It has a nice
Euro-Reef skimmer. Off the top of my head, I can't remember what model
it is and I don't want to pull it out of the sump to check as that would
involve a bit of monkey business. I know it's rated for my 125 anyway as
the fella I bought it from knew his stuff pretty well I'm sure. Anyway,
the sump is rigged according to the way he laid it out and I'm not sure
it's baffles are in the right place for the water line to stay level for
the skimmer. I know the skimmer is supposed to be sitting in about 6-8"
of water according to what I have read from your posts.
<About right for this skimmer, yes.>
But as it sits now, it's in about a foot of water which is equal to the
"max fill" line in my sump for the water I tried to find a diagram for
my particular skimmer to see how the baffling should be but haven't
found any help. I will explain how mine is set up.
From left to right, the skimmer is first, which also has the drain water
coming in from the tank.
The first baffle is glued to the bottom of the sump and is about 6"
tall.
Then there's a gap and the next baffle is about a foot tall and has open
space at the bottom for water to flow through. Then another gap and the
next baffle is like the first, glued to the bottom and about 6" tall.
Then it's the return (mag 18) pump. At this point we're in the middle of
the sump. From here on I'm not concerned as it's my fuge on the other
half of the sump, which has drain water coming in as well and trickles
down to the pump.
<Okay.>
I've always tried to keep my water steady at the max line for the sump
that he had drawn with a marker. I thought he said that's where it
should be for the skimmer to work best. But at this level, the water is
well over that first baffle. Also, the water level goes down equally in
the skimmer chamber as well as the pump chamber. I'm certain the water
line needs to stay constant for the skimmer to work best. At least in
the skimmer chamber.
<The water line needs to be consistent for the skimmer's performance to
be consistent.>
I drip Kalkwasser at about a drop a second in the sump to compensate for
evaporation and to keep water line consistent. This works great and
beats buckets for sure, but I'm not sure my sump is configured properly
to begin with.
<To keep the water level in the skimmer chamber from fluctuating with
evaporation
you will have to keep the water level in the pump chamber below that of
the first baffle,
6". If you wish to run a higher level than this you will need to extent
that baffle up to whatever
level you want to run.>
Help.
Thanks,
Jason
<Welcome, Scott V.>
Many a questions for you.... Reef sump... skimmer sel.
Qs 6/1/09
Hello,
Hope all is well with everyone. I have a few questions for you. I have a
180g reef tank that I would like to retro fit a sump to. I want to add a
HOT overflow box to the tank and would like to know:
1. What kind? I am thinking a CPR overflow, but what size?
<As large a model that you can fit, ideally two for redundancy with the
return pump only flowing what one can handle. You can not have too much
overflow capacity!>
2. How big of a sump?
<As large as you can fit in the space.>
3. How big a return pump? I would like to have an underwater pump. The
distance from the sump to the tank is about 5-6 feet.
<See above.>
4. What skimmer do you recommend? I am looking at the Bubble King, the
Royal Exclusiv Alpha 170 or the Vertex IN-250? I don't know if you have
any experience with these but I would love you opinion on which you
think is the best for the money.
<The Vertex hands down for the dollar. Both are fine skimmers though.>
Thanks for your help in the past and on this question.
- Jeromy
<Welcome, Scott V.>
Re: Algae Scrubber Question
Dear Mr. Fenner,
<Eric>
Thanks for your reply! Well, I took the plunge so to speak and installed
a sump. I have a hang on overflow from TOM going, nifty little item that
uses a powerhead to keep air out of the siphon. I know some of the
people you have manning this site are not big fans of these overflows,
but this is a temporary stop gap (max 2 yrs) until I can get a bigger
tank going.
<I hope it works... till then>
It's a simple job, just a 10 gallon glass tank with 3 panes of glass 1
inch apart (middle one is 2 inches off the ground) to act as a bubble
trap.
<Good idea>
I have a small amount of extra live rock in the make shift refugium
area, and I moved my protein skimmer and heater down there as well. I
have some purple algae, Ochtodes I think, growing in the main tank that
I'll move mostly to the sump. Beautiful Algae! Hopefully that will help
with the red hair algae menace. Failing that I'm thinking of using
Chaetomorpha. I also have a light rigged down there on a reverse
photoperiod, it's just a cheap clamp on reflector and 60W plant growing
light I got at Home Depot. No discernable effect on temperature so far!
Thank you for your encouragement, plumbing the sump has been a real
education. The tubes that came with the overflow were kind of flimsy
(and ribbed, just begging for something to get clogged in there like
algae), so I opted for some of my own tubing from Home depot.
<You are/were wise here>
The drain pipe is 1" ID, and the return is 3/4" ID. I installed ball
valves on both of them so I can control the flow rate to and from the
tank. I have a 475 GPH pump for the return, and a Koralia 1 Powerhead in
the tank. Too much flow for zoanthids, mushrooms, GSP, a couple LPS and
a small finger leather?
<Mmm, no... not if blasting them directly>
I'm actually thinking of getting rid of the leather, he sheds almost
once a week, and only open up 2-3 days per week. He might need a new
home I think.
Possible allelopathy etc.
<Yes>
I tested the tank with a bunch of conditions, (power-outage, pump
failure, siphon break) and it started right back up again with no
overflows. No unwanted siphons etc, just need to make sure everything is
clean. It sure makes water changes easy. My only concern is that the
water has gone a light milky white color since the sump was installed...
bacteria? dust from new live rock? micro bubbles from a bad plumbing
job?
<All possibilities>
not sure there. All the
water parameters check out...
pH -8.0
Alk - on the low end 1.9ish, so added some Seachem buffer.
<Mmm, see WWM re... needs to be added to the new/make-up water, not
directly to the system>
Calcium - has always been highish at 400-450.... can't get it down even
with weekly 25% water changes.
NO2, NO3, NH4 are all undetectable.
Magnesium is at 1250ppm
S.G. is stable at 1.026
That's my other worry, is that with the high calcium I started a
precipitation storm.
<Yes... very likely the high Ca is responsible for both the diminished
alkalinity AND the dust in the water>
But I'd expect that to look different than just milky water.... with
actual crystals forming. I'll try to get a picture of the setup so you
can see for yourself, my fiancé just got a new camera that she's
learning to use. Thanks again for all your help, it's a privilege to
get information from someone with as much experience as yourself.
Cheers!
Eric
<And you my friend. Bob Fenner>
Tank Configuration 5/5/09
Hello All,
< Hello Ramon and Sons ! >
I have two questions that I need help with,
< Ahh, I thought you might. >
I have a Red Sea Max 65 Gallon All-in one( just cycling for about 2
weeks now) a 29 Gallon that has some Fiji rock 2 inch sand bed and a 10
Gallon tank that I am using to kill off BGA.
I would like to know which would be the best way to connect them all
together?
< That would depend on your plans for each tank. >
I can't drill the RSM, 29 Gallon, or the 10 Gallon.
< Can't? >
I have 2 Maxi-Jets 1200s that I can use and buy an overflow for the 29
gallon to the 10 gallon and use the 2 pumps, one would be for the flow
to the 29 gallon and one pump for the return from the 10 gallon to the
RSM.
< O.K. If I am reading this correctly the plan is as follows:
The 65 gallon to the 29 gallon with a maxi -jet.
The 29gallon to the 10 gallon with an overflow.
The 10 gallon will then return to the 65 gallon with another Maxi-jet.
If drilling is absolutely not possible I would scrap the 10 gallon frag
tank and have the 65 overflow into the 29 and then returned. The two
Maxi-jets will not pump the same even if they are rated the same.
Although
initially this could be corrected with the use of a valve, it is still a
recipe for future disaster. You should also check the Maxi-jet with a
head loss calculator to be sure it will be sufficient.
http://www.reefcentral.com/calc/hlc2.php >
I was thinking of making the RSM into a reef tank, the 29 gallon into a
refugium and the 10 gallon into a Frag tank or do you have any
suggestions on what to do with the 29 gallon and 10 gallon?
< You took the words right out of my mouth...or my keyboard. That would
be my suggestion as well if drilling were possible. >
Any Ideas would be helpful.
< Please write back if you decide to drill and/or have anymore questions
>
Thanks, Ramon and Sons
< You are quite welcome. G A Jenkins >
Freshwater to Saltwater Sump
4/11/09
Hi guys, and girls, I'm back with another quick question.
<Hello! I hope I can be of some help.>
I found online the Marineland model 4 new sump that a guy had been using
for 6 months in his freshwater tank. What do I need to do, as far as the
bio wheels having freshwater bacteria compared to saltwater bacteria, to
make it work in my 125 gallon reef ready saltwater tank that has been
going for 3 years. Can I rinse off the bio wheels in saltwater and let
them sit in my sump for a month and let new saltwater bacteria grow on
them.
Plus what do you think of the new Marineland acrylic sump model 4, and
also the Marineland pro 300 skimmer...??
Thanks for all your past, present and future help.
Aaron
<Aaron, I would not reuse the bio wheels. They are fairly inexpensive so
I see no reason to expose your tank to possible contamination.
Especially since you do not know the current owner and have no clue as
to what he/she may have dosed.(medications, additives, etc.....) The model
4 looks a bit expensive to me considering the price of a glass aquarium
with a similar footprint. Building your own with a new or used
aquarium, acrylic and some time could save you a nice bit of those hard
earned dollars. It would also
give you a bit of room for a refugium. Here are a couple of links with
good refugium DIY info and ideas.
http://www.wetwebmedia.com/refugium.htm
http://www.melevsreef.com/29g/sump/design.html
After doing a bit of research on the Marineland skimmer it seems to be
pretty good bang for your buck. You should also consider The Reef
Octopus Extreme 200. Very nice skimmer for the price. I think you should
be fine either way. Adam Jenkins>
Sump Design 2/25/09 Hello, <Wes.> I've been spending
quite a bit of time reading the helpful insights that you have on your
site. Excellent!! <Thank you.> I have a new system. 75 gallon
sump. Will have it plumbed to 2 tanks. One sump pump for each tank. I
have the option of 3 or more drain lines going to different parts of the
sump. I will have a collection sock sleeve followed by a small wet/dry
Bioball chamber at one end,. Next to it will be about 50lbs of Live Rock
and a protein skimmer. Then the water will pass through baffles for a
small refugium area and finally overflow into the area with the 2 pumps.
My question is this: Will this be too much circulation through the fuge?
Should I have one of the drain lines go straight to the Pump area to
lessen the flow? <How much flow, what sized lines and what size
refugium are we looking at here? See:
http://www.wetwebmedia.com/sumpdesfaq.htm> Thanks Wes <Welcome,
Scott V.>
Sump/refugium design 1/22/09 I’ve been working on this
build of my 150 gallon reef ready tank for some time. At first, I
thought I was limited to the under the cabinet space as there is no
room for anything next to the tank – a wall on one side, and a
hallway on the other. After some measurements however, it appears as
though I can drill through the back few inches of one of the walls
and get through to a very large walk-in storage closet. <Great!
Nothing like a bit of demolition work to get things going!> I
already have everything I would need for this setup, but just wanted
to send my plans your way for input on to whether this would work
well or not. <Ok> Now the 55 refugium on the left would
actually be turned 90 degrees, as in from the front we would see the
short side; it was just easier for illustration to draw it this way.
My main concern is height and gravity. I know the top of the 55
would have to be lower than the bulkhead on the 150 so that it would
drain downwards towards the tank. <Yes.> Then it would flow
either out of a drilled hole in the 55 or an overflow (leaning
towards a drilled hole, just haven’t done this yet) and would have
to continue downhill into the sump below. The refugium would
output into its own chamber in the sump that is separated from the
skimmer so to allow all the beneficial stuff from here to have a
clear path into the pump and back into the display tank. Could it
become problematic that I am only technically skimming the water
that overflows from the right side of the tank? <No, you will
still skim plenty.> I had also thought of splitting the flow from
the left to be 50% into the refugium and 50% back into the skimmer
section. This would both slow the flow through the refugium as well
as increase the amount of water through the skimmer section. Do
you foresee any problems with this setup or the splitting the left
overflow idea? <I would not split the flow, just how it is
diagramed will be fine. Do keep in mind most “reef ready” tanks use
1” throughputs on the overflow good for about 300 gph safely each.
With the long horizontal run you will have I would plan on about
half this flow through that line.> Thanks for all your help as
always! Josh <Welcome, Scott V.> |  |
Overflow Redundancy For Sump 1/13/09 Hi Bob, Many of the
in-sump skimmers require water levels of 6 to 8" to operate efficiently.
Once installed, most or all of the remaining capacity of the sump is
reduced which will then overflow the sump should a power outage, pump
failure, etc. occur. I've attached a pic of what I have done to remedy
the problem. The components used were about 10 bucks. Pretty cheap
insurance for protecting your flooring material. Regards, James
<Good idea. BobF> |  |
Re: Overflow Redundancy For Sump 1/15/09 I just wanted to
throw another idea out regarding the email below that doesn't involve
drilling the sump or using up more space within the stand. <Please
do> To maintain a consistent and high water level within a sump for
the skimmer without having to keep the water level high in the sump as a
whole (and no glass cutting or silicon handiwork), we did the following:
* added a 2.5 gallon tank inside the sump, raised with a PVC shelf *
moved pump for skimmer into 2.5 gallon tank * pointed overflow drain
pipes into the 2.5 gallon tank <Ahh, I see> Doing it this way
maintains the water level that the pump is in (for consistent skimming)
while allowing the water level in the sump as a whole to deviate without
any issues (assuming you don't allow so much to evaporate that you have
salinity shifts!) and you can maintain it as low as your other pumps and
equipment will allow. As long as your overflows move more water then
your skimmer takes in, it works fine and the excess water goes over the
edges of the 2.5 gallon directly into sump. If your overflows aren't
draining properly, you've already got bigger problems on your hands (or
floor...) I'm beginning to suspect this hobby has a larger range of
potential solutions for individual problems then any other! Hopefully
this will inspire others to come up more ideas to share! David
<Thank you David... did you See James'/Salty Dog's recent related piece
re this? Here: http://wetwebmedia.com/sumpdesf8.htm Requires dumping
the water back in by hand... but a good/worthwhile stop-gap measure for
keeping water off the floor in many cases. Bob Fenner> Overflow
Redundancy For Sump 1/13/09 Hi Bob, Many of the in-sump skimmers
require water levels of 6 to 8" to operate efficiently. Once installed,
most or all of the remaining capacity of the sump is reduced which will
then overflow the sump should a power outage, pump failure, etc. occur.
I've attached a pic of what I have done to remedy the problem. The
components used were about 10 bucks. Pretty cheap insurance for
protecting your flooring material. Regards, James <Good idea.
BobF>
Re: Overflow Redundancy For Sump 1/15/09 Yes, James has a
very innovative idea! <Well thank you and this is James.> It's
actually what inspired me to pass along the changes below that
allowed us to maintain drastically lower water level in sump (I tried to
find a non-drilling/cutting solution because adding a large bucket in
the stand would be challenging, and knowing my luck I would probably
crack the sump while drilling the overflow hole to drain into the
bucket!) <I just used a hole saw available at Sears or other hardware
stores. You do have to drill at a relatively slow speed to keep the
acrylic from heating up. Using a dull hole saw will make things even
worse.> I meant to mention in the original email (per advice from a
LFS)... I've gotten into the habit of also laying an oversized piece of
pond liner in every stand to keep the water up during clumsy
maintenance! <A good idea also along with applying a few coats of
polyurethane to protect the wood if need be.> Reading through the
responses you post really is a highlight I look forward to every day.
There is so much more time to enjoy the hobby when we do not have to
constantly deal with problems. <Amen.> I'm confident our tank
would be a maintenance and emergency nightmare without the wonderful
stocking, equipment, and maintenance advice the entire crew has made
readily available. Thanks again for the incredible public service you
provide. I'm looking forward to reading the next round of responses
posted from your awesome team! <Why thank you David, and another
thank you from the Crew at Wet Web Media. James (Salty Dog)> David |
Sump Design 1/12/09 Comments or suggestions? <Looks
fine, the water will flow downhill! Scott V.> <Bob, I reattached
the images as .jpg files.> | 
 |
Re: Sump Design 1/12/09 Is it going to be posted on your
site? <They are as I write.> Then I will be famous. <Heee,
in a way!> Further FYI it is for a highly modified AP 24. I could
provide detailed photos if interested. <Feel free to send them
along, limited to few hundred Kb.> Dan <Scott V> |
Improved filtration/Overflow, sump setup 11/24/08 I recently
set up a new 135 gal Oceanic reef tank. I converted my old 55ga tank
into a refugium underneath. The refugium is a simple design. It consists
of three compartments, divided by two acrylic sheets. The first
compartment is where I keep my skimmer and heaters, this spills into my
second compartment, which contains some live rock rubble and Chaeto
algae, and then the final compartment simply contains my two return
pumps. The volume of the system is approximately 40 gallons. My question
is do you think this simple design will be very effective? <Yes, tis
the setup nowadays.> Could I improve on it by putting a small pump
(200 gph or so) in the final compartment and pump the water that was
going to go to the display back to the first compartment to run through
the process again so to speak? <No, you want the raw water from the
tank running to the skimmer.> Also, I'm not sure what my two
overflows are rated at (if that means anything). <Typically 1�
bulkheads, good for a bit more than 300 gph per, though �rated� much
higher.> My return pumps are rated at 740 gph ea (again ratings don't
seem to mean much). <Nope.> The water level draining at the teeth
on the overflows is not even half way up the teeth. <Not a factor,
the bulkhead is the limiting factor here.> Last question, can it
handle more return? <Likely not.> Is looking at the water level on
the teeth a half-way accurate way to judge this? <No, see above.>
Thank you Corey <Welcome, Scott V.> Sump
question, des. 11/17/08 I have an Aqua line sump and
removed all the bio balls. I have filter material in the top tray
trickling down over pieces of live rock sitting on the egg crate that
the bio balls used to rest on, so my live rock is not full submersed on
the bottom of the sump. My question is should I remove the plastic egg
carton allowing the live rock to be fully submersed and there is a long
filter sponge preventing any debris to get to the area were the main
pump and skimmer are, do I keep that sponge in place? <I would
submerge the rock. As for the sponge, you definitely could keep it
there, but do be sure to clean it frequently. If you plan on a refugium
to culture pods, do not use the sponge before the pump.> Finally I
wanted to breed some co pods and other micro algae with the live rock so
do I need to hang a light on one side to allow light in as the filter
material on top will not allow light through. <You will need a light
to grow the algae, a macroalgae such as Chaetomorpha is what you will
want here.> Thanks for all the expert help. Brian <Welcome,
Scott V.> Sump/Refugium chamber order 11/15/08
Hi Guys, unbelievably in-depth and expansive resource you've put
together. Thank you all for your time! <A collaborative effort;
thank you!> I'm working on a sump design for my 90g reef tank. I'd
like to use Ogo (Gracilaria?) <yes> in the refugium section since I'm a
sashimi fan, which I realize will require some design finesse to keep it
"tumbling". To help facilitate that I'm thinking of incorporating
adjustable control of the flow through the refugium into my design. How
I accomplish this will depend on the order of my sump's sections,
which leads me to my questions that I haven't found answered after lots
of reading. It seems that the recommended sump section order is
skimmer and refugium on either end, with the return in the middle.
Overflows draining into skimmer and refugium. <It is one way,
generally allows for a larger refugium since the water level in the
refugium can be higher, not dependant on skimmer chamber flow through.>
-Wouldn't the skimmer catch more junk if all the tank's overflow was
passing through it, instead of some passing only through the refugium at
each pass? <It does to a point. Running too much water through the
skimmer will decrease dwell time. This will also decrease skimmer
output, to nothing if too much water is run through. > -Would the
refugium (and therefore the tank) be happier with skimmed or unskimmed
water? <I would go ahead and plumb one of your overflows over to the
refugium, feed it raw aquarium water.> My gut tells me that ideally
all overflow would pass through the skimmer, then refugium, then return.
This would seem easiest to do by arranging the sump sections in the same
order. If my gut isn't lying this time, do you know of any design
ideas/plans/pics on allowing some skimmed water to bypass the refugium
to facilitate the adjustability I feel I might need? <Do check out
http://www.melevsreef.com/allmysumps.html. Marc has a number of designs
posted here.> Thanks a ton! <Welcome, Scott V.>
Sump Change Out 11/07/08 Hello Crew, <<Hiya
Carlos>> Let me say first what a great asset you guys are. <<And
gals, yes?…thank you>> There are so many questions (and differing
answers) on our hobby and you are certainly the best resource I have
found. <<This is indeed true (differing answers/opinions)…we
appreciate the kind words>> I have a 75 g tank that has been
established for a year and a half. One of the challenges (and enjoyment)
of the initial setup was to DIY as much as I could (I'm an engineer so I
could not help myself). <<Ah yes! I too much enjoy DIY>> I made my
sump from an old 20g tank and added a wet-dry filter consisting of two
Tupperware containers, a filter pad and some shotgun wadding. I also
made my own skimmer using an old in-line pool leaf catcher, an airstone
(wood), and a venturi that came with my pump. I've always had two
concerns about this setup: 1. That my trickle would eventually become a
nitrate factory <<This type filter really has no capacity to further
process/reduce NO3>> and 2. That my skimmer had very poor bubble
production and would eventually not keep up with demand. <<Indeed>>
I recently got a deal on a new skimmer from an aquarium shop that is
(sadly) going out of business. I'm planning to revise my sump this way:
The skimmer will sit in a container that will maintain a constant 10" of
water level (fed directly from the overflow on the tank). This will
overflow into a division that will contain live rock. On the other side
of the division will be my pump and heater. I plan to start out by
dumping all of my shotgun wadding into the live rock area, then slowly
remove portions of it and replace it with equal or slightly more volume
of live rock. <<Okay>> Does this sound like a good plan? <<Sure
sounds fine>> How much live rock should I add at a time? <<A few
pounds at a time to replace the wadding over the course of a couple
weeks>> I really do not have a good way to cure the rock. Would I be
better of adding "dead" rock and letting it seed from my wadding?
<<Mmm, not in my opinion. I would try to find cured/partially cured rock
at your LFS and just monitor water quality closely. There's a good
chance that the small amount of newly added live rock will have
little/no impact and will be HUGELY more beneficial than adding dead
rock>> Thanks in advance for your patience and your response. <<Is
my pleasure to assist>> Best Regards, Carlos <<Cheers, EricR>>
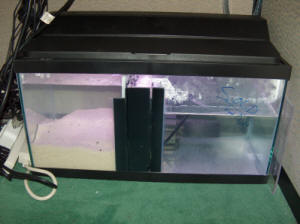
Sump Modification 10/12/08 Hey Crew, <Chris.> I've
finally decided that it's time to install a sump on my 55g reef.
<You will love it.> It's been up and running for almost a year
now, and yes, I am kicking myself for not doing this right at the
start. I recently inherited an old acrylic wet/dry trickle filter
from my dad's old reef tank. My plan is to convert this into a sump
for use on my tank. The design is shown in the picture below: The
dimensions of the unit are 31.5" long x 15.75" tall x 10.5" deep.
Originally, the water flow into the unit was in chambers 1 and 2. I
remember him having empty shotgun casings as a biomedia. (This was
about 1990, things have come a long way). <Quite an innovative
media.> I believe I will need to slightly modify the existing
design. The two red pieces in chambers 1 and 2 are not there. I
believe that in order for me to have live sand in the first chamber,
I will need to add these correct? <Yes, at least the one closest
to the first chamber, to hold the sand in.> If not, that would be
fantastic. <Don’t worry, these are very simple to add. Just a
matter of having the new baffle cut, place in the sump, and a small
bit of acrylic solvent to bond it all together.> Also, in chamber
3 there is an automatic top off system that is controlled by a float
valve. Now, here is where I need a bit of guidance. In order for me
to get this sucker inside my stand, I'm going to need to remove the
center support temporarily. Obviously, this requires draining and
removing my tank. <There are ways to get around draining the
tank, but draining is the safest way.> As for water flow into the
sump, I have two options. I've been given an overflow box that is a
"gravity run" type. That is, no option for adding a powerhead to
ensure a siphon. I've heard the type without a powerhead can be
somewhat risky, but that could've been due to the guy at the LFS
store trying to sell me his for $250 which I find completely
outrageous. <As for HOB overflows, the non powerhead using types
work fine. The real trait to look for is not dumping the water from
the tube when the return pump shuts off; this will help the siphon
start when the flow starts back up. All good HOB overflows on the
market share this trait. If you are going to tear the system down
anyhow, do consider drilling for a true gravity fed overflow. You
can visit my site for more info on this:
http://reefercentral.com/drilling_video.html.> If these types are
really that bad, the other option is to buy another 55g tank, and
have it drilled. <You can, or drill yourself.> Your
thoughts/advice are much appreciated. Chris <Thank you, Scott
V.> | |
Re: Sump Modification 10/13/08 Scott, Thanks for the
quick reply! <Happy to help out Chris.> I've also realized
that in order to run my skimmer in the second compartment, I'm going
to need to add a baffle there as well in order to keep the water
level up. I've also decided to go with buying another tank and
having it drilled. <A good move, do shop around a bit, some 55’s
out there are tempered (undrillable) on the sides and back in
addition to the normal bottom tempered pane.> I picked up the
overflow yesterday and it doesn't look to be in the greatest shape.
I also figure that with drilling a new tank, I will be able to get
exactly the type of overflow I'm looking for. A few more quick
questions while I have your attention. For a return pump, a mag 7
should suffice? <Yes, is fine for filtration purposes, you will
need some supplemental flow via powerheads or a closed loop. A Mag 7
with typical plumbing and head height will give you in the area of
300 gph.> Do you recommend anything higher than that? <You
definitely could, but if you have a Mag 7 or can get on cheap go for
it.> The sump will be located directly underneath the display, so
I would only be push water maybe 4 or so feet. I've also decided to
replace the substrate in the display. I have fairly large diameter
crushed coral substrate in the display now, but would like to go
with something a bit finer. <Many of us have made this switch at
on point or another!> I appreciate all your help! <Again, my
pleasure.> Chris <Scott V.> |
Sump Question, lighting use 10/9/08 Good morning to all,
<Shawn.> I'm planning on adding a sump to my 75 gal. mostly reef
tank. I presently have a lighted refugium with live rock and it houses
my protein skimmer and heater. I have been reading through your archives
and remember reading that you can set up a sump with out lighting which
would help produce plankton. Did I read this correctly or am I wrong
about this. <It can, but so can a sump with a light.> Would there
be any advantage to setting up a lightless sump. <There can be. Many
use lightless sumps set up as biofilters with sponges or Aiptasia. For
the most part it is hugely beneficial to set up a lit refugium with a
macroalgae. This will aid both the pods and your filtration.> My main
intentions are for culturing more food for the corals as well as adding
capacity to the system and additional filtration. I have been adding
live Copepods to the refugium and tank to try and get a reproducing
population going but have not been very successful as of yet. <Try
the macroalgae refugium, lit on a 10-12 hour cycle. > Thanks in
advance for your help and advice, Shawn <Happy to share, Scott
V.>
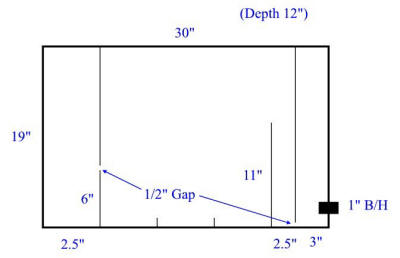
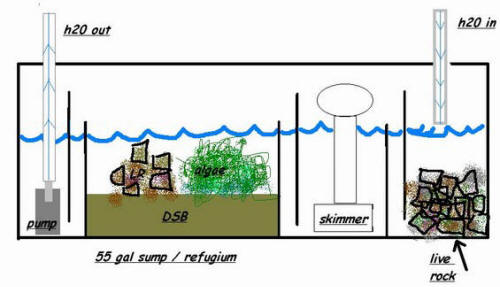
Questions from a Newbie 8/13/08 New to the saltwater world,
been reading a lot. Have had a 55g freshwater tank for over a year.
I have purchased an up and running 55g saltwater with 5 fish, couple
crabs, bunch of hermits and snails and a shrimp, live rock (27
rocks, don't know how to estimate lbs) and sand (about 2" deep).
Uses 2 fluval cartridge filters, 204 and 404. (Nitrates 160,
Salinity 1.030 when I got it! Nitrates 40, Salinity 1.023 now,
working the nitrates down with water changes.) I have also
purchased a 120g tank with a 30g sump that I am planning to startup.
<Okay.> My questions: 1) The setup came with one overflow box,
1" bulkhead. I'm thinking of using 2 overflow boxes, 1" B/H in each
or a rated 1200 GPH, but from reading your site planning on 600 GPH,
then using a ¾" return to a Current Switching Valve (3iQ Ventures)
fed from a Rio 20HF HyperFlow for the return pump (870 GPH at my
head height that I will adjust with a ball valve) and 2 Hydor
Koralia #2 Powerheads (600 GPH each) for a total of about 1800 GPH
total circulation. How does this setup sound? <There are many
numbers floating around about how much a 1” drain can flow, 300 gph
is the actual number. Also, consider running an extra overflow or
two for redundancy, if two will flow what you are running, use three
or four overflows. One will likely fail in time and this will keep
the water in the tank. Do also consider drilling this tank before
setting up, it is a far more reliable method to transit water to the
sump.> 2) The sump (pic attached) has ½" openings between
chambers. This seems very limiting to me. Will I have to reconfigure
or will this work? <This is a bit small, but can work. The issue
you may run into with higher flows is higher water velocity through
these openings. This means that the baffles will be less effective
at stopping bubbles.> 3) I am planning a 5" DSB in the refugium
in the sump. Do I still need a DSB in the display tank or can I go
2" deep there? (looking for ways to reduce startup costs, but
willing to invest if best for the long run) <You can run a DSB in
one or the other, the more the better. If you do not run a DSB in
the display, 1” or less is all that is needed/wanted.> 4) Not
sure the best way to start the new tank and transfer the fish, sand
and rock. I'm thinking of filling the new tank with new water and
half of the live rock from existing tank, then cycle for a month or
until all the numbers look good. Then move the fish and the
remaining rock. With this plan, I'm not sure how to move the sand
without making a mess of either the existing tank before I move the
fish or the new tank after it is up and running. I'll obviously be
buying a bunch of new sand but would like to use the existing also.
Your thoughts? <I would just move everything at once. One move is
less disturbing, moving half your rock out disrupts some of the
filtration on your existing tank, and you should not need to
cycle/cure your existing rock in the new system. You may even
consider bringing the Fluval filter over to the new system for the
first few weeks to help out.> Thanks for your help and for your
great site. Jeff Gaines <Welcome and thank you, Scott V.> | 
|
Sump size 08/08/2008 <<Hi Jeff...Andrew today>> I am setting
up a 120 gallon tank, which I have not decided will be reef, or FOWLR. I
am planning to use a 20 gallon long aquarium as a sump. Will this be
sufficient? <<Personally, I would prefer to go somewhere in the area
of 40 gals for a sump, for a 120g. 20 Gals does not fair much when
divided up.>> Thank you for your reply. Best regards, Jeffrey
Castaldo <<Thanks for the question, hope this helps. A Nixon>>
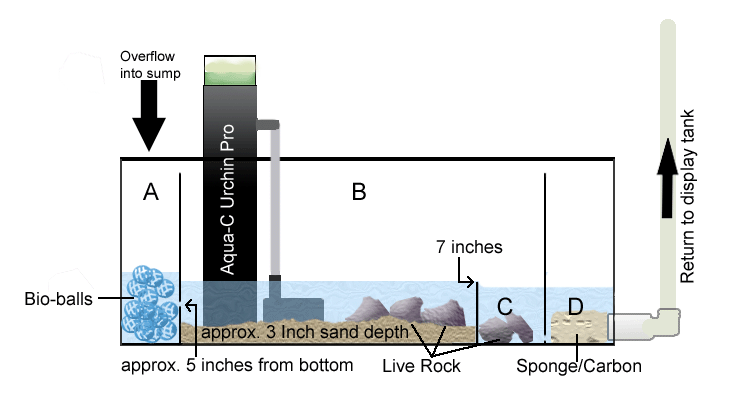
Sump re-design 5/17/08 Hi
Crew, <Jason> I have what I hope to be a fairly
straight-forward question regarding my sump redesign. I've looked
over your sump articles to get some ideas, but I'm still a bit
unsure on how to proceed. I have a 55 gallon display with a 15
gallon sump inside the stand. Because it's a relatively small sump,
I want to make sure I'm making the most of it. Basically I'd like to
remove the bio-balls from the first chamber (A) and either replace
them with sand or live rock rubble. <I would use the last> I'd
also like to add more sand to chamber B as well since the current 3
inch depth is kind of in-between the preferred depth; of course that
may be a problem because if I add too much sand then the pump for
the skimmer will be close to being out of the water (at least given
the currently sustained water depth). Eventually I'd like to add
some Chaeto to the sump - as soon as the LFS has some in stock.
<I would definitely move the skimmer and its pump to area "C">
Does my plan seem sound to you? Or, in your infinite wisdom and
kindness, can you recommend an alternative modification? <Mmm,
this is "about it"> I've attached a drawing of the set-up to help
clarify things. Thank you, Jason <A very nice graphic! Bob
Fenner>
Re: Sump
re-design 5/17/08 Thank you for such a quick response!
I'll take your advice and place rock rubble in the first chamber.
I'm not sure if I can move the skimmer to chamber C, as it's a
pretty snug fit and the mag pump is rather large, but I'll give it a
shot...I may have to get creative :) Glad you like the diagram. If
you have any graphics/drawings on your site that you would like
updated, I'm happy to volunteer my services. <Heeee! Be careful
where you volunteer! The tasks are endless> Thank you, Jason
<Welcome. Bob Fenner> |  |
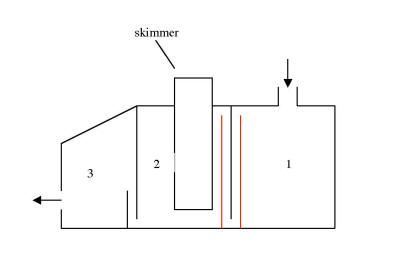
Sump Design 3/9/08 Hello, I am just starting out in the SW hobby.
I have a 150 gal tank that I initially want to use as a FOWLR setup, and
maybe in the future add some corals and inverts. <OK, many of us
start out this way.> I also have an empty 55 gal tank that I want to
convert into a sump / refugium. I have some Plexiglas to use for baffles
and dividers for the sump but am not sure what would be the best way to
configure everything. Does this design look like it would be ok or do I
need to make some changes? Any advice or suggestions would be
appreciated... thanks! <Your design looks fine, although I would put
the skimmer in the first chamber to get the rawest water possible. One
other option is to put the skimmer chamber on one end, the refugium on
the other and a common sump return area between the two. With this
configuration you can split your overflow lines between the two sections
on the ends and have the both overflow into the return area. The
advantage to this is it allow you to run a higher (greater volume)
refugium. Your rock rubble can go anywhere you wish with this. Either
will work fine, just wanted to give you another option. Have fun with
this, Scott V.> | 
|
Sump Question, des., store-bought... no WWM referral...
2/29/08 Hello all. <Hi Matt> I currently have a 55 gal reef
aquarium with some mushrooms, polyps, and leathers. I also currently
have 2 tank raised clowns and some snails. I really want a sump in order
to have all of my "gear" hidden. My tank is not drilled. I have an old
10 gal glass aquarium or I can afford to buy a 20 gal aquarium. What do
you suggest I do? <I'd go with the 20, gives you more water in the
system.> Are there any good plans out there for building one of
these? <Really need to do nothing to the sump, just place your return
pump into it unless you want an area for chemical media. Eshopps
manufacturers very affordable sumps so you might want to think about
this. Drs. FosterSmith carries these. The model RS-75 would work great
and it is priced at 114.00 including filter sock inlet assembly and at
18" long, should provide plenty of room for your gear. See here.
http://www.drsfostersmith.com/product/prod_display.cfm?c=3578+3579+18365&pcatid=18365>
Also, I have an AquaC Remora HOT skimmer that I want to continue to use.
Can I use this and hang it on the sump? <Yes, as long as the water
level in the sump completely covers the pump.> I do not want a
refugium at this point, so I do not really want to plan for that. All I
really want is a place for my skimmer, and a water return, just for more
volume and circulation. Any help would be great. <Do a Google search,
DIY Sumps. Should provide some links re this.> Thanks a lot. You are
all wonderful. <You're welcome. James (Salty Dog)> Matthew
Diethorn
Re: Sump Question... still no referral... 3/1/08 Wow,
thanks for getting back to me so quickly. <You're welcome.> Just
one more question about this though. I will get a 20 gal glass tank. But
I guess I will need an overflow box too because my tank is not drilled.
Can I just run piping from the overflow box into the 20 gal tank which
will be under my 55 gal tank and place a pump in the 20 gal sump with
piping going right back into the main tank? Is this possible, or do I
need another box on the outside from the overflow box into the sump?
<All you will need is an overflow box to feed water to your sump and
would not pipe, but run the standard 1" flexible drain hose. I would
also install an inlet assembly with filter sock. See here.
http://www.drsfostersmith.com/product/prod_display.cfm?c=3578+3579+16746&pcatid=16746
This will help cut down splashing and offer mechanical filtration. A
nice set up as the sock can be backflushed and reused.> Thanks again.
<You're welcome. James (Salty Dog)> Matthew |
Thoughts and Suggestions on a Combined Refugium/Sump…and Pumps –
01/07/07 Hi Crew! <<Hiya Doug!>> I've been in the hobby
just a few months now, and am excited to step up from my 20G to a 120G!
<<Neat! Bigger “is” better>> I'm planning for mostly FOWLR, but may
add more inverts/corals as I slowly gain experience. <<Mmm, then do
keep this in mind when making your stocking selections…you will want to
collect “reef friendly” specimens>> Here are my current plans: -
120G tank, 48x24x24", acrylic. - Stand 40" tall, 9" canopy. - 2
corner overflows – each with 2" inner diameter bulkhead at 20" height.
<<Ahh, very good…I see you’ve been reading!>> - 2x 1" inner diameter
bulkheads for return from sump. For a sump/refugium below, I'm
thinking of a standard 55G tank following your diagrams. <<”Standard”
glass tanks work quite well as sump and/or refugium vessels…and are a
whole-lot cheaper than the purpose-built retail alternatives. Add a few
baffles, drill and install a couple bulkheads (when/if necessary), and
you’re “golden”…with money saved/ready to spend on other areas. My own
system incorporates a modified 55g tank for a refugium, and a modified
75g tank for a sump>> - Skimmer: AquaC EV180 w Mag 7 pump. -
Aiming for 15x water flow gives 1800gph. <<Indeed…but I expect you
will find that trying to process this much water volume through a 55g
sump will be problematic>> - Two sump return pumps, internal Eheim
1262s (want it to be quiet),should be about 1600gph at 5" head.
<<Very good pumps…and the “redundancy” of two pumps for your return can
be a lifesaver, literally. About a year ago a faulty GFCI tripped and
shut down the return pump on my heavily stocked 500g reef system (was
off more than nine hours before discovery). The ensuing anoxic condition
resulted in the loss of more than $1200.00 worth of livestock (fish and
corals). Let’s just say “lesson learned”… I now have two return pumps on
separate circuits for this system>> Questions: 1. Is that too much
flow through the refugium? <<Yes… A couple to a few hundred gallons
per hour is generally sufficient for a refugium. Obviously, utilizing
“separate” vessels for sump and refugium make plumbing for the differing
flow rates a bit easier>> 2. If so, would it work well to use just a
single Eheim for the sump return, ~800gph, with an internal powerhead
like a Tunze Stream in the tank? <<800gph through the sump would be
easier to accommodate (and a LOT less noisy), and some creative work
with the baffles could provide a “raceway” to allow the full force of
the flow to circumvent the refugium section on its way from the skimmer
chamber to the pump chamber, while allowing you to divert a few hundred
gph to the ‘fuge…if you choose to keep with a single combined vessel. I
still like the idea of two return pumps…perhaps a couple Eheim pumps of
lesser size…>> Then maybe reduce the drains to 2x 1.5"ID? <<A pair
of 1.5” drains would handle a flow of 800gph quite well, with a healthy
safety margin>> Your thoughts and suggestions are very welcome!
Thanks, Doug <<Is my pleasure to assist. EricR>>
Rack system with individual sump style prefilters for fish room
ingenious or idiot 12/16/07 Hi Crew Merry Christmas,
<And to you and yours> I have quick question about rack systems.
Since my pursuit of the fish hobby rests on my wife's tentative interest
I have decided to try a rack system as an addition to my fish
collection. The reasoning behind this is my wife has a particular taste
in fish. Box fish, Cow fish, Cucumbers, Octopus, Nudibranchs, seahorses,
and other special needs, and system crashing animals. typically when
doing rack systems the tanks all flow into one big reservoir. Now the
design I am thinking of doing is using all drilled tanks, but with the
outlets drilled into the back wall about an inch from the top and two
inches from the corner. <Okay...> with the return line at the
opposite side. now instead of having the drop directly into the
reservoir I am considering using individual pre filter sump boxes for
each tank, five gallons each with live rock then carbon just prior to
entering the main reservoir. <Neat idea> I have considered this
because with CERTAIN Nudibranchs, sponges, cucumbers, box fish, Sea
apples and the like can release toxins that can wipe out a system as
experience has shown. So as a precaution I figure this will help. Of
course I will be using a commercial protein skimmer in the receiving
portion of the main reservoir. Does this seem like a good idea? or will
it not matter if something goes awry? Thank you for all your help crew.
<I do think this is a good idea... make sure and situate these
intermediate sumps where you can service them... Bob Fenner>
Adding sump/Fuge to a nano -12/14/07 Dear Mr. Fenner & Crew,
<Hello again Pearson> Below, you will find my previous
correspondence for reference. I couldn't find the original emails,
so I just copied them from the FAQs. <Ah, good> I wanted to
thank you again for your input, and to let y'all know I finally went
ahead with this project. A few nights ago, I successfully drilled
and plumbed my JBJ Nanocube 12 gallon tank to accommodate a 15
gallon sump/refugium. While I have never drilled a tank before, nor
done any kind of DIY projects related to aquaria, it turned out to
be pretty straight forward. There were a couple of design
considerations I took into account that may be of use to someone
else considering doing something similar. <I thank you for
sharing your experiences, observations> I decided to plumb the
return line into the display portion of the tank, and the drain line
in the last chamber of the rear section of the tank. This way,
the rear section functions as an overflow of sorts, and still causes
water to flow through all three rear chambers, so they can still be
used to house LR rubble, carbon, a heater, or whatever else you
might have back there. I also made sure to line up the return
bulkhead with the location of the existing hole in the rear wall of
the display tank where the stock MaxiJet pump outlet was, so I could
take advantage of that hole, and not have to drill a new/larger
hole. This also allows me to return to the stock configuration if I
ever need to. I would only have to seal the bulkheads, and place the
MaxiJet back in place. <All sounds/reads as reasonable> The
benefits of this experiment are already evident. I'm using a Mag 2
as a return pump. Flow in the display is increased, and at the same
time temperature is decreased. I now have plenty of room in the sump
for growing macro, a DSB, more live rock, one or more media reactors
(Phosban, carbon, what have you), an automatic top-off system, room
to fit a decent skimmer, without having to resort to one of those
tiny nano skimmers, not to mention the increased water volume and
system stability. <Yes> Attached are a couple of pictures for
reference. If you feel any of this might be helpful to others,
please do post. <I will definitely do so> A great big thanks
to everyone at WWM for all that you do for the hobby and hobbyists,
and for helping me work out this project. Pearson <I REALLY
wish that a couple friends/crewmembers here would crank out a title
on "Aquarium Engineering"... such a work (DIY, mathematics...) with
good graphics could/would help so MANY folks. Thank you again for
sharing. Bob Fenner> | .jpg_t=1197559764.jpg)
Outstanding. | .jpg_t=1197559719.jpg.jpg) |
|
|