|
FAQs about Stands, Supports for
Aquariums: Leveling 3 Related Articles: Aquarium Stands, Marine
Tanks, Canopies, Covers &
Lighting Fixtures,
Related FAQs:
Leveling 1, Leveling 2,
Leveling 4,
Aquarium Stands 1, Aquarium Stands 2, What to Use, About
Floors Underneath, DIY, Finishing/Coating, Commercial, Modification, Repair, & Tanks, Tanks 2,
Tanks 3, Tanks 4, Aquarium
Repair 1, Acrylic Aquarium
Repair, Used Aquarium
Gear,
|
.jpg)
|
29g Biocube leveling and stand flatness
11/7/16
Greetings Crew,
Life can be crazy and I've moved 3 times and acquired a 6 month old
since I last wrote you about stocking and setting up a Caribbean Jawfish
themed tank. Things have settled down and I think we'll be at this
location at least a few years.
<Ahh>
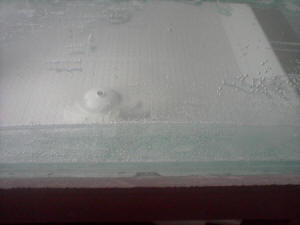
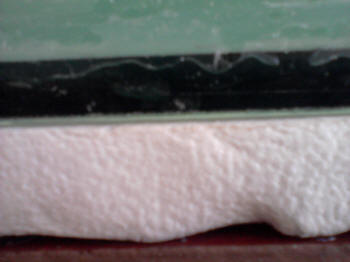
In the interim the stand for my 29 gallon biocube had developed swelled
spots in the top around the screw holes. It was made by a 3rd party (as
opposed to oceanic or CoraLife) out of some kind of fiberboard and I did
not think the top was salvageable. So I removed it and cut a piece of
3/4 inch plywood to matching shape, painted it to match and sealed with
4 coats of polyurethane after filling over top the screw holes.
<Okay.... know that this unit likely weighs in at some three
hundred pounds... DANGEROUS should it fall>
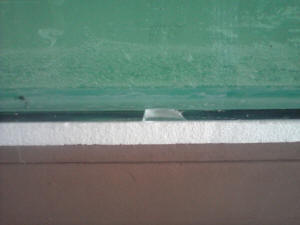
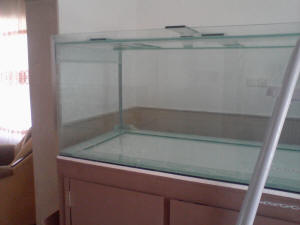
Now while attempting to level I've observed that 3 corners of the tank
are not making good contact with the stand top. Specifically the front
right has an apparent 1.5mm gap, 2mm in front left and 1mm in rear left,
while the rear right makes good contact. I did not use a foam leveling
pad as my research seemed to show it was not indicated for this style of
tank as it appears to be fully supported by it's frame.
<I would use said foam>
I filled it to 1/3 full to see if the gaps closed up any and they
remained.
I am sure if the tank were to fail I would be confined to keeping small
Betta tanks for the rest of my life. How should I proceed from here?
<As stated and you've hinted, drain the tank and place a piece of cut
foam twixt it and this stand>
Much thanks for your input,
Keith from Charlotte, NC
<Welcome. Bob Fenner>
Re: 29g Biocube leveling and stand flatness
11/8/16
Bob,
Always thankful for your advice (both direct to me and via the countless
pages of WWM I've read). I do seem to be picking up a bit of higher than
normal concern in your reply, do you see a flaw in the direction I am
headed?
<Mmm; I do not>
I am absolutely intent on making things as safe as possible and so
have ruled out keeping toxic specimens such as Zoanthids.
<You are wise here.
Esp. some genera can probe problematical; should there
be a challenge>
I will seek out a piece of 1/4" Styrofoam before proceeding. Should that
be
sufficient to handle the poor planing I described earlier?
<Yes it should be>
On the matter of additional safety measures, I've been contemplating
looking for some sort of anchor I could use to secure the stand to a stud
from a few inches away, to add better security against tipping than just
the sheer weight of the system.
<I'm VERY much in favor of this brace/bracing>
I've already purchased a lock that I will
be adding to the cabinet to keep little hands away from chemicals,
controls
and electrical workings.
Thanks again,
Keith from Charlotte, NC
<Thank you Keith. BobF>
|
Two birds with one stone. Stand/tank minor gap, cleaning old dry
LR 9/16/16
Hi WWM Crew,
<Hey Eddie>
As always I am eternally grateful to you all for your patient assistance.
Your website is a treasure trove of aquarium knowledge. Every time I visit I
come away richer. I have been “dry” for almost four years now, but still
considering myself a part of the saltwater hobby. I’m getting ready to get
“wet” again, and I have a LOT of questions to ask so that I do it right this
time. I’ve been studying WWM (and other sources) for several years, but
often with greater learning comes only more finely honed questions. Today I
have two sets of such questions. I guess this is a “two birds with one
stone” type email.
<Let's see>
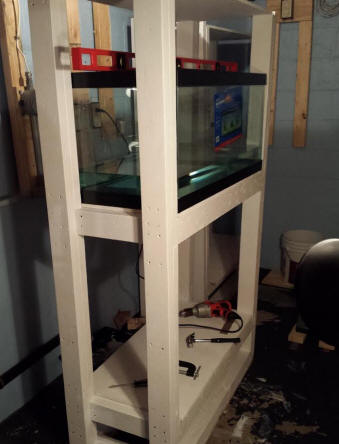
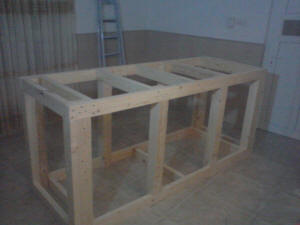
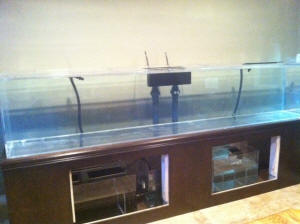
It’s been a while since I have asked a question, and I have been busy. I’ve
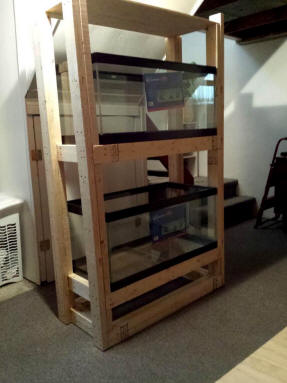
been at work building a stand for my 75 gallon tank.
<I see this in your pic. REALLY like the fastener pattern>
I wanted to do this stand right because my last stand (for my old 55 gallon)
was not made right and eventually resulted in the catastrophic failure of
the bottom of the tank. I did a ton of research on how to do it, and this
(picture) is what I came up with. I’m kind of proud of it. What you see is
the finished frame for the stand. I have already treated it with spar
urethane. I also have some quarter inch oak plywood and trim that I will use
to “skin” it (and I’ll treat that with urethane as well). While I’m working
on the skin though, I thought I would go ahead and use the frame of the
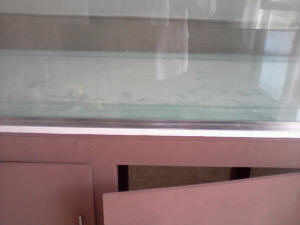
stand for a water test on my tank. It’s a slightly used glass tank with an
offset overflow (as you can see from where the cutout in the stand top is
located).
<Good idea>
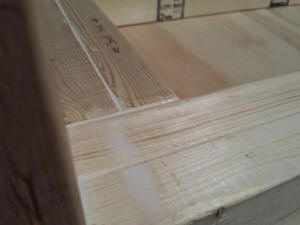
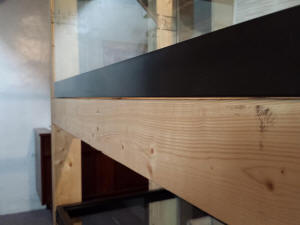
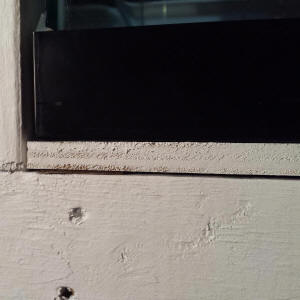
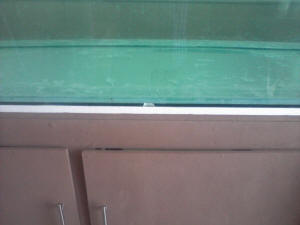
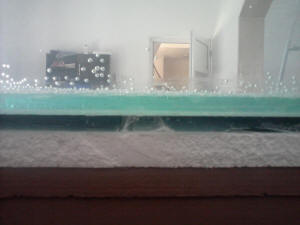
The stand frame is level, and when I sat the tank on it found that it is
almost perfectly planar. On one side there was a tiny gap running several
inches where I could slide a driver’s license fairly snugly.
<This is with the tank empty? I'd fill it; see if the gap
diminishes/disappears>
At widest I would estimate it to be 1/32nd of an inch. The reason for this
is something I found out after I built the stand, but something that I’ll
pass on to any DIY-ers who read this FAQ. When boards (2x4’s, etc.) are
planed, often the very end of the board is slightly thinner than the
rest—from where it tilts slightly under its own weight coming out of the
planer. It would be wise when working with wood to cut off the last inch or
two off the end of the board to avoid this (like for the top side rails of
an aquarium stand). This is the reason for that slight dip.
<Ahh!>
I was going to use Styrofoam anyway, which brings me to my first series of
questions. I bought some ¼ inch Styrofoam sheets from Lowe’s that are 4 feet
long. I was not thinking about the fact that my stand is 48 and ½ inches
long—so the Styrofoam will not cover the entire bottom of the stand. Will
the Styrofoam “spread out” under the weight to cover this gap?
<Mmm, not likely; no>
Or (because the tank has a floating bottom) should I cut the Styrofoam into
strips—say 2 inches wide? I could have two 48 X 2 inch strips and two 18 ½ X
2 inch strips (trimmed to fit together at the corners).
<I would cut such a strip; to cover the entire 48.5" base>
I got several sheets of the Styrofoam, and I planned to use some for the
test fill (which will last a week or two at least—it will be out of the way
in the basement), and then replace it when I set up the tank. Is it even
necessary to use it for the test fill?
<I would risk filling w/o w/ the small gap you're experiencing; but if you
feel uncomfortable, insert the foam.>
I don’t want to do ANYTHING to weaken the tank (after what happened before).
<Understood>
The second series of questions has to do with my old live rock. I had about
50lbs of live rock in the old tank when it failed. I put it in five gallon
buckets (dry) and it has been sitting in my basement for almost 4 years. The
buckets have been open to whatever dust has settled on them (and whatever
bugs or rodents might have crawled over them). I want to use this rock as
base rock, and reseed it with some fresh live rock for the new tank.
<I would do this>
I read through the live rock FAQs again yesterday (2nd time through) and I’m
not sure whether I need to soak these rocks in water with bleach or if it
would be better just to rinse them.
<I'd at least blast them with a hose... No need to bleach likely>
I got the impression from the FAQs that bleaching is needed if the rocks had
something on them you didn’t want (like BGA or crypt, etc.). This was not
the case with mine. I was planning on bleaching them anyway—because they had
been dead so long and sitting in the basement, but a friend told me it would
be better to rinse them off and use them as they are—that anything dead in
them will help the tank cycle.
<I agree w/ your friend>
Do I need to bleach them? Would it be better not to bleach them?
<No bleach>
Thank you so much for all your help,
Eddie
<A pleasure to share. Do please send along a photo of the stand, set up as
it progresses. Bob Fenner>
|

Re: Two birds with one stone. Stand/tank leveling
9/17/16
Hi Bob,
<Eddie>
Thank you for responding (as always). For the sake of clarity, I want to
correct a mistake from the previous email. I said that the stand was 48 ½”
long, but I meant the tank. The tank has standard 75 gallon measurements for
the plastic base (48 ½” X 18 ½”). The stand is actually 49 X 19” to give
myself a ¼” leeway on all sides.
<Ahh! Good>
I think from your answer that you realized that I meant cutting the strips
of Styrofoam to go under the plastic base of the tank.
<I would cut the foam to fit the entire top... 49 by 19 inches>
I may go with two U-shapes that meet in the middle. Anyway, thanks again for
all the help.
Eddie
<BobF>
Re: Two birds with one stone. Stand, leveling base 9/25/16
Hi Bob,
<Hey Eddie>
I was getting ready to do the test fill today (cutting the Styrofoam, etc.) when
I realized that I told you wrong in the original email. It’s ¾ inch Styrofoam
instead of ¼ inch. That shouldn’t make a difference, right?
<Oh yes; though a quarter inch might do it... a half or your 3/4 is better>
Also I noticed a slight rise in the very middle of the plywood top of the stand
(1/32 to 1/16 of an inch in the very middle). The stand is planar around the
edges (with the slight exception detailed before. I know this because I tested
it by setting the tank on top of it. I didn’t notice this rise, of course,
because the tank has a floating bottom. For that reason it shouldn’t matter
either, right?
<Not much, no>
I am a little worried because the Styrofoam is thicker than I had previously
told you. I’m worried that it will put too much pressure on the glass bottom of
the tank (especially where the plastic support piece runs front to back across
the middle.
<The foam's function is to even out small differences>
Please tell me I’m being too paranoid.
<Not to worry>
Thanks again for being there for all of us,
Eddie
<Welcome. BobF>
|
Flat cabinet top; /stand 7/5/16
Hi
<Chris>
I've read a lot about the problems or otherwise of not having a perfectly flat
cabinet top, but can't really settle on a situation that matches mine enough to
make me comfortable. I need some advice .
<Okay>
I've kept marines for over forty years now but last weekend had a
catastrophic tank failure where the front seam leaked, suddenly, almost for the
entire length of the 63 inch long glass front.
<Yeeikes!>
I suspect though will never prove that there was a defect somewhere in the
silicone - after the tank was empty (this happened quickly so I won't even go
into the fate of the reef), I found that all three braces were loose as the
silicone had also failed there.
<Does happen....>
Keeping this very short, you might imagine I am paranoid about cause and looking
for things that perhaps aren't an issue.
The aquarium is not being repaired, but replaced. The size is 63in long and 24 x
24in square = about 1,000 litres or 220 gallons. It is rimless and sits
on a solid top cabinet; the top itself is made with double-thickness (but
manufactured that way, one piece) kitchen worktop with wood box-section supports
at each end and centre (and is braced with angle-iron section metal running for
the length). It's solid.
Except, I find that with a spirit level along the length of the cabinet, there's
a slight dip in the centre of less than 1mm (it's just enough to slide a
credit card under, then move left to right for about a foot before things are
too tight).
<Good measure, description>
Something has distorted over the years, but whatever the cause this is the
situation now.
Finally, my question. Is this dip something so minor that, with polystyrene
sheet under the tank to distribute any imperfections and weight,
>The sheet should fix this minor dip<
I need not worry?
<I would not>
Or is perfection required (in which case I hesitate to guess what to do, other
than perhaps finding some plastic sheet that will slide under and fill the
space, then cover this with the polystyrene. But that would leave two edges to
create pressure points, even though these would be beneath the mat).
Any advice? Am I worrying for nothing?
<The sheet as you state>
I'm under time pressure because what is still alive from the reef is in the
bath, without enough filtration or water for the biological load, so I need to
fix this quickly.
Thanks for any advice.
Chris
<I'd do as you plan. Bob Fenner>
Re: Flat cabinet top 7/5/16
Major thanks for the advice and reassurance. Just to make sure, I realise I
messed up because I referred to a polystyrene sheet (in the sense of adding a
sheet under the entire rimless tank to take up the slight bowing/imperfection)
and a plastic sheet (in the sense of sliding a thin piece of plastic under the
polystyrene before the tank is placed on top, to 'fill in the gap' at the risk
of creating two potential pressure lines front-back at the edges of the sheet,
even though these would be 'absorbed' up by the polystyrene.
From what I think my poor description was interpreted as, you suggest only using
the polystyrene?
<Yes; correct: ONLY the polystyrene>
I thought of using thicker than standard ... not that I know what 'standard'
means. In the past I've used ceiling tiles, which are fairly thin (1/8th inch
perhaps?);
<This will likely do, but if you're out buying it new, I'd go with 1/4">
one suggestion I read was to use much thicker (1 inch).
Unsightly I can live with - I can add acrylic sheet as a trim to hide whatever
is under the tank - so just trying to get the best options in use here.
I'm reassured that the dip isn't thought too significant.
And major thanks once more
Chris
<Cheers Chris. BobF>
Re: Flat cabinet top 7/5/16
Many thanks again - I have a plan!
Chris
<Ah good. B>
|
Uneven floor; stands, reading
4/21/16
Hi guys and girls.
<Dom>
Looked online for answers but everyone seems to disagree. I have a new
tank and stand, it ended up being 120cm by 55cm, I guess around 100
gallons.
<Do the math for volume... or... read on WWM re other ways of
determination>
I now have a dilemma. The area I think is safest to put the tank is
across several floor jousts against a load bearing wall. That said, I've
realised the floor is very uneven in that area. Alternatively I could
run the tank along two floor jousts across the middle of the room,
but I fear it will be too heavy.
<....? You didn't search, read...>
What would you suggest in this situation? My mother (the homeowner)
wants to use layers of newspaper to adjust the level of the floor. I
fear that over time this will settle and the stand will warp :(
<Read here:
http://www.wetwebmedia.com/aqstdfloors.htm
I have a thin layer of foam for between the tank and the stand to fix
minor inconsistencies but that won't help the stand.
<And the linked files above. B>
I'm very worried. We don't have much money to fix things, the tank is
being paid off in small fortnightly increments.
Re: Uneven floor 4/22/16
Thank you for your reply. Sorry to be a pain but I'm not clever on this
subject. I had researched but there was a lot of conflicting
advice.
<NOT on our site. I have no idea what other folks have stated>
I probably should have stuck to this site.
<Ahh! Yes>
The tank in question is 105 gallons, I only said guess as a figure of
speech :)
I'm not worried about the weight as the stand is flat and should
distribute the load evenly.
<NEED to shim up the whole stand as the tank is filling... SOOOOOO; a
piece of ply wood under all feet....>
Unfortunately, my old 20 gallon was sitting where I want to put this new
tank, which is why I didn't register the floor being uneven. I stripped
and drained that one yesterday.
From my understanding you suggest people use wood shims to level their
tanks.
<Yes; this or plastic shims>
But I would have thought this would cause more pressure on the stand
because now parts of the stand are unsupported.
<? Not following you here. Do you understand what I'm referring to when
I say to put a piece of cut plywood of adequate thickness (at least an
inch here) under ALL feet of the stand>
I guess that is what you would suggest also, it seems to be talked about
in those links you gave me.
I'll give it a go. Thanks for your help, sorry for being a bother
~Dom
<Never a bother. Please send a photo of the stand, floor. Bob Fenner>
Re: Uneven floor 4/23/16
Hi Bob,
I understand that I am supposed to put the stand on the plywood. Then
between the plywood and the floor I use shims to make the piece of plywood
level.
<Mmm; well; the ply AND the stand level. MEASURE the top of the stand
itself... in two dimensions; on all surfaces>
The problem as far as I see it is that then areas of the plywood will be
unsupported, and the shims mean there is less surface area to spread the
weight over the floor. Or am I overcomplicating matters?
<Perhaps... IF the floor is not supported underneath evenly, I would attach
the plywood to the stand (with screws); to ensure all moved as one unit>
I went and bought a piece of inch thick plywood today and some shims. So I
am all set to go.
Can you confirm that what I have outlined is what I need to do?
<As stated>
Here is the picture of the floor that you requested. You can see the plywood
leaning against the wall. It's hard to tell in the picture but the
floor has a high point in the middle and a low point on each side.
<What is underneath this floor? HAVE you READ on WWM re? HERE:
http://www.wetwebmedia.com/aqstdfloors.htm
The Stand is assembled so it would be hard to get a photo of the base. It's
a solid piece of wood (guessing laminated chipboard) with several small
clear plastic feet around the perimeter. It's an Aqua One tank if that
helps. I've also attached pictures of the shims I bought because the store
people had no idea what I meant. But I think I got the correct things.
As always, thank you for your help
~Dom
<Dom? Please flip the stand over and send a pic.... Is it this one?
http://www.aquaone.com.au/2015-04-16-04-47-04/cabinet/item/1803-52011gbk
I might remove the plastic feet if so. BobF>
|
.JPG)
.JPG) |
Stand; what to use; leveling f's
3/15/16
Hey Bob,
<Ditto>
Separate topic, 50/50 split on research so far.
For a 180 gallon Marineland tank, that has a rim it sits in, I built a
2x2 inch square aluminum stand for it. It is very level, no deflections
or low spots.
<Impressive!>
Would you still use plywood in between stand and tank?
<Mmm... yes>
The manufacturer stand made of wood just has the trim border, not solid
piece. Half the people I have asked said you just need to support the
trim, which is the part of tank that touches.
<This is so>
Others have said plywood would help distribute weights.
What's your thoughts?
<Well; the ply, foam... something other than metal in the frame, will
give a little bit... sometimes enough to save glass to glass
mal-interaction and significantly reduce torsional problems.
Thanks, bob
<Welcome! Bob Fenner>
leveling 17 gallon rimless glass tank
1/8/16
Hi,
<Adam>
I have a question about leveling a "small" rimless glass tank.
Specifically the tank is a Mr. Aqua 17.1 gallon with a footprint of 24"x12" and
a height of 14". The aquarium is going to sit on a counter top. I have a 1/4"
closed foam pad from the manufacturer that will go beneath the aquarium. OK, so
it turns out that the countertop is not level, and the front side of the
countertop/tank is ~1/8" lower than the back. I was thinking about
trying to level the tank by placing a piece of 3/4" thick external or marine
plywood, with dimensions slightly larger than the tank footprint, on top of the
counter.
<Good. This is the best approach>
I would then attempt to shim the plywood so that it is level, and then place the
closed foam pad and tank on the shimmed plywood. Is there any problem with this
approach?
<No problem. This is exactly what I would do>
Would you recommend sealing the plywood even if it is "external" or "marine"
grade?
<I would do so... for looks, longevity>
If so, would an oil-based polyurethane be sufficient?
<Yes>
Is 3/4" thick plywood a strong enough platform?
<For the volume, weight involved here; yes>
This will be a saltwater tank so I am concerned about the plywood holding up. I
have not worked with shims before, but I can envision that the shimming process
will entail placing multiple shims side-by-side under the front side of the
plywood to lift the front 1/8". Then I would try to insert shims in the <1/8"
gaps that would be created along the sides of the plywood. Does this sound
correct?
<It is; use a "good", long enough "carpenter's level; moved/rotated about on the
top; to assure level in all planes>
Thanks!
Adam
<Welcome. Bob Fenner>
|
Gap Between Tank & Stand 9/28/15
Hello,
<Hey Adrian>
Just wanted your opinion on leveling a tank. I built a double frag rack found
here: http://i.imgur.com/8EHveep.jpg
<Oh; very nice.... looks like sturdy 2 by 4's.... secured in three dimensions.
Have you or are you going to seal the wood?>
I also added Gorilla wood glue wherever the wood seams meet:
http://i.imgur.com/1oU1KIP.jpg
<Ah, good>
On one of the tanks, there is a slight gap along the horizontal span of
one side, found here:
http://i.imgur.com/5Pz46SJ.jpg
<This I don't like>
The distance is about 3/32" of an inch, and goes for about 80% of the way.
The corners of the tank seem to touch fine and everything else is good.
Just wondering what to do here?
<T'were it me, mine... oh, I see this below>
1) Foam then plywood on top
2) Foam only on the perimeter rim
3) Nothing
<Plywood.... Likely 1/2" will do... screwed from the mid points in...
will likely bring the base up to level; if more than a 1/16" gap is still there,
the foam>
Thanks
Adrian
<Welcome. Bob Fenner>
|
  |
|
Re: Gap Between Tank & Stand 9/28/15
Hi Bob,
<Ad>
Thanks so much for your reply. I actually have your book here on my desk from
when I first started the hobby.
<Oh!>
In regards to the plywood... I just realized some concerns :(
There are (2) 2x4's on each horizontal span and they are screwed/wood glued
together, so I'm not sure it would even move upwards with the plywood screw
technique, since it's the "outer" piece that the rim sits on, and that has the
slight sag/gap. Is that correct?
<Yes>
If that's the case.... what do you suggest? Plywood route still and perhaps
shims between the plywood and the 2x4?
<The same as before>
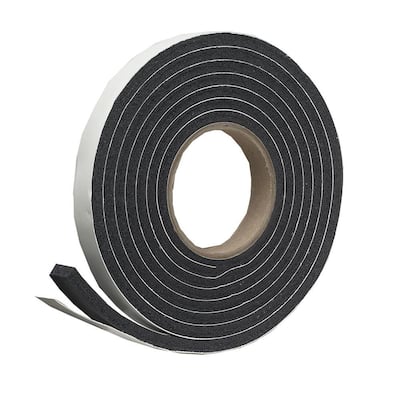
I thought of this too
http://www.homedepot.com/catalog/productImages/400/ce/cec6e0bd-c2e7-44d1-bde8-74fe98610c3c_400.jpg,
but I know that foam is only used for surface imperfections, not to hold the
weight.
<This is so. Do try the ply, and the foam in turn. Should be fine. BobF>
Re: Gap Between Tank & Stand 9/28/15
Thanks for the response Bob. I'm still a bit confused as to how the wood is able
to move in an upwards direction, when the lower piece is glued and screwed into
another 2x4 next to it, but I will go get the ply tomorrow and give it a try.
<Good.... and not to be mysterious here. The "magic" of plywood in this
application is that by screwing every six inches or so, the wood underneath is
"drawn up" to (teleologically) "meet" the resistance of the plywood's layers to
bend/flex. As prev. stated, I do NOT think this will result in an absolutely
planar surface>
Just so I understand you properly, when you say to try the foam afterwards, do
you have any suggestions? A yoga mat or 1/4" rubber on top of the plywood? I
suppose something that doesn't compress easily.
<Quarter to half inch closed cell Styrofoam... can be bought in sheets at
Lowe's, craft shops>
I will keep you posted and this thread, so others can benefit as well.
A.
<I thank you. B>
|
Re: Gap Between Tank & Stand 10/19/15
Bob,
<Adrian>
As promised, an update for you and the thread/website. I didn't have time to get
to it until now. I couldn't find any foam that was fitting, but I did screw in
the plywood. The plywood ending up bending down a bit instead of the beam coming
up. After much debate, I decided to use composite shims underneath the plywood,
and the tank now sits so that even a piece of
laminated paper cannot fit under the black plastic trim.
<Ah, good>
I only had to use a couple tiny pieces in opposite ends.
http://i.imgur.com/yU3G6TZ.jpg
http://i.imgur.com/deF8T35.jpg
<Very nice work>
Foam will be in order though for the main tank, as it is a flat bottom...
<Good>
I hope this is satisfactory....
<Ah yes; well done. Bob Fenner>
|
 |
|
|
Stand level 9/1/15
HI,
<Tim>
I contacted you about modifying this stand. Please disregard, as I have decided
not to do that. Thanks.
I have a Marine land Newport stand and 37g column tank set up. Before eating
<setting?> it up, I noticed one of the plywood sides was a little wavy. I
checked it with a level before filling on the carpet where I would be placing
it. Looked level. Upon filling it, it did not.
<Did not? Look level?>
But we discovered that one corner was resting on part of the space where the old
tank was sitting, causing it to list into the dip in the carpet where the old
tank had smashed it down.
I emptied and moved it into the dip balancing it in the grooves of the old tank,
since they were the same width. It seems pretty level now. It’s about 1/10th of
a degree still listing towards that side, though.
Everything seemed solid, both empty and full, and the wave has not increased.
Everything solid.
I wonder if I should get another stand.
Here are some pics. What do you think?
<Not concerned re this small defect in the stand, and if there is only a small
(1/16" let's say) gap when the tank is empty, twixt the molding and stand, I
would not worry. IF more, but only a little bit, I'd put a piece of Styrofoam
sheet (avail. from Home Depot, Lowe's and such) between the tank and stand....
READ here:
http://wetwebmedia.com/AqStdLevlF3.htm
and the linked files above. Bob Fenner>
Thanks,
Tim
|
 |
|
Acrylic tank; blem., stand/level concern
12/31/14
I wanted to ask you guys a couple questions. I have a 1200
gallon 1 1/2" acrylic tank. The seems look ok with some
crazing. I have included a pic at the top of the front panel. It is
about 1/2" wide so it is still leaving about an inch of bonded space.
<I see this "blem"... and suggest you or someone try a low viscosity
Weld-On product or equivalent... to fill in this gap>
Should I reinforce this or is this ok if the rest of the tank is normal?
<Because it is near the top, its shape, size, not likely a problem ever;
but I would still try capillating in a wee-bit of solvent here.
Take care NOT to drip excess... perhaps a bit of blue tape around the
area lest there be run-off>
The tank dimensions are 10'x4'x4'. My last question is
I talked to an engineer and my tank is level side to side but
from front to back (4' side) it is almost a 1/2" unlevel.
<?! What?... I really, make that REALLY don't like this... measure the
panels... length and width... is/was one side actually mis-cut this half
inch?>
He said this was about an extra 100lbs on that panel but should be
fairly insignificant to the rest of the tank. He said it should be fine.
Do you agree with this? Thanks.
<"Should be fine" in that the tank should not catastrophically fail,
yes... but if this were some tank our old company had fabricated, we
would not ship it; and if I paid others to make it; I'd at the very
least extract a ten year warranty against leaking or failure... if not
sent it back. Bob Fenner> |
 |
|
Re: Acrylic tank
12/31/14
Thanks for the responses. I probably phrased the question wrong. The tank is
all the same size, just my floor has a slight decline causing the tank to
lean slightly.
<Ahh; still a concern. I'd be making sure the floor underneath is strong
enough by far... AND shimming up whatever support you're utilizing to spread
the mass of this set up about, above or below floor>
The tank side to side is level but because the concrete
<Oh! On the floor side then>
is slightly going down hill, the water level is about 1/2" higher in the
front of the tank than the back. So over 4' it has a 1/2" decline. Is this a
problem or was the engineer correct in saying the panel will hold about
100lbs of water extra and shouldn't be a big concern?
<It is FAR better for you to make sure the tank is level AND planar. Have
you read my article re stands on WWM?>
Thank you.
<Welcome. BobF> |
Raised corners
10/15/14
Good day, kind sir. I have a standard glass 55 and I built my own stand.
The stand is level as all get out. As I started filling the tank I
noticed that 3 of the 4 corners of the tank do not sit flush. They are
roughly 1 mm off the stand.
<Mmm; even when the tank is filled completely? I would place a thin
piece of foam under the tank frame to cushion, even out a bit>
The short side between two of the corners (front to back) also appears
to be 1 mm off. I was given this tank from a friend and it's an older
(15-20 yr) tank that has been resealed. Is it possible for the tank to
actually
warp a bit?
<Ah; yes... glass itself is a super-cooled liquid... it does bend, flow
a bit... and the Silastic will give a smidgen>
And if so is it safe to continue to fill and use?
<Likely so, but I would still... Let's have you read here:
http://wetwebmedia.com/AqStdLevlF3.htm
see some of the queries/responses re such leveling issues>
Any info would be greatly appreciated...
Thanking you in advance,
Concerned father of two.
Re: Raised corners
Thank you so much for the advice, sir. I will be sure to read up. Thanks
for the link.
Also thanks for an amazing site. I find it informative and educational.
Thank you again...
<Certainly welcome. BobF>
<Welcome. Bob Fenner>
Tank not flush
10/17/14
Hi again guys! Sorry to bug. I'm the guy with the standard 55 that was off about
1mm in 3 corners when sitting on its stand.
<Ah yes>
I read the link you provided and I have now placed a 1/2" piece of foam (Owens
Corning EPS) between the tank and stand.
This helped a little. I can now slide a credit card in between the foam and tank
with a little effort. (About half the gap as before)
I haven't filled the tank at all yet.
<Do so... the gap should close handily. No problem>
Should I start to fill the tank and see if it flushes out?
<Yes>
Toss the tank and start over? The tank itself (the frame at least) appears
level.
I'm sorry to bother again but I haven't a fish store any where near me. And with
two young daughters in the home I don't want to take any chances.
Thank you for your time.
It is GREATLY appreciated.
Dad of two.....
<As long as the stand (and floor underneath) are otherwise sturdy, level and
planar, all should be well. Bob Fenner>
Large Tank Stand Construction
9/30/14
I am having a contractor build me a stand for a 250 gallon in -
wall salt tank. He is framing / supporting the weight using 2x4
<Mmm; not what I would do... IF making/fashioning of wood, the uprights
should be four by fours>
and plans on running 2 plywood pieces across the top. Since the tank is
glass and has multiple areas that are plumbed through the bottom, is
there any issue with this design?
<Uhh, no... cut our round holes for the through-puts in the bottom...>
Certainly he will cut out access areas in the plywood for plumbing, but
I have read mixed reviews online about leveraging plywood under the
tank.
The intended purpose was to assist with weight distribution, however I'm
unsure if this will jeopardize the integrity of the glass or create
concerns down the road with the plywood getting wet.
<With enough/sufficient support of the ply underneath... good screws
connecting through it every eight-twelve inches... s/b fine>
Your feedback would be much appreciated.
Jeffrey
<Do have a read through here:
http://wetwebmedia.com/aqstands.htm
and the linked files above. Bob Fenner>
Re: Large Tank Stand Construction
9/30/14
Thank you for your prompt feedback.
<Welcome>
I will tell the contractor that he should use 4x4 for the supports.
Should the plywood be treated or painted to protect against damage from
the salt water?
<... yes; assuredly. Please read where you were referred to>
I also read on your site, many references of placing Styrofoam between
the plywood and the tank. Is this recommended for glass tanks or is this
only used when the tank requires leveling?
<Yes. BobF>
re: Large Tank Stand Construction
9/30/14
Thanks Bob. I spent a good amount of time this evening reading the many
posts on the links you provided. I can't seem to find an explanation of
the benefits to adding Styrofoam on top of the plywood to support the
tank.
The only references I found spoke about existing Styrofoam that was
damaged and another instance to slightly level a tank.
Could you explain why & if I should have my contractor install Styrofoam
above the plywood, as my concern is that the foam would have some "give"
and may cause leveling issues versus the glass being placed directly on
the plywood. If I didn't mention it already it's a 250 gallon glass
aquarium predrilled on both rear corners.
<Depending on the construction of the tank itself, and the surety of the
level and planar qualities of the ply, you may well not find Styrofoam
useful. B>
Brand new acrylic aquarium with "floating" bottom
1/27/14
I hope you can reply to this question today.
<I as well>
Long story short, I just received a 500 gallon 90" x 36" x 36" 1"-thick
acrylic tank and steel stand custom fabricated by a supposedly well
known and highly regarded fabricator.
<You, we are free to name names>
Problem is a good portion of the tank bottom floats over the stand base.
<Floats... as in doesn't touch the base all the way around? Even when
filled?>
After much investigating and looking, it turns out the tank is about 3/16"
shorter in height measured in the middle front of the tank than the
ends.
<... 3/16"...!?>
Each end is 36" exactly. The middle is about 35-13/16". This
causes the tank bottom to flex up and top to flex down. This in
turn makes a majority of the front half of the tank float.
<Can you define, describe this in a different way?>
The back and right end appear to be firmly supported by the stand.
The left end is about half supported.
<... have you checked the stand itself... to insure that IT ITSELF is
level, planar?>
The front mostly floats a 1/16" or so. The steel stand came with a
3/4" plywood top adhered to the steel stand. I placed a 1/2" sheet
of the heavy duty expanded Styrofoam sheet used under concrete slabs
between it and the tank.
<Ah, good>
The fabricator says this irregularity is likely due to thickness
variance in the top and or bottom acrylic sheets.
<What? No... assuredly not>
He says all cutting is done on CNC machine, so the side sheets are
absolutely exact in dimension. (I'm not with the tank right now to
confirm this.) I did research and see that cast acrylic sheets
(which this is) have thickness tolerance variations of up to 15%.
<15%!... cast? How thick is this material? Do you know the manufacturer?
Is this an import (from Mexico? China?)>
So this could explain my problem if the center of the top and bottom
panels are thinner the ends...essentially making the front of the tank
an hourglass shape (though only by fractions of an inch).
<VERY small fraction>
The fabricator says this is not uncommon and this can be addressed by
shimming between tank and stand to get full support under the tank.
<... shim UNDER the PLYWOOD... NOT the tank>
I expressed my concern that this would just address the perimeter and not
the center of the tank. He said they could reset the plywood top
and shim between the steel stand and the plywood and get full support
under the full perimeter and at each of the three additional cross
braces that run along the top of the stand front-to-back.
<Yes; this can be done... easily>
Again he says this is common to make these field adjustments and that the
tank is not flawed in any way.
<... I'd be measuring all... again>
My question to you is this. Are all these assertions made by the
fabricator correct?
<Not all; no>
Is it acceptable to shim this 500 gallon tank as he proposes.
<Yes>
Is this common/acceptable practice (shimming)?
<... well... not generally necessary w/ all-acrylic tanks>
Would the shims hold up over the life of the tank (which is hopefully
decades)?
<Yes... IF made up of solid material, not allowed to get wet, decompose
or rust>
I spent thousands on this tank. I don't want to be unreasonable, but
I want it to be "right" and obviously don't want a catastrophic failure
to occur at some point in the future because of this.
<Oh; as a former fabricator, installer of many large systems I can
definitely relate, commiserate. All should be well here IF the ply/stand
is adequately shimmed>
Thanks.
<Welcome. Bob Fenner>
|
emergency! Chipped glass tank... mystery Uneven stand f' as well
7/11/13
Dear Sir/Madame,
<Amad>
I have a 220x80x70cm tank, it's made out of 10mm glass. So the
tank is 70cm
high and I gave it a test fill after giving the silicone about
two weeks to cure. I filled it up to 65cm, but I'm planning to fill it
60cm max. So I filled it and left it like that for a day (the tank with
about 1100L of water), the next day I didn't notice any problems,
when I came back later that day, I noticed that chips had broken
loose from the bottom pane from both sides, front and back, see pics.
<Broken loose? Something... someone must have impacted this area with a
solid>
I emptied it, leaving just a cm of water and removed the pieces, thank God
it was not leaking, one piece was quite big but most of the silicone was
intact (I had to remove a small bit of silicone to remove the chip), and
it didn't crack the bottom pane
further. The backside chip is smaller, but both chips are about at the
same spot on each side. I noticed that even when I filled the tank with
1100L water, that the bottom pane still doesn't touch the
Styrofoam, but is a little little bit above it.
<Something amiss here... I'd take the tank off and measure your stand
surface in several places with a long level or a short one with a long
straight edge. The surface of the stand itself is apparently not level,
planar>
I don't know if the chipping was caused due to weak spots at both
sides or because of the stress...
<Not likely at all... otherwise the tank bottom glass would have split.
This is an impact break>
It didn't leak. So what I did next was silicone the pieces back into
place and I siliconed an aluminum corner strip to the front as
you can see in the picture. I have still to do that for the back. The
aluminum goes about 2 to 3cm underneath the tank. On
the inside there is a glass plate on both sides used for bracing.
<A Euro-brace... near the top... on the long faces of the tank.>
So my questions are:
(1) can I use this tank if I fill it up to 58cm to 60cm or will the tank
burst?
<Too likely the latter>
(2) was the fortification with the aluminum a good thing to do?
<Not a good thing... It only "goes about 2 to 3cm underneath the tank."
Why would you make an edge that disallows the bottom glass to sit flat?>
(3) what do you think caused the chipping
<Impact>
and why isn't my tank 100% level on the Styrofoam. I screwed a piece of
plywood on top of the stand so that it would be level and not bent, and
on top of that I've put the Styrofoam.
<Did you check to assure the ply was planar AND level in all length,
width dimensions?>
What are my options and what should I do.
<Mmm; more of a repair here is required>
picture 84 and 85 are of the front, picture 86 and 87 of the back and
picture 88 of the aluminum corner strip I added to the front after
siliconing the chip back into place.
thank you very much.
Amad
<I'd drain the tank, test the plywood top as stated, and cut off the
aluminum parts that go under the tank bottom... AND cut out the internal
bottom Silicone/Silastic, and place a strip (5 cm., 2 in. wide is fine)
of 10 cm. glass, Siliconed in all along (flat) the bottom seams). See
WWM re such repairs. Bob Fenner>
|
 |
Re: emergency!
7/11/13
Thank you for the answers Bob, very much appreciated!
<Welcome>
But what impact, there is nobody here who could have done it, at least no
human begin, and I don't have any animals inside the house... and it's at
both sides, so my guess is stress
<Very strange>
And shouldn't the Styrofoam make everything that is not level, level?
<Mmm, no; helps if all is just a bit... a few mm.; not level>
I have a Eurobracing at the top and the bottom, you can see that in
the pictures I've attached to this e-mail.
<Ah, good>
Other than that the plywood was slightly bent, it's 100% level,
maybe I have to screw it in more places, but I thought I had done that well
enough.
<I'd screw it every six inches, 15 cm., AND seal/coat the plywood...
it will warp in time otherwise if/when it gets wet>
What if I removed the plywood and placed the tank on top of the stand after
placing the Styrofoam on top of it, see pic of the stand attached.
<I see>
Ok, so what I'll do is:
1) get the heavy tank with some help of the stand and check the surface of
the plywood.
2) should I cut out the silicone of the whole bottom? I have a Eurobracing
at the bottom at both ends, at the top and the bottom as you can see,
wouldn't that be good enough? Maybe I've misunderstood what you mean.
<After seeing these pix, I would NOT cut the Silastic... I would leave all
as you have done for the tank as it is>
Thank you!!
Amad
<Welcome. BobF> |
 |
Re: emergency!
7/11/13
It could be that the pane was damaged a little at those spots and that it
couldn't withstand the pressure so it chipped off,
<... doesn't happen... glass/es are super-cooled liquids... don't fracture
as you describe>
maybe that's a logical explanation? The large panes have been cut by hand,
he (the one I bought the glass from) said that they didn't fit in his
machine.
<No worries; huge pieces of glass are cut by hand. Easy to do w/ proper
tools>
I hope to be receiving an answer from you, thank you for your help so far.
Kind Regards, Amad
<And you, B>
Re: emergency! 7/11/13
I know that the plywood itself is 100% in it's dimensions, because it's a
factory plywood as you can see in the pic I have attached.
gr. Amad
<... and you're sure no one has been in the house; could have damaged the
tank by bumping something hard into the edge? I'd be asking all who have
access to the area. B>
Re: emergency! 7/11/13
Thank you!
<Welcome>
Yes I asked my mom if no one entered at some point, she said no, and at this
time I am around the house most of the time, I haven't seen any kids.
And it's at both ends, a child would just throw something at it, not plan
strategically how to destroy the tank.
<... Again, very odd>
So I should not cut any silicone?
<Correct. I would fill in, as you say you've done, the "scalloped out areas"
where the glass was chipped (to prevent someone cutting their hands), but
the internal bottom bracing should hold this tank together>
Just try to make the plywood 100% (I honestly thought it was and as you
said, those 2 or 3 mm's are being sorted out by the Styrofoam).
<Yes; should be... BUT, you stated you could see light between the foam and
the tank bottom... not good. This IS more than a few mm.>
So that's then the only thing I'll do, look at the stand and level it. Do
I need to do anything other than that and it will be
safe to fill it?
<Should be; yes>
I will also remove the aluminum from the bottom. Let me know if I forgot
something.
<With the Al removal you should be fine>
Thank you for your help and expertise!
gr. Amad
<Glad to share. B>
Re: emergency!
7/12/13
Thank you!!
gr. Amad
<Welcome. B>
|
Re: emergency! Chipped glass tank, uneven stand
7/16/13
Hi Bob,
I would just like to say that I put screws every 10cm and it didn't
work, maybe the stand underneath the plywood isn't 100%, it's very
frustrating. And it really is just 2 or max 3mm above the foam in the
middle and the right side. When I filled it with water, the right side
went down but not in the middle, this probably caused the chipping, and
perhaps the bracing was the reason that it didn't break the bottom pane
in half. I don't know what to do. I hope you have some advice for me.
<Mmm, if it were me... I'd redirect my frustration/angst w/ this
project... remove all the screws, determine where the dang high spot/s
are, grind them down and put the ply back on>
Thank you.
Gr. Amad
<Welcome. BobF>
Re: emergency!
thanks. Then I have to call in many people to help hahah, I calculated
that the aquarium is about 200+ kg.
Gr. Amad
<Yeeikes! Yes; many friends... and a good plan... likely suction type
tools for lifting the tank. BobF>
Re: emergency!
o man! I don't have those possibilities out here, so what should I do
than, because I'm afraid it'll break!
gr. Amad
<Better that it breaks w/ you and friends shifting the tank off the
stand, then when it's filled. B>
Re: emergency!
true.. but I think the tank won't survive, it's really heavy, I'll have
to place it on foam on the ground, lifting it up might be even worse
then
<... so?>
Re: emergency!
maybe I'll just shift the tank, unscrew it bit by bit, than turn the
plywood with the tank on top, if that'll work and try to sand the higher
places of the stand
<I'd remove>
Re: emergency!
Hi bob,
<Amad>
maybe you can look at these pics, what do you make of it?
The first pic 89 shows the tank filled partially, I filled it just now.
Pic 90 a pic of the left side, its on the foam.
Pic 91 is of the middle
Pic 92 is of the right side
Pic 93 is a close up of the right side
Pic 94 is a close up of the middle
Pic 95 is a close up of the left side.
I hope the pics are good enough
Do I still need to sand, I'd rather not because it will be a tough job
with the risk of breaking the tank.
<.... is the tank not settling flat on the foam? B>
Thank you.
Gr. Amad
|
94 & 95' Not all right, I see the light... |
Re: emergency!
it is as if it's not, when there is no water in it the left side is on it,
the middle not and the right side not, but the space is not big between the
aquarium and the foam. When I put water in the tank, the right side goes
down but not the middle. Maybe the stand is a little bit higher on the left
side. I am emptying the tank.
<Amad; I am VERY glad/relieved to read this. B>
Re: emergency!
the stand is pretty even, I shifted the tank and placed a level at the front
from the left to the right, then at the back from the left to the right.
<Keep moving the level... and if it isn't long enough to span the uprights
(and ply), use a true (flat) straight edge under (between) the level>
At some places maybe a tiny tiny bit off, but I don't think that's the
reason, or at least I don't know what the reason for the tank not being even
on the Styrofoam can be
<? Well; either the ply, the foam or the stand is uneven... or the floor
with the stand setting itself uneven on it... My vote is still on the stand
being the issue here. B>
Re: emergency! 7/16/13
that I am emptying it? I still don't really know what causes this, maybe it
could even be the foam
<.... READ here:
http://www.wetwebmedia.com/aqstdleveling.htm
and the linked files above> |
|
300 Gallon Acrylic Tank Question,
stand planarity issue 1/16/13
I have been working on a used 300 gallon 10’ x 2’ acrylic tank and stand for
the last year. This is going to be an upgrade to my 72 gallon reef. I
covered the existing stand with ½ inch birch plywood, added molding, stained
and varnished the whole thing and I am very happy with the results. When I
first got the tank I noticed that the top of the stand was not completely
flat so I took a lot of time trying to make sure that the top was level.
After all that I still do have some areas where I can slide a piece of paper
between the tank and stand. This was the case even when I test filled the
tank. So my question is would it be a good idea to put a piece of Styrofoam
or similar material between the tank and stand?
<Mmm, yes I would>
My concern is that this material would break down over time and put more
stress on the tank.
<No; less than if you left it out>
The other issue is that the tank is 10 feet long and I’m not sure I can even
get a single piece of material that size.
<A cut to fit piece will be fine>
What would you recommend in this
situation? Thanks in advance.
<Cheers, Bob Fenner> |

before and after pix |
Maximum acceptable UN-levelness and UN-planarness???
9/16/12
Dear WWM,
<Todd>
I have been web-searching for many hours now (about two hrs on your
awesome
site) but still can't find the answer I'm looking for. I have read gobs
about how to level an aquarium but I want to know what you consider to
be the acceptable "tolerances" for levelness and planarness so I know
when I can stop trying to get it perfect. In my case I have a 240 gallon
glass tank of 96" x 24" x 24".
<A sixteenth of an inch or so for both>
It is resting on 3/4" water-sealed plywood of 97" x 25". Under the
plywood is a frame of pressure-treated and water-sealed 2"x4"s
<I'd use four by fours for the corners at least>
supporting the outer edges of the plywood. The 2"x4"s are attached with
the long side contacting the plywood. Under the 2"x4"s is a bed of
gravel, under that is earth. The tank is inside an outdoor greenhouse I
built for an aquaponics system. The idea is that the gravel will squish
out just enough to allow the weight of the tank to crush down and find
even support. I think the tank is planar to at least 1/16" ( I can't
slide a 1/16" piece of metal anywhere between the tank and the plywood).
The tank is out of level 1/8" in the 24" span and 5/8" in the 96" span
<Too much>
(I added some water and measured at the four corners). Since it is
difficult to move the tank and add gravel exactly right, I want to stop
trying when it is good enough. So, can you please tell me what you think
are acceptable "tolerances" for water level difference per lateral foot,
or total for 24" and 96", and what is the maximum width gap acceptable
between tank and plywood base? THANKS A LOT! -Todd
<As stated. A sixteenth of an inch. Bob Fenner>
Re: Maximum acceptable UN-levelness and UN-planarness???
9/17/12
Bob,
Ok, 1/16" maximum gap between tank and plywood, thanks.
On the levelness, do you mean 1/16" variance per lateral foot or 1/16"
variance maximum for the whole 96" length?
<Total, end to end, front to back...>
Thanks again so much, this info is really hard to get and invaluable in
staving off a major disaster!
-Todd
<Too much twisting of seals is a bad idea. BobF>
|
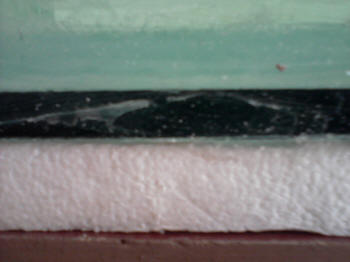
Re: Nannacara anomala gender issues, actually: Foam under tank
8/5/12
Hey Bob,
<Dunc!>
Thanks for the advice and sorry for not attaching the foamy pics - here they
are!
Duncan.
<Ahh, I think/consider that you will be fine here for many years... this is
not "too much" foam degradation to present danger. Cheers, BobF>
|
.jpg)
|
Re 200G Tank - 3/4" plywood construction? & now stand/level
7/10/12
Salty Dog,
<Dave>
Thank you!
<You're welcome.>
Next question is regarding leveling. I have filled the tank. It is not
completely level. I wonder if it needs to be drained and the concrete
subfloor leveled before I use it. Here are the differences, with the
bottom right corner being the highest water line.
Back right corner: 2.5mm lower.
Front left corner: 4.5mm lower
Back right corner: 6mm lower.
<Mmm, two back right corners with different dimensions?>
I am almost certain there is no twisting. I think there is an uneven
grade on the floor which causes the tank to lean slightly forward and
right.
<I would measure from the floor up to the top edge of the right front to
the left rear and the same with the remaining two corners. That
should tell you whether there is a twist or just a front to back or side
to side difference. I'm thinking the later.>
Do you think I have an issue? If no, am I just barely within acceptable
range? I'd rather be conservative. As I mentioned before, this is a 3/4?
acrylic tank 60" L x 30" tall.
<Acrylic is a tad more forgiving than glass so you should be fine here.
Is the bottom of the tank entirely
supported by plywood or moisture resistant MDF board?>
Thanks!
<You're welcome. James (Salty Dog)>
Dave
Re 200G Tank - 3/4" plywood construction? 7/10/12
Hi Salty Dog...
<Dave>
<<Mmm, two back right corners with different dimensions?>>
This is a rectangular tank, two back corners have the same dimensions,
but my measures seems to confirm that the direction of the slope in the
flooring is roughly from the back left corner to the front right corner
(diagonal).
<<I would measure from the floor...>>
I measured the floor, and this roughly confirms the slope, although I
guess it is possible the floor itself has some very slight twists (IE,
the back right corner measure could be a slight twist in the floor).
<< supported by plywood or moisture resistant MDF board?>>
The stand is built with continuous floor contact on sides/front, and
contact planks dispersed along the bottom (if that makes sense, almost
like stand bottom studs). So it seems there is good weight distribution
in the stand. The tank does sit on top of a sheet of 3/4" plywood (which
as I mentioned before, is used throughout the rest of the stand).
Sounds like you are leaning towards my leaving it alone. Does this added
info sway you one way or another?
<Mmm, not really. That's less than 1/4" difference in five feet.
If it were mine I'd leave be unless
the aesthetics concern you....water level being different at opposite
ends.
Best to have checked
this out before you put water in the tank. :-) James (Salty Dog)>
Re 200G Tank - 3/4" plywood construction? 7/11/12
OK, great, I'll leave it. I actually filled it up with freshwater to do
the level check (also with lots of vinegar to get off old coralline
etc). This is why I'd be slightly less worried about having to fix the
leveling. But, any modification comes with risk (such as sending the
plane in the wrong direction :o ) so I probably will just leave it!
<Nothing to modify, just a matter of shimming up the stand to true it
up.>
Thanks again!
<You're welcome. James (Salty Dog)>
R2: Larger Sized Aquarium (96x30x30), stand/underneath –
07/08/12
Eric,
<<Hey Rick>>
What options do I have if after filling the tank, there are still a few
minor gaps between the bottom of the tank and the top of the Styrofoam
(I found another spot at the front corner that currently doesn't sit
flush)?
<<It’s important that the tank sit flat and planar. It may settle on the
foam you have just fine as it gets filled…but hard for me to say from
here. If you have real concerns maybe removing the foam before filling
the tank is the best option (I kept many tanks without such, decades
back), or maybe switching it out for something not so thick if the
surface of the stand is “less than perfect.” A sheet of ¼” high-density
insulation may be all you need…and should be less prone to
distortion/damage during installation than the Styrofoam. (I know, easy
for me to recommend…I do understand how difficult any shifting of this
tank will be)>>
Cheers,
Rick
<<Perhaps you can get someone local to come “put eyes” on your project
and get their opinion as well. Maybe an LFS/Installer…or even another
experienced hobbyist. I’ll also ask Bob to chime in, if he sees this.
EricR>><Nada mas. B>
Re Acrylic aquarium
crazing? Now: 3/27/12
Hi Crew,
<Hello Dave>
I have one follow-up question based on the exchange below that I had
with Salty Dog recently. This was regarding my tank level and
slight leveling issues with my basement concrete slab underneath
it.
Anyway, now I can see that the water level at the lowest uneven corner
(i.e., front right) is above the top right corner of the tank. It rises
along the top panel of the tank in that area, and slightly in the top
left corner as well.
I don't see that the overflow/sump system has any issues due to
this -it seems to run OK.
Does this pose any structural concerns?
<Should not as long as you feel the tank does not have a twist due
to the floor not being
level.>
Thanks!
<You're welcome. James (Salty Dog)>
Dave
Shimming a wooden
stand
3/13/12
I have a new 125g Marineland dual overflow
<Are these still 1" ID? See ScottV's piece if so:
http://www.wetwebmedia.com/SystemPIX/PlumbingPix/Oneinchart.htm
and the linked files above>
aquarium along with a custom 40" tall
stand. After setting the tank on the stand (on carpet
which is on concrete slab, no other flooring choice) and filling with
tap water for leak and plumbing test, I noticed the water level
was off about a 1/4" from back to front and just a smidge over a
1/2" from left to right (likely a combo of carpet and the concrete
slab).
<Yikes... too much>
I want to make sure Im doing things the right way because 125
gallons of water in the floor would make for a pretty bad day! I
decided to shim along the back and was able to get rid of the water
level difference there. It may be obsessive, but I shimmed about
every 4 inches all the way across in between the stand and the carpet
(is this okay?).
<Yes>
Next to take care of the left to right water level difference I stacked
2 shims together on the left side of the stand again, about 4 inches
apart all the way down the side and then plugged 1 shim to half of a
shim along the front of the stand in order to fill gaps about every 6
inches (is this okay?).
<Mmm, don't know if I'm following you... the stand
is a cabinet type? If so, this is fine.... To lift parts of the
continuous "footer" a bit to bit along>
After stacking two shims together on the left side of my
tank the water level is still off by about 1/8th of inch.
Is this acceptable?
<Likely so; yes>
Even if it is, would it be safe to use aprrox half a shim
(I've been using the composite snap off kind) in a stack with the
two already stacked together?
<It is>
Essentially stacking 2 and half shims together under the left
side?
<Again, assuming the stand "side" is one piece of wood
(horizontal), the answer is yes. Bob
Fenner>
Re: Shimming a wooden stand, and 1" through-puts, pump
choice/size... 3/14/12
Bob, thanks very much for the quick response and yes the stand is a
cabinet style and yes Marineland dual overflow aquariums are still
1" overflows.
<Rats!>
Thanks for the link about the 1" overflow problems. Im
planning on using a Mag 9.5 as my return that I had lying around.
Do you think its too much for the 1" drains?
<at 950 gph, by far>
The return is plumbed through a 1" SCWD using 1" pvc
braided tubing and hose barbs and then into a section of pvc using a
1" sweep 90 elbow.
<Still...>
In all there is approx 4 ft of vertical piping and tubing, along
with 3ft of horizontal tubing, 4 hose barbs, a sweep 90, and the SCWD
that the return has to travel through.
<I still wouldn't trust it, this... maybe both 1" lines
dedicated to returns... I'd redrill or fit w/ a decent overflow
box... See Glass-holes.com re. And 1.5 inch is what I'd
choose>
Of course these numbers are actually x2 but since the SCWD only lets
water travel to one side of the tank at a time, the second side
shouldn't affect actual head loss (at least I didn't think so).
I plan on most of my flow coming from 4 JBJ 1600 gph powerheads
<Good>
on a Wavemaker so if the Mag 9.5 is to<o> much, I have no problem
getting a smaller pump because Im not concerned with a lot of flow in
the sump, really just enough to feed the skimmer and the refugium(which
is fed by a split off from 1 of the returns with a union valve).
If you feel the Mag too much any other pump suggestions would be much
appreciated.
<See WWM re... am a huge fan of Eheim's line>
Again,
thank you very much for your help. I just wanted the opinion of
an expert (that's an ego stroke....lol) to make sure my shimming
was both safe and effective. I figured......the more shims the
merrier.
<I do agree. Cheers, BobF>
re: Shimming a wooden stand, overflow number,
size 3/14/12
Thanks again Bob, I think I failed to point out the Marineland tank
does have two 1" returns and two 1" overflows. (If that makes
a difference regarding the Mag 9.5)
<Actually, not really. Any can accommodate "about" 300
gph, discounting siphoning... but I do NOT trust that any one, even two
could become easily occluded. Am a huge fan of over-sizing
overflows for volume, noise reasons.
Cheers, B>
re: Shimming a wooden stand; pump/Eheim choice for
sump 3/14/12
Looks like Im Eheim shopping. Any advice on a particular model or
gph rating when considering head loss.
<http://www.eheim.com/products/detail/Universal-Pump
Your choice... I'd run "just some" water through the
sump... B>
Re: Pump, circ. for sumps f'
Bob, after looking over Eheim pump models, Im leaning towards the 1260
model which is rated at 640 gph. I was wondering if this is still
too much flow for the dual 1" overflow lines.
<Mmm, too much for one of them, should the other be/get blocked...
See our prev. email>
My concerns with going much lower are being able to feed both my
fuge and my reef octopus skimmer.
<Oh! The skimmer has its own pump I hope/trust... and a few
turnovers of water to it, and the sump is fine per hour>
The skimmer has the bubble blaster hy 2000s pump rated at 550
gph. Question, do I need to have a flow in the sump that is at
least 550gph?
<... Read here: http://www.wetwebmedia.com/sumppumpcircf3.htm
and the linked files above>
I was thinking with less flow than the skimmer is rated for, the
skimmers pump would pump the skimmer section of the sump dry.
<... and the FAQs on skimmers in sumps>
Please tell me Im wrong with that line of thought. Thanks
again, you have been most helpful.
<Rather than wait for a response, do please learn to/use the search
tool (on every page) and indices. B>
Re: Shimming a wooden stand 3/27/12
Bob, after doing a lot of reading, I've noticed that sometimes its
suggested to place the aquarium stand (cabinet) on 3/4" to 1"
plywood when placing it upon carpet. Due to the 40" height
of my stand, Im wondering if this would be beneficial for me.
Would this perhaps reduce the "top heavy effect" as well as
help with leveling?
<Can, yes>
If so, would you then do any shimming needed between the plywood
and the carpet or shim between the stand and plywood (despite the ugly
appearance that would create)?
<Best between the ply and carpet>
As always, thank you so much for your time. I just got the
Sicce Syncra pump btw.
<Ahh. Welcome. BobF>
Re: Shimming a wooden stand 3/31/12
Bob, I've decided to go ahead and place the 1" plywood under
the cabinet.
Should the plywood be cut to the exact dimensions of the bottom of the
cabinet, or slightly larger? Thanks again.
<As big as to fit under all feet, perimeter of the stand's base
is fine; more makes it harder to shim.
BobF>
Re: Shimming a wooden stand 7/22/12
Bob, you helped me out tremendously just a few short months ago in regards to
shimming a cabinet style stand as well as a few other things. Well, Im
back with another question. Before that I wanted to tell you that I picked up a
copy of your Reef Invertebrates book yesterday and though I've barely scratched
the surface, its great. Im just having an issue pulling it out of the
wife's hands!!
<Ahh!>
lol. The question I have is again about shimming. I acquired another
6ft 125g aquarium and had another custom 40" tall cabinet style stand built for
it. This aquarium, like the other is on a carpeted slab floor which is
apparently "out of whack". I placed the cabinet on 3/4" plywood and
shimmed it level. It was out a little over a 1/2" left to right and 1/4"
front to back.
<Too much>
The issue Im having is that though the aquarium is level and fully
contacts the top of the cabinet, the weight where the cabinet contacts the
plywood underneath is not even. The front right corner of the cabinet is
on the shims and you cant wiggle or move them at all. They obviously have
weight on them. The back right corner and the shims in between the
front ones however can wiggled around fairly easily. I would assume this
means that though the aquarium itself is level the weight distribution between
the cabinet and the floor is not. Is that correct?
<Yes; you need more shims... of diminishing size/height>
Would I correct this by stacking more shims in the areas where I can
easily wiggle them around?
<Yes>
I forgot to mention, I am shimming between the plywood underneath the
cabinet and the carpet.
<Good. Cheers, Bob Fenner>
|
|

